ClonerAlliance Box Pro User Manual Download Page 9

ClonerAlliance Box Pro User Manual

9

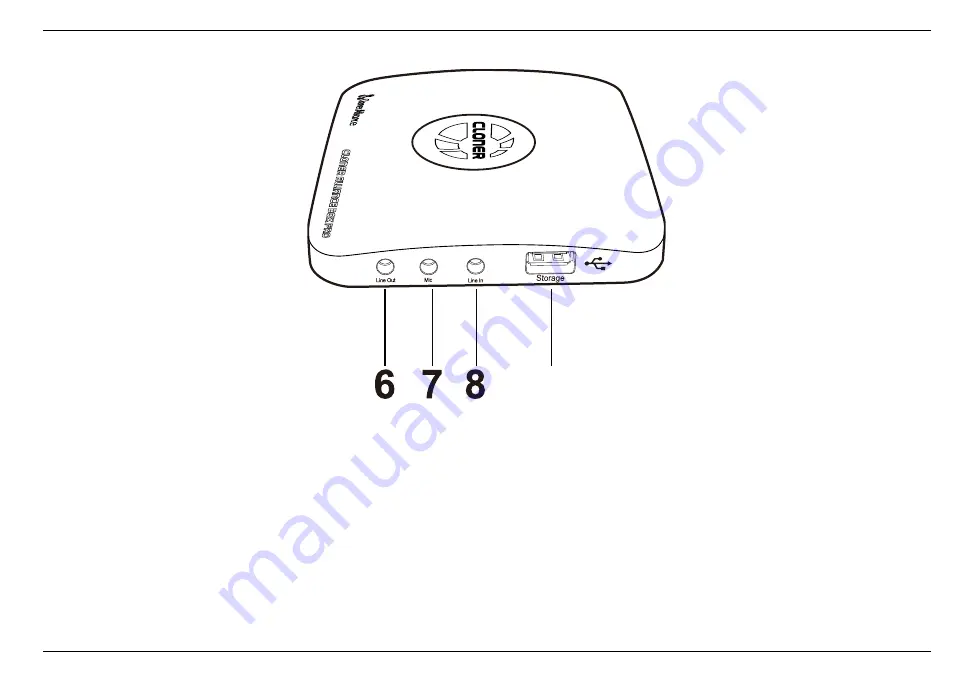
6. Line Out: Insert the headphone plug into this jack to output the video sound.

7. Mic: Insert the microphone plug into this jack to input voice.

8. Line In: Stereo audio inputs.

9. Storage: Insert the USB flash drive or mobile hard disk and record videos to this storage medium.

1.2. Product Diagram

3

Summary of Contents for Box Pro

Page 1: ...ClonerAlliance Box Pro User Manual CLONER ALLIANCE BOX Source Snapshot Rec Stop...

Page 2: ...Inc All rights reserved Documentation Version 2 7 0 No part of this publication may be reproduced transmitted transcribed stored in a retrieval system or translated into any language or computer lang...

Page 3: ......

Page 4: ...onerAlliance Box Pro away from water and other liquids as this may cause the unit to malfunction 3 ClonerAlliance Box Pro may become warm during use This does not indicate malfunction 4 Do not place h...

Page 5: ...e Recording 13 2 6 Menu Navigation 15 2 7 System Setting 15 2 8 Image Setting 17 2 9 Audio Setting 19 2 10 Schedule Setting 21 3 How to connect to PC and record videos directly 23 3 1 Install Register...

Page 6: ...4 3 How to live stream with OBS Settings in OBS 38 5 Frequently Asked Questions 43 6 Supported Resolutions 49 7 Product Specifications 50 8 After Sales Warranty 51 9 Contact Us 52 10 Disclaimer 53...

Page 7: ...rce Snapshot Rec Stop a Power Adapter b MMI Cable VGA AV YPbPr to HDMI Cable c Micro USB to USB Cable d ClonerAlliance Box Pro e Remote Control f User Manual g HDMI Cable If any parts is missing broke...

Page 8: ...ClonerAlliance Box Pro is turned on 3 Source Press this button to switch the input signal HDMI VGA YPbPr and AV are available 4 Snapshot Press this button to take a snapshot 5 Rec Stop ClonerAlliance...

Page 9: ...hone plug into this jack to output the video sound 7 Mic Insert the microphone plug into this jack to input voice 8 Line In Stereo audio inputs 9 Storage Insert the USB flash drive or mobile hard disk...

Page 10: ...Pro and TV 12 In Connect an HDMI cable between the video player and ClonerAlliance Box Pro 13 MMI Connect the included VGA AV YPbPr to HDMI cable between the video player and ClonerAlliance Box Pro 14...

Page 11: ...face Set the system time by year month day hour minute second Play back the contents in the USB storage device Set the recording frequency Starting time and recording time Then videos will be recorded...

Page 12: ...MI cable connect your video source gaming system set top box etc to the ClonerAlliance Box Pro Plug it into the IN port For AV VGA YPbPr Video Sources Using the included MMI cable plug one end into th...

Page 13: ...ClonerAlliance Box Pro User Manual 2 1 Connect Diagram 7...

Page 14: ...he REC STOP button on ClonerAlliance Box Pro or press the REC button on the remote control The top LED light will flash while the unit is recording or saving a file 4 To stop recording press the REC S...

Page 15: ...es on ClonerAlliance Box Pro directly Once you ve recorded at least one video you may play back videos from ClonerAlliance Box Pro to your TV using the playback feature Please follow the steps below 1...

Page 16: ...ClonerAlliance Box Pro User Manual 2 Choose USB by the remote You will then see a list of videos that have been recorded 2 4 How to playback the recorded files on ClonerAlliance Box Pro directly 10...

Page 17: ...al 3 Select your desired file by using the up and down arrow buttons on the remote control And then press OK to playback the selected video in full screen 2 4 How to playback the recorded files on Clo...

Page 18: ...ttons on the remote to choose previous next rewind forward To go back to Capture mode when you are done playing back videos simply press the Back button on the remote several times until you are back...

Page 19: ...liance Box Pro User Manual 2 5 Schedule Recording 1 Press the TIME button on the remote control Set the system time by using the four buttons of volume control on the remote control 2 5 Schedule Recor...

Page 20: ...p time by using the four buttons of volume control on the remote control Then exit schedule settings by clicking Back button on the remote control 3 Then ClonerAlliance Box Pro will start to record vi...

Page 21: ...nu Navigation Press on the remote control to browse the menu settings of ClonerAlliance Box Pro which are System Setting Image Setting Audio Setting and Schedule Setting 2 7 System Setting Show time T...

Page 22: ...be selected File size Set the size of recorded file there are two options 4GB and 16GB FAT32 supports up to 4GB for one single file NTFS and exFAT support up to 16GB for one single file Loop Recording...

Page 23: ...ClonerAlliance Box Pro User Manual 2 8 Image Setting Brightness Set the value of brightness 2 8 Image Setting 17...

Page 24: ...value of saturation VGA Auto When VGA is the signal source press ok to adapt automatically Decoder Update Press ok to update decoder Encoder Update Press ok to update encoder Restore Restore factory...

Page 25: ...ClonerAlliance Box Pro User Manual 2 9 Audio Setting HDMI Volume Set the volume of HDMI 2 9 Audio Setting 19...

Page 26: ...e in Volume Set the volume of Line in Line out Volume Set the volume of Line out Line out mixed Switch on off Line out mix function When it s set to on line out will mix HDMI Mic and Line in audio whe...

Page 27: ...ClonerAlliance Box Pro User Manual 2 10 Schedule Setting Schedule recording Switch on off the schedule recording function 2 10 Schedule Setting 21...

Page 28: ...schedule task there are two options Once and Every day Tip The parameter options may change as the firmware upgrades Please refer to the text description If you have any question about this please co...

Page 29: ...loneralliance helper exe Download 64bit ClonerAlliance Helper from https static cloner alliance com download cloneralliance helper x64 exe 3 2 Register Please register ClonerAlliance Helper first befo...

Page 30: ...x Pro or visit the registration link https www cloner alliance com register first enter your SN number you can get your registration code directly a Click Here If you get trouble in the process server...

Page 31: ...onerAlliance Box Pro to the power adapter and connect your HDMI source to the IN port 2 Plug the power adapter into the power socket and plug the other end into the 12V 1A port of ClonerAlliance Box P...

Page 32: ...fter all devices have been connected properly please power on all connected devices Tip When ClonerAlliance Box Pro is recognized by PC successfully the LED light will turn off and you can see video i...

Page 33: ...sure Video Streaming Audio Streaming device is installed successfully and appears in the Device Manager Right click My Computer Manage System Tools Device Manager If Video Streaming Audio Streaming d...

Page 34: ...ClonerAlliance Box Pro User Manual 3 4 Connect 28...

Page 35: ...link below to visit the Frequently Asked Questions https www cloner alliance com help knowledgebase cat_cloneralliance_box_pro 3 5 Record Capture 1 After all devices are connected properly insert the...

Page 36: ...ClonerAlliance Box Pro User Manual 2 Click to start recording 3 5 Record Capture 30...

Page 37: ...ClonerAlliance Box Pro User Manual 3 5 Record Capture 31...

Page 38: ...lick to stop recording Tip During recording you can also click to pause at anytime When you want to resume please click to continue recording Be sides you can Click to take screenshots click to captur...

Page 39: ...ClonerAlliance Box Pro User Manual Software interfaces may vary depending on the version 3 5 Record Capture 33...

Page 40: ...After recording click to view the recorded video Then you can double click the file to play back the video directly ClonerAlliance Helper also supports recording videos at the scheduled time Click to...

Page 41: ...ClonerAlliance Box Pro User Manual ule recording window Then click the button to set up the schedule recording task 3 5 Record Capture 35...

Page 42: ...al Please enable schedule recording first and set the Recording duration Starting time Repeat mode and Date for schedule recording Then click OK Then videos will be recorded automatically at the sched...

Page 43: ...nd into the 12V 1A port of ClonerAlliance Box Pro 4 2 Install ClonerAlliance Helper and OBS Studio Note If you want to livestream with OBS using ClonerAlliance Box Pro you need to install ClonerAllian...

Page 44: ...live stream with OBS Settings in OBS 1 Run Open Broadcaster Software OBS Studio Tip Please do NOT run ClonerAlliance Helper and OBS Studio at the same time You need to run each of them separately 4 3...

Page 45: ...ClonerAlliance Box Pro User Manual 2 Please click below Sources and select Video Capture Device from the pop up menu then click OK 4 3 How to live stream with OBS Settings in OBS 39...

Page 46: ...Device window select Video Streaming in the dropdown list of Device and then scroll down to the Audio Output Mode option Please select Output desktop audio DirectSound in the drop down list Click OK...

Page 47: ...ClonerAlliance Box Pro User Manual 4 3 How to live stream with OBS Settings in OBS 41...

Page 48: ...aming Start Recording button to start streaming recording Note Please do NOT run ClonerAlliance Helper or any Third Party Live Streaming Software like OBS Studio at the same time You need to run each...

Page 49: ...gnal The default signal selection is HDMI If you are trying to record from AV VGA YPbPr sources please switch to the proper input signal with the remote control or by pressing the SOURCE button on Clo...

Page 50: ...t your drive using your computer and make sure the formatting is a Full Format not a Quick Format Then try recording again PS Some customers can t format external hard drive correctly We strongly advi...

Page 51: ...ur drive using your computer and make sure the formatting is a Full Format not a Quick Format Then try recording again PS Some customers can t format external hard drive correctly We strongly advise y...

Page 52: ...FYI You can also use remote to adjust bitrate The higher the bitrate is the larger the recorded file will be Do ClonerAlliance products record 5 1 audio from the HDMI AC3 DTS etc or just 2 channel Clo...

Page 53: ...onized The PC streaming direct recording feature is very resource heavy In other words you may need a faster PC with a better graphics card to use this feature such as a gaming PC The recorded files d...

Page 54: ...any other unexpected factors ClonerAlliance technical support may miss your chat request Don t worry If we missed your chat request we will get back to you ASAP All questions will be answered in 24 ho...

Page 55: ...SUPPORTED RESOLUTIONS Max Input Resolution 3840x2160 30fps Max Out put Display Resolution 1920x1080 60fps Max Recording Resolution USB 1920x1080 60fps Max Recording Resolution UVC 1920x1080 60fps 49...

Page 56: ...s FAT32 NTFS exFAT Input signals HDMI VGA YPbPr AV MIC Output signals HDMI pass through USB Micro USB Bitrate Max 22Mbps Maximum storage capacity No limitation Power supply DC 12V 1A Weight 7 05 oz Di...

Page 57: ...st period Don t worry about refund win dow s period Feel free to test it If you want to return it contact us at support cloner alliance com 2 Year Warranty Your purchase comes with a 2 year warranty T...

Page 58: ...contact us by support cloner alliance com or call 1 844 9 CLONER toll free and we will serve you with utmost satisfaction We ll offer a satisfying discount on batch purchase and affiliate program If...

Page 59: ...stered trademark of HDMI Licensing LLC USB is a registered trade mark of USB implementers Forum HDMI and USB are registered trademarks of their respective companies ClonerAlliance Inc is not affiliate...

Page 60: ...Toll free 1 844 9 CLONER Support Email support cloner alliance com Market Email market cloner alliance com www cloner alliance com Copyright ClonerAlliance Inc All rights reserved...

Reviews: