R e s i d e n t i a l Tr a n q u i l i t y
®
2 7 S p l i t ( T T S ) - 6 0 H z H F C - 4 1 0 A
R e v. : 8 M a y, 2 0 1 4 C
30
G e o t h e r m a l H e a t i n g a n d C o o l i n g
Electrical - Low Voltage Wiring
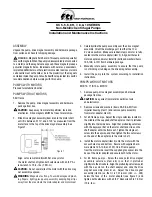
From Water Source
IN
OUT
NOTE: Shut-off valves, strainers and
other required components not shown.
Solenoid
Valve
Flow
Regulator
To Discharge
Stage 1
Stage 2
Figure 27: Two-Stage Piping
ELECTRICAL - THERMOSTAT WIRING
CAUTION!
Thermostat Installation
The thermostat should be located on an interior wall in a
larger room, away from supply duct drafts. DO NOT locate
the thermostat in areas subject to sunlight, drafts or on
external walls. The wire access hole behind the thermostat
may in certain cases need to be sealed to prevent erroneous
temperature measurement. Position the thermostat back
plate against the wall so that it appears level and so the
thermostat wires protrude through the middle of the back
plate. Mark the position of the back plate mounting holes and
drill holes with a 3/16” (5mm) bit. Install supplied anchors and
secure plate to the wall. Thermostat wire must be 18 AWG
wire. Wire the appropriate thermostat as shown in Figures
28a through 28c to the low voltage terminal strip on the CXM
control board. Practically any heat pump thermostat will
work with these units, provided it has the correct number of
heating and cooling stages.
Y2
Y1
G
R
C
Y2
Y1
G
R
C
TAH Air
Handler
T-Stat
ATP32U03
ATP32U04
Y1
Y2
G
R
C
A
L
Terminal
Blocks in
Compressor
Section
Fan Control
Board
O
O
O
W
W
W
A
C01
C01
FP
FP
FP
FP
+V
+V
W1
W1
W2
W2
Figure 28a: Typical Thermostat Wiring, TAH AHU with
AHU32U03/4
CAUTION!
Refrigerant pressure activated water regulating
valves should never be used with ClimateMaster
equipment.
IMPORTANT:
Violet jumper from FP to FP on Terminal
block 2 in compressor section must be removed when
unit is installed with TAH air handler or when FP2
sensor is
fi
eld installed on existing air handler.
See equipment wiring diagram for more details.