Disassembly
Removing the 3G Module 2 - 17
2.Disassembly
Removing the 3G Module
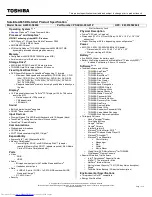
1.
Turn
off
the computer, turn it over to remove the battery (
).
2.
The 3G module will be visible at point
on the mainboard (
).
3.
Carefully remove the screw
(
)
4.
Carefully slide the 3G module
(
) out of the 3G transfer card and lift it up (do not exceed 10degrees)
to remove it from the computer (
).
5.
Carefully remove the screw
(
)
.
6.
The 3G interface adaptor card
will pop-up, and you can remove it from the computer (
).
1
2
3
5
6
a.
1
d.
2
3
f.
3
e.
4
b.
5
c.
6
3. mSATA Module
6. Interface Adaptor
•
1 Screw
Figure 12
3G Module Removal
a. Locate the 3G.
b. Remove the screw.
c. Slide the module and lift
it up.
d. Remove the 3G module.
e. Remove the screw.
f. Remove the card.
Summary of Contents for W940AU
Page 1: ...W940AU W941AU W945AUQ ...
Page 2: ......
Page 3: ...Preface I Preface Notebook Computer W940AU W941AU W945AUQ Service Manual ...
Page 24: ...Introduction 1 12 1 Introduction ...
Page 44: ...Disassembly 2 20 2 Disassembly ...
Page 48: ...A 4 Top Positivo W941AU A Part Lists Top Positivo W941AU 䎮䶂 Figure A 2 Top Positivo W941AU ...
Page 50: ...A 6 Top Stand W941AU A Part Lists Top Stand W941AU 䎮䶂 Figure A 4 Top Stand W941AU ...
Page 52: ...A 8 LCD W940AU A Part Lists LCD W940AU Figure A 6 LCD W940AU 姕嬲 ᶨ凔 ...
Page 53: ...LCD W941AU A 9 A Part Lists LCD W941AU Figure A 7 LCD W941AU 姕嬲 ...
Page 54: ...A 10 LCD W945AUQ A Part Lists LCD W945AUQ Figure A 8 LCD W945AUQ 姕嬲 ...
Page 57: ...Bottom W945AUQ A 13 A Part Lists Bottom W945AUQ Figure A 11 Bottom W945AUQ ...
Page 58: ...A 14 Combo A Part Lists Combo 朆侸句 Figure A 12 Combo ...
Page 59: ...DVD Dual A 15 A Part Lists DVD Dual 朆侸句 Figure A 13 DVD Dual ...
Page 60: ...A 16 HDD A Part Lists HDD Figure A 14 HDD ...
Page 100: ...Schematic Diagrams B 40 B Schematic Diagrams ...