ООО "Бассейн-Сервис" – продажа и монтаж оборудования для бассейнов.
Тел: 8 (800) 700-65-50,
CHOOSING THE POWER SOURCE
When locating the power source, it should be one that turns on and off as the pump and motor does. The best location is the
spa's timer box. If no timer box exists, you unit can use the pump motor as its power source by removing the back plate.
CONNECTING TO THE TIMER BOX
220 VAC -
Connect the black (3 stranded) wire cable to the 220 VAC timer box by splicing the 3 wires and connecting the
black and white wires to the LOAD side on the timer box. It makes no difference which colored wire goes to the two load
screws. Connect the green wire to GROUND. When installed correctly, the unit should come on and off when the power
comes on and off. If this fails to happen, you have installed the unit improperly.
110 VAC -
Connect either the white wire or the black wire to the LOAD side on the timer box. It makes no difference which
colored wire goes to the two load screws. Connect the green wire to ground. When installed properly, the unit should come on
and off when the power comes on and off. If this fails to happen, you have installed the unit improperly.
CONNECTING TO PUMP MOTOR
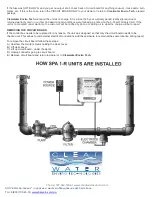
Disconnect the back plate to the motor where the electrical connections are. You will notice two connections where the power
source is connected to. Connect the ionizers black, white and green wires to the same as the motor. If connected properly, the
ionizer will come on and off with the motor.
YOU MUST FOLLOW ALL LOCAL, STATE. NATIONAL OR INTERNATIONAL CODES WHEN INSTALLING. A CERTIFIED
ELECTRICIAN MAY BE REQUIRED.
You should use a flexible conduit from connection to connection on the power cable. The size of the connector
already on the control box is 1/2". There is no need to cover up the electrode wire.
Once this is all complete, open up all valves and turn the power on. Check for water leaks and all electrical connections for
proper and firm connections.
SETTING THE CONTROL BOX
Turn the control knob in a clockwise direction to turn the unit on.
To get the spa "ionized" as quickly as possible, turn the control knob to Max so that you obtain the highest output.
With the proper pH readings, the spa should be fully "ionized" in 2-8 hours. However, this figure may vary.
OBTAINING THE PROPER COPPER-ION LEVEL
All units include a Copper-Ion Test Kit. Follow directions on the inside label of the test kit. When testing, YOU MUST ALWAYS
LOOK DOWN FROM THE TOP THROUGH THE TEST TUBES - NOT FROM THE SIDE.
WE RECOMMEND A COPPER-ION LEVEL 0.2 - 0.3 PPM. IN VERY HOT, HUMID AREAS, YOU MAY GO SLIGHTLY
HIGHER. FOR BEST RESULTS, MAINTAIN .3 PPM.
ALWAYS MAKE SURE THE pH IS BETWEEN 7.2 - 7.8.
When starting up the system, test the copper ion level every hour or so till you have obtained .2 - .3 PPM.
Once that reading is obtained, turn the control knob
DOWN OR COUNTER CLOCKWISE.
The actual setting is determined by many factors including water temperature, weather conditions and chemistry and amount
of water.
If you are unable to test the Copper-Ion level every hour or so when first installing the unit, or will be gone for a
couple of days, set the unit from the very beginning to slightly below the half way mark.
YOU NEVER WANT TO OVER "IONIZE" THE SPA.
Once the desired Copper-Ion level is obtained, monitor the setting on the control box. Keep it at this setting until the Copper-
Ion is either too high or too low.
IF THE COPPER-ION LEVEL IS TOO HIGH
Turn the control knob down (or counterclock-wise) a notch Test the following day. Continue this procedure till the Copper-Ion
level stabilizes. Once you obtain the proper setting, this usually stays the same all season long. If the water gets warmer, the
chance of algae and bacteria increases, thus a higher Copper-Ion level may be required. Be sure to test the Copper-Ion level
weekly in case adjustments are needed.


