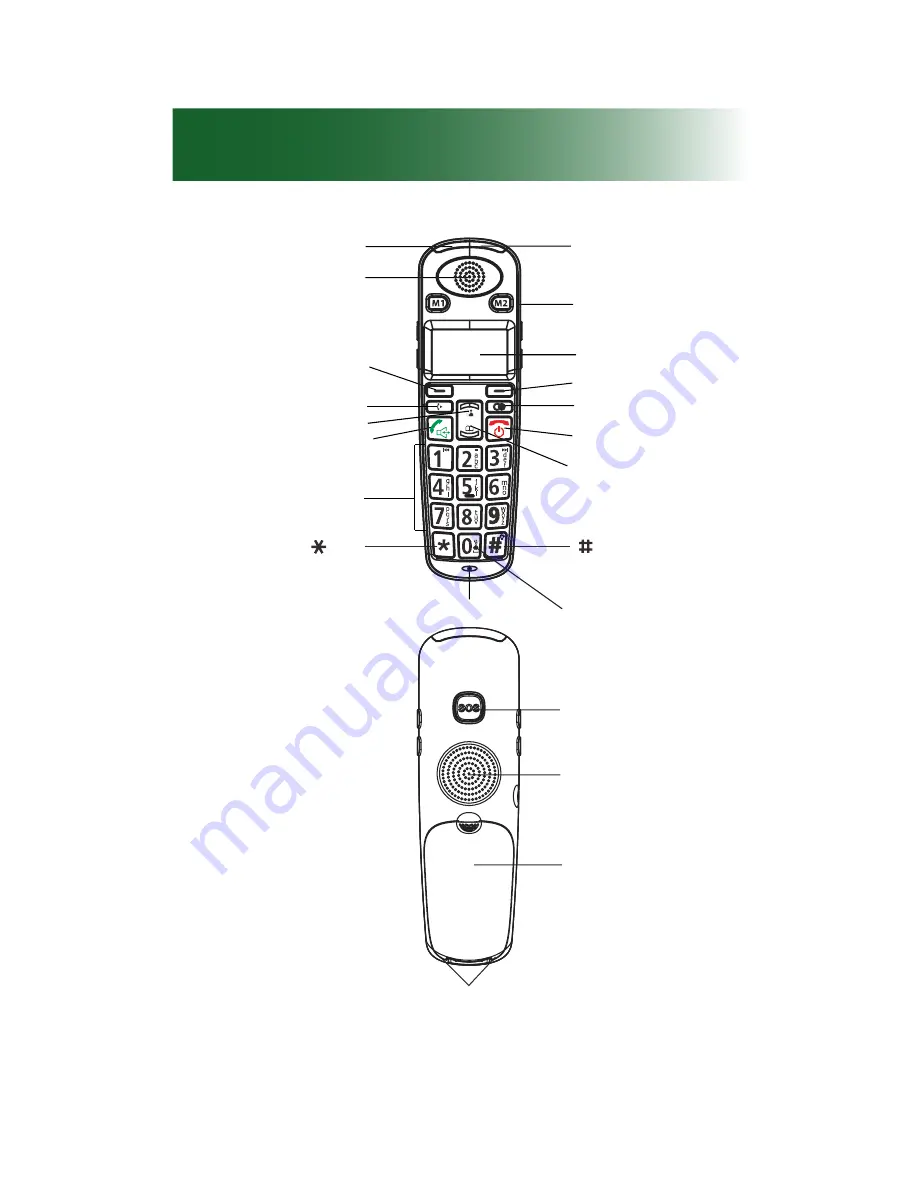
ClearSounds A700 User Manual Download Page 24

22

Handset

Flash light

Earpiece

Left soft key

Up/CID key

Int key

Dial/Speaker key

Alphanumeric

keypad

key

Microphone

key/Flashlight 

function key

Down/Phonebook

key

End key

Redial key

Right soft key

Display

One-touch

Memories

M1

~

M2

Amplify indicator

Shaker/Visual ringer

SOS button

Speaker

Battery compartment

cover

Charging contacts

Summary of Contents for A700

Page 1: ...A700 DECT 6 0 Amplified Cordless Phone User s Guide Instructions are included for optional additional handsets ...

Page 2: ......

Page 3: ... time number of unheard messages and the name and number being called Handset flashlight Alarm clock with snooze function One touch calling via three handset memory keys SOS emergency key programmable Ten ring tones with selectable extra loud vol umes Bright strobe light ringing notification and hand set vibration Handset volume amplification and tone adjust ment Speakerphones with volume control ...

Page 4: ...contracted with your service provider Voicemail message waiting indication Caller ID talking caller ID and non viewed calls indication Call waiting icon Contact information Please contact us with any questions that you might have We are happy to assist you ClearSounds Communications Inc 1743 Quincy Avenue Suite 143 Naperville IL 60540 USA 800 965 9043 toll free www clearsounds com ...

Page 5: ...tubs sinks and damp basements and do not use the phone when you are wet to avoid electrical shock If the phone is submerged unplug the base from AC power before you retrieve the phone WARNING Do not overload extension cords or power strips This can result in electric shock WARNING Use this phone only with the sup plied AC power adapter assembly Other types of power adapter assemblies can damage th...

Page 6: ...er This can cause a short circuit a fire or electric shock WARNING Do not push any type of object into the telephone Contact with dangerous voltage points can occur resulting in fire electric shock or parts damage WARNING Do not disassemble the phone Dangerous voltages or other risks can occur Use after incorrect reassembly can lead to electric shock WARNING If you are in the vicinity of a gas lea...

Page 7: ...a damp cloth to clean the unit Do not use liquid or aerosol cleaners CAUTION In the following circumstances unplug the phone from AC power and refer to qualified service personnel Liquid spills in the phone or it is exposed to rain or precipitation The phone does not operate according to descriptions in this manual or performance of the phone distinctly changes The phone is dropped or the casing i...

Page 8: ...ering machine or voicemail 16 Register additional handsets 17 Let s begin 18 Place a call 18 Answer a call 19 Handset 22 Backlighting 23 Home screen 23 Icons 24 Let s navigate 25 Handset keys 26 A700 base 29 Area settings 33 Language 33 Display 35 Screen contrast 35 Time and date 36 Audio 39 Volume and tone 39 Consistent amplification 41 Keypad tones 43 Paging and alarms 44 Page a lost handset 44 ...

Page 9: ...rt a pause 61 What is a pause 61 Insert pauses while storing a number 62 Phonebooks 63 Add phonebook entries 63 Edit a phonebook entry 65 Delete one or all phonebook entries 66 View details of phonebook entries 66 View phonebook status 67 Caller ID book 68 View and dial caller ID numbers 68 Add caller ID numbers to phonebook 69 Delete a number in the caller ID book 70 Delete all numbers in the cal...

Page 10: ... machine right for you 94 Answering machine with call waiting 95 Turn on the answering machine 96 Record a personalized message 97 Listen to your recorded message 98 Day of the week settings 99 Restore the default message 99 Record time 100 Voice prompt and language 101 Change the number of rings before pickup 102 Voicemail calls 103 Visual indicators of calls and messages 104 View missed calls 10...

Page 11: ... Delete entries from the inbound calls list 114 Restore defaults 115 Restore handset default settings 115 Additional handsets 116 Register additional handsets to the base 116 vfSelect a base 117 Name a handset 118 Troubleshooting 119 Specifications 126 Compliance 127 Warranty 132 Accessories 134 Service 135 ...

Page 12: ...ease contact your vendor or ClearSounds Telephone base Handset Optional additional A700E handsets are available Each additional handset comes with anA700E base a power adapter batteries and a Setup Guide Phone line cord AC power adapter assembly Three rechargeable AAA NiMH batteries Setup Guide and User s Guide ...

Page 13: ...hese areas Recessed areas such as corners under or next to cabinets Surfaces affected by vibration Areas with high background noise Install handset batteries Follow these warnings to avoid explosive or caustic reactions WARNING Insert batteries according to the marked polarity symbols WARNING Use only rechargeable AAA NiMH batteries Other types of batteries can damage the phone and cause personal ...

Page 14: ...eries WARNING Do not dispose of batteries with household waste Recycle or dispose of batteries according to regulations of your local municipality To install handset batteries 1 Slide back the battery cover and remove the cover 2 Insert the batteries according to the marked polarity symbols The flat side of each battery presses against a spring 3 Slide the battery cover until it snaps into place ...

Page 15: ... To AC outlet If you subscribe to DSL service Please attach a noise filter contact your DSL provider to the telephone line between the base unit and the telephone line jack in the event of the following Noise is heard during conversations Caller ID features do not function properly To single line telephone jack Noise filter ...

Page 16: ...epleted If you attempt to fully recharge the batteries and the battery icon does not return to insert fresh rechargeable Ni MH batteries Note When replacing the batteries always use good quality Ni MH rechargeable batteries Never use other batteries or conventional alkaline batteries To charge the batteries 1 Place the telephone handset on the base station A beep occurs and the screen lights and s...

Page 17: ... all available features and how to personalize your phone The features are described in unique topics that lend themselves to scanning If you see an inter esting feature you can take the time to personalize your phone using the instructions for that feature The default remote access PIN for this phone is 0000 ...

Page 18: ...d has unique features and benefits When your line is engaged voicemail service detects and stores a record of incoming calls and messages whereas the answering machine does not If you prefer using an answering machine for easy message access but you also want to be alerted to incoming calls when you are on the line with another caller you can primarily use the answering machine and purchase voicem...

Page 19: ...nal handsets Your telephone handset is registered to the base Base 1 If you purchased additional ClearSounds A700E handsets you must register each additional handset to the base For registration instructions see page 116 ...

Page 20: ... on the screen if you press the alphanumeric keys first 1 Pick up the handset and press the key Result The icon appears on the LCD 2 Dial a telephone number 3 To end the call either press the key or replace the handset on the base Predialing You can enter the desired number in Standby mode which allows you to make corrections before dialing to connect the call Follow these steps 1 Enter a telephon...

Page 21: ... number is displayed If the caller cannot be identified only the Call information displays 1 To answer the call press the key If you have activated the Auto Answer function when the handset is on the base simply lift it up to answer 2 To end the call either press the key or replace the handset on the base If you have a voice message the MSG WTG ON and icon will show on the LCD The phone will not r...

Page 22: ...allers hang up or after the parallel phone had answered the call Calling with more than one handset If you have more than one handset registered to the same base you can make internal calls Making an internal call 1 Press the key then enter the handset number you want to call Enter 9 to call all other handsets registered to the same base 2 If the handset entered is valid the called handset will ri...

Page 23: ...21 Note During the internal call if an external call comes in the LCD will show the caller s number You should press the key to end the internal call first then press the key to answer the call ...

Page 24: ...Dial Speaker key Alphanumeric keypad key Microphone key Flashlight function key Down Phonebook key End key Redial key Right soft key Display One touch Memories M1 M2 Amplify indicator Shaker Visual ringer SOS button Speaker Battery compartment cover Charging contacts ...

Page 25: ...n you lift the handset from the base or when you press handset keys After 10 seconds the backlighting turns off To turn it back on again press Home screen The home screen is the phone display that you see when the phone is at rest or when you press ...

Page 26: ...ler ID service One or more calls were unanswered Flashes if the inbound calls list is full Messages Voicemail service One or more voicemail messages are waiting Alarm clock set The alarm is set to ring Ringing indicators handset vibration and light are set The handset vibration and flashing light ringing indicators are set Messages answeringmachine One or more answering machine messages or memos a...

Page 27: ...cted command on the screen you select or implement the command For example if you press beneath Back you return to the previous screen If you press beneath Select you select the displayed menu item 1 To display menu items press the Menu soft key 2 To scroll through menu options press Up f key or Down key repeatedly 3 To select a menu press the Select soft key when the desired menu appears on the L...

Page 28: ... the next 40 seconds Handset keys Most keys have several functions Take a few minutes to explore all of the keys This is a good time to become familiar with the keys Later you can refer to these diagrams as necessary Flash light Earpiece Left soft key Up CID key Int key Dial Speaker key Alphanumeric keypad key Microphone key Flashlight function key Down Phonebook key End key Redial key Right soft ...

Page 29: ...D Down Phonebook key Scroll down through lists and menu options Decrease the earpiece speakerphone volume during a call Enter the Phonebook Dial Speaker key Make Answer a call Activates the speakerphone if pressed during a call End key End a call Long press to activate power on off Press this key and return to the home screen Flashlight To turn on the flashlight beam at the top of the handset pres...

Page 30: ...ng call to another handset Set up a conference call with an external line and an internal handset RedialkeyEntertheredialbook Inserta pause when pre dialing a number Left Right soft keys Perform the functions indicated by the text immediately over it on the bottom line of the display which changes time by time ...

Page 31: ...29 A700 base Rear and bottom View Phone Line Power Jack Page button Speaker Volume up down Answer Machine on off Message indicator Delete key Charge pins Play Stop key Repeat Skip key ...

Page 32: ...ICM incoming message press and hold to delete the current message In active mode all lights on press and hold the key to delete all the messages Repeat Skip key Press to play the current or next message Press the Repeat key twice to play the previous message Volume up down key When playing announcement or messages press to increase or decrease the relevant volume Page button Press this button to p...

Page 33: ... enter the PIN Code The default PIN Code is 0000 Then press the Select soft key 4 Use Up key or Down key to select a handset press the Select soft key to confirm After that the deleted handset cannot be used with the base If you select the current handset a warning tone will be heard Flash Time Flash time is used for switching between your current call and the call waiting if you subscribe to call...

Page 34: ...he press the Select soft key 3 Press Up key or Down key to choose Flash Time menu Press the Select soft key 4 The display shows the current setting Use Up key or Down key to select Flash 1 100ms Flash 2 300ms Flash 3 600ms press Select soft key A700 base ...

Page 35: ...h Italian Turkish Spanish Portuguese and Slovak You can change the language used to display the menu messages 1 Press the Menu soft key 2 Press Up key or Down key repeatedly to choose HS Settings then press the Select soft key 3 Press Up key or Down key to choose Language then press the Select soft key 4 The languages will be displayed Use Up key or Down key to scroll through the options Each lang...

Page 36: ...ss the TAM soft key 2 Press Up key or Down key repeatedly to choose TAM Settings press the Select soft key 3 Press Up key or Down key repeatedly to choose TAM Language press the Select soft key 4 The languages will be displayed Use Up key or Down key to scroll through the options Each language will be displayed in its own native translation 5 Press the Select soft key to choose the required langua...

Page 37: ... screen contrast for the handset 1 Press the Menu soft key 2 Press Up key or Down key repeatedly to choose HS Settings then press the Select soft key 3 Press Up key or Down key to choose LCD Contrast then press the Select soft key 4 Use Up key or Down key repeatedly to choose among the 17 available contrast levels then press the Save soft key 5 Press the key to return to standby mode ...

Page 38: ...mat for the handset You can select the 12 hour format or the 24 hour format 1 Press the Menu soft key 2 Press Up key or Down key repeatedly to choose HS Settings then press the Select soft key 3 Press Up key or Down key to choose Date Time menu press the Select soft key 4 Use Up key or Down key to choose Time Format press the Select soft key 5 You can use Up key or Down key to choose the Time Form...

Page 39: ...tings then press the Select soft key 3 Press Up key or Down key to choose Date Time menu press the Select soft key 4 Use Up key or Down key to choose Set Time press the Select soft key 5 Enter the current time by numeric keypad and press the Save soft key to save and exit To set the date format for the handset You can select the MM DD YY month day year format or the DD MM YY day month year format ...

Page 40: ... set the date for the handset If you do not subscribe to caller ID service you must set the time and date that your phone displays 1 Press the Menu soft key 2 Press Up key or Down key repeatedly to choose HS Settings then press the Select soft key 3 Press Up key or Down key to choose Date Time menu press the Select soft key 4 Use Up key or Down key to choose Set Date press the Select soft key 5 En...

Page 41: ...e handset s volume and tone Your phone is equipped with a specialized amplification function designed to fit your needs During a conversation you can adjust the Vol or Vol control on the left side of the handset and use the AMP key on the right side You can also adjust the Tone control to fit the levels to your hearing requirements The selected volume will be displayed on the LCD Volume Control He...

Page 42: ...ceiver mode during a conversation the Amplify indicator red light on top of the handset turns on If you press the AMP key again the indicator will go out Note When the word MUTE appears in the right corner of the screen the phone is NOT muted ...

Page 43: ...n still temporarily turn off amplification WARNING Consider the hearing levels of other phone users before you set amplification consistently ON The phone can emit excessive volume and amplification that can cause hearing loss Your phone is equipped with a specialized amplification function designed to fit yout needs If you switch this function on the handset receiver volume adjustment is 15 30 dB...

Page 44: ... choose HS Settings then press the Select soft key 3 Press Up key or Down key to choose Amplified press the Select soft key 4 You can use Up key or Down key to choose On or Off to enable or disable the function 5 Press the Save soft key 6 Press During calls handset illumination at the top indicates that amplification is on ...

Page 45: ...own key repeatedly to choose HS Settings then press the Select soft key 3 Press Up key or Down key to choose Tone Setup press the Select soft key 4 Press the Select soft key again to choose Key Tone 5 Use Up key or Down key to choose On or Off to enable or disable the function 6 Press the Select soft key Note For normal use we recommend you leave the key tone enabled This makes the phone easier to...

Page 46: ...o page a handset Press and hold located on the bottom of the base for less than five seconds All handsets registered to the base beep for about one minute To stop paging Press again Note On a long key press more than or equal to 5 seconds the base will enter registration mode Alarm clock You can use the handset as an alarm clock The alarm clock also has a snooze function To set the handset alarm c...

Page 47: ...he Select soft key 6 Take one of these steps If you selected Off press The alarm clock is off If you selected On a Press numeric keys to enter the alarm time in 24 Hour format HH MM including an initial zero when appropriate Then press the Select soft key b Press the Snooze soft key and use Up key or Down to enable or disable the snooze function Press the Select soft key c Press The alarm clock is...

Page 48: ...f you prefer no beeping for out of range handsets you can turn off this function Toturnofforonahandset sout of rangealarmfeature 1 Press the Menu soft key 2 Press Up or Down key repeatedly to choose HS Settings then press the Select soft key 3 Press Up key or Down key to choose Tone Setup press the Select soft key 4 Press Up key or Down key to choose Range Alarm press the Select soft key 5 You can...

Page 49: ...47 6 Press the Select soft key and you will hear a confirm beep 7 Press ...

Page 50: ... hearing aids 1 Move your hearing aid T switch to the T position 2 Hold the handset close to your hearing aid Neckloops Neckloops amplify phone sound in T coil equipped hearing aids In order to use a neckloop with a 3 5 mm plug you will need to purchase a 2 5 mm to 3 5 mm adapter that is sold separately We recommend the CS CL004 by ClearSounds To use an audio only neckloop Audio only neckloops do ...

Page 51: ... Accomplish these tasks as usual Answer or place calls Adjust handset or speakerphone volume End calls To use a neckloop with a built in microphone You can speak handsfree through neckloops that include built in microphones 1 Before or during a call connect the neckloop to the 2 5 mm handset jack Handset jack on the left side 2 Position the neckloop around your neck ...

Page 52: ...50 Assistive listening jack Answer a call Place a call Engage a connected call Press Adjustvolume tone oramplification Left Right Vol Tone Vol AMP End a call Press Tone AMP Vol Vol ...

Page 53: ...r of the second caller while you are having a conversation Caller 1 4361234 Caller 1 4 Caller 2 2915678 Caller two s info rmation is displayed Caller ID info display 1 When you are on the line the telephone will automatically display the name and number of the second caller 2 Press the Flash soft key on the left side to answer the second caller 3 When you have finished press the Flash soft key to ...

Page 54: ... select a ringtone for the handset 1 Press the Menu soft key 2 Press Up or Down key to choose HS Settings then press the Select soft key 3 Press Up or Down key to choose Ring Setup then press the Select soft key 4 Press the Select soft key to choose INT Ring or press Down key to choose EXT Ring then press the Select soft key Result You can select the ring tone from Melody 1 to 10 When you adjust t...

Page 55: ...se 2 Press and hold until the screen is blank The handset turns off 3 Do not return the handset to the base place it on an alternate surface To turn on the ringer Replace the handset on the base To adjust or turn off the handset s ringer volume 1 Press the Menu soft key 2 Press Up or Down key to choose HS Settings then press the Select soft key 3 Press Up or Down key to choose Ring Setup then pres...

Page 56: ...ation appears on the LCD Lights and vibration You can enable or disable these light and vibration indicators of incoming calls On the handset a white flashing light and vibration Handset light and vibration To turn on light and vibration Press and hold until the heandset vibrates appears on the screen If the phone rings the handset vibrates and the light flashes To turn off light and vibration Pre...

Page 57: ... visual ringer will also flash with the ringer you have set Flashlight If you turn this feature on a steady white light will remain lit and can be used as a flashlight To turn the flashlight on In standby mode press the key until the light turns on To turn the flashlight off Press the key until the light turns off ...

Page 58: ...d associate them with one touch keys All the numbers will be stored in the Phone Book Handset Two memory keys SOS emergency key To store a handset memory key or SOS number 1 Press one of the keys or the j key in standby mode Number appears on the screen 2 Press numeric keys to enter the telephone ...

Page 59: ...lect soft key A confirmation tone occurs and the number appears Note The memory default names are M1 M2 and SOS You can add a name after them but cannot delete the default name e g you can modify M1 to M1 home Replace or edit a one touch entry To replace or edit a memory key or SOS entry in the handset 1 Press the Menu soft key 2 Press Down key to choose Phonebook press the Select soft key 3 Press...

Page 60: ...Select soft key A confirmation tone occurs and the number appears Delete a one touch entry To delete a memory key entry in the handset 1 Press the Menu soft key 2 Press Down key to choose Phonebook press the Select soft key 3 Press Up key or Down key repeatedly until the entry you want to edit displays press the Select soft key to confirm 4 The display shows New use Up key or Down key to move on t...

Page 61: ...r by continuing to press the key until you see it Case Press a key repeatedly until you see the letter of your choice The uppercase letters appear in order and they are followed by the same letters in lower case Enter the next character Press the next key If the next character resides on the same key wait until the cursor moves to the next position before you press the key again Enter spaces On th...

Page 62: ...60 Keypad tips soft key Special characters Press the numeric key repeatedly until you see the special character ...

Page 63: ...little patience to set up but once it is stored whenever you press the one touch key the phone does all of the work for you Automated service messages always include a few seconds before each prompt begins So when you program the one touch key you must insert one or more pauses to wait for each prompt to begin After pauses you enter the additional numbers that the prompt requires In the ClearSound...

Page 64: ...he automated service number 2 Call the number and jot down the following until you reach the destination a The number of seconds between the last number dialed and the first prompt b The next required response 3 Using your notes follow the instructions for storing a one touch number for instructions see page 56 While storing the number and required responses press one or more times in sequence to ...

Page 65: ... You can enter up to 30 digits and pauses To add a phonebook entry in the handset 1 Press the Menu soft key 2 Press Down key to choose Phonebook press the Select soft key The first entry in the phonebook appears or Empty appears 3 Press the Select soft key and Name appears 4 Press alphanumeric keys to enter the name To enter a space press To enter another letter on the same key wait for the cursor...

Page 66: ...ring a number use the Erase soft key to correct it Each time you press the key the last digit is deleted To clear all digital press and hold the Erase key If you want to set a VIP number you should select a special ring tone for it The ring tone should be different from the external ring you have set You can set up to 9 VIP ring tones associated with 9 VIP numbers groups ...

Page 67: ...ou want to edit displays press the Select soft key to confirm 4 The display shows New use Up key or Down key to move on to Edit Press the Select soft key 5 If necessary press the Erase soft key to clear the digit s then enter the desired name and number Press the Save soft key 6 Press Up or Down key to scroll to a ringtone that you want associated with this caller Then press the Select soft key ...

Page 68: ...oft key to confirm 4 Press Up key or Down key to choose Delete press the Select soft key to confirm Then the display shows the next entry 5 At step 4 if you choose Delete All menu and press the Select soft key the display will show Confirm You can press the Select soft key to delete all the entries or press the Back soft key to cancel and exit View details of phonebook entries 1 Press the Menu sof...

Page 69: ...ebook status The phonebook can hold 50 entries You can view the number of stored entries To view the phonebook status 1 Press the Menu soft key 2 Press Down key to choose Phonebook press the Select soft key 3 Press the Select soft key The display shows New use Up key or Down key to move on to PB Status Press the Select soft key 4 The display shows the current phonebook status for example 07 50 Use...

Page 70: ... area This message will display when someone calls from an area where the telephone company is not offering the caller identification services or is not yet providing number delivery to your area Private If the caller has exercised the option to prevent his name and number from being sent the message will show on the LCD View and dial caller ID numbers 1 Press the Menu soft key 2 Use the Select so...

Page 71: ...er ID number to phonebook The caller ID number is a temporary record of who called and when The phonebook is permanent until deleted Adding the caller ID number to the phonebook makes the caller ID information permanent 1 Press the Menu soft key 2 Press the Select soft key to choose the CID Book 3 Use the Up key or Down key to view the numbers When the desired number displays on the LCD press the ...

Page 72: ...nfim and exit You will hear a confirmation beep Delete a number in the caller ID book 1 Press the Menu soft key 2 Press the Select soft key to choose the CID Book 3 Scroll to the number you want to delete by using Up key or Down key 4 When the desired number appears on the display press the More soft key 5 Use the Up key or Down key to choose Delete press the Select soft key You will hear a beep a...

Page 73: ...oft key to choose the CID Book 3 Press the More soft key and use Up key or Down key to choose Delete All menu Press the Select soft key 4 The display shows Confirm press the Select soft key Result You hear a beep and the phone returns to standby mode after clearing all the caller ID numbers ...

Page 74: ...standby mode 2 Press the Select soft key to choose Message 3 Press Up key or Down key repeatedly to choose Memo press the Select soft key 4 You can record your message after a tone Recording will stop automatically after 3 minutes You can also confirm and end the recording by pressing the OK soft key During recording the LCD shows Recording Note If someone leaves you a memo the vffbv icon will app...

Page 75: ...t is off of the base you must still press to answer the call To turn on or off auto answering 1 Press the Menu soft key 2 Press Up or Down key to choose HS Settings then press the Select soft key 3 Press and scroll to Auto Answer then press the Select soft key 4 Press and scroll to On or Off to enable disable the function Press the Select soft key You will hear a confirmation beep Note When the an...

Page 76: ...dset Place Answer End 1 Lift 2 Dial 3 Press appears on the screen 1 Lift 2 Press Press Call duration appears on the screen Note If you set the handset to auto answer simply lift the handset from the base to answer a call For instructions to set auto answer see page 73 Calls ...

Page 77: ...e Redial feature For details see page You can enter the desired telephone number up to 32 digits in Standby mode which allows you to make corrections before dialing Follow these steps 1 Enter a telephone number up to 24 digits Check it You cna also use the key to insert a pause When the number appears correctly press the key Note If you make a mistake while entering a number press the Erase soft k...

Page 78: ...e call either press the key or replace the handset on the base After you hang up the LCD displays the call duration Notes You can select the ringer volume by using Up key or Down key when the phone rings with an incoming call If you want to delete the icon press the Up key in standby mode then press and hold the key for several seconds After that press the fkey to return to standby mode The handse...

Page 79: ...77 Place Answer End 1 Lift 2 Dial 3 Press 1 Lift 2 Press P r e s s To call other handsets in your home ...

Page 80: ...e s that you wish to call To call one handset Press the numeric key that indicates the number of the handset that you wish to call Call FR HS X appears on the recipient phone To call all handsets Press 9 Call All HS appears on the recipient phone If an external call comes in while you converse on an internal call press to end the internal call before you answer the external call Calls ...

Page 81: ...touch memory keys you can call these numbers with one touch If you need instructions for storing one touch numbers see page 56 To place a one touch call using the handset 1 Lift 2 Press the or that you wish to call The number appears on the screen and the phone dials ...

Page 82: ... handset or base phonebook you can call it quickly If you need instructions for storing phonebook numbers see page 63 To call a handset phonebook number 1 Lift 2 Press The first phonebook entry appears 3 Press or and scroll to the name 4 Press The phone dials Calls ...

Page 83: ...dialed 2 Press the key to dial the number Toredialarecentlydialednumber 1 Press the Redial key in standby mode 2 If you want to scroll through the memory press Up key or Down key repeatedly until you find the number you want to dial 3 Once the desired number appears on the display press the key to dial the number Notes If no numbers are found Empty is displayed When the redial book is full each ti...

Page 84: ...ress the More soft key to choose the desired option Add to PB allows you yo add the number to the phonebook See page 63 Delete allows you to delete the selected number Delete All allows you to delete the entire redial book 4 To return to standby mode press the key Note At step 3 when you select Delete or Delete All options a message Confirm will ask you to confirm the deletion To confirm press the...

Page 85: ...se entries Received calls Missed calls Voicemail messages voicemail service required You can quickly dial any of the numbers stored in the list To call from the inbound calls list using the handset 1 Lift 2 Press and scroll to the number that you want to call Inbound calls appear on the screen the most recent first To add an area code or 1 press the More soft key and then scroll to the format of y...

Page 86: ...ou have stored an SOS emergency number you can press the SOS key to dial the number For instructions to store an SOS number see page 56 1 Lift 2 On the back of the handset press The number appears on the screen and the phone dials Calls ...

Page 87: ...akerphone To enjoy optimal speakerphone performance locate the handset away from areas with high background noise To turn on the handset speakerphone during a call To turn the speakerphone feature on Press the key during a call line engaged The icon appears on the LCD To turn the speakerphone feature off Press the key again The icon will disappear Notes Before putting the handset near your ears be...

Page 88: ...chine message and you want to speak to the caller you can intercept and speak to the caller Note You must use the handset to intercept a call To intercept a caller leaving a message Pick up the handset and press The answering machine stops recording During calls ...

Page 89: ... headset to the handset during a call The headset jack is located in the left side of the handset and is a 2 5mm standard plug Simply plug the headset into this jack and the headset will be activated Note When the headset is plugged into the headset jackthemicrophoneonthehandsetwillbedeactivated Earphone Microphone Clip Headset Jack Vol Vol ...

Page 90: ...e headset to the jack 2 Place the headset on your head 3 Optional To adjust volume Press Vol Vol To amplify sound Press AMP To adjust tone Press Tone 4 To end the call press During calls Left side Right side Right side Tone AMP Tone AMP Vol Vol ...

Page 91: ...nversation 2 To unmute the microphone and return to conversation press the Unmute soft key Answer a second call call waiting If you subscribe to call waiting service with your telephone service provider and a new call comes in during a phone conversation the phone notifies you of the incoming call If you choose to answer the second call you can switch between callers and the waiting party remains ...

Page 92: ... Caller ID on call waiting service Tone sounds on the line H a n d s e t d i s p l a y s information If caller and local service make it available Caller 1 4361234 Caller 1 4 Caller 2 2915678 Caller two s info rmation is displayed Caller ID info displayed During calls ...

Page 93: ... caller that you will put him or her on hold 2 Press the Flash soft key 3 To reconnect with the first caller press the Flash soft key again Note If you have transferred an external call to another handset you cannot use the call waiting function via the second handset ...

Page 94: ...he number of the handset you want to transfer the call to 2 If the called party can answer your call he she can press the key to talk with you only At this time you can inform him her of the incoming call 3 When the called handset answers press the key or replace the handset to the base to complete the transfer Set up a conference call You can set up a three party call with an external caller and ...

Page 95: ...resses the key to answer 3 The caller can press the key to start the 3 way call 4 Either of the two internal handsets can press the key to leave the conference call at any time Note If one of the handsets drops the conference call the remaining handsets will continue to conference To leave a conference call Press The other parties remain connected until they press ...

Page 96: ...e or voicemail Each method has unique features and benefits Answeringmachine Call screening You can hear the caller leave a message and pick up the handset to speak One touch message retrieval Holds 15 minutes of messages Voicemail service Detectsandstoresarecordofincomingcallsandmes sages that come through when your line is engaged Purchased through your telephone service provider ...

Page 97: ...m your telephone service provider If you do not answer the second caller and the caller leaves a message the message becomes a voicemail To set up your phone in this way you must set the number of rings before pickup for the answering machine to be less than the number of rings before voicemail pickup The number of rings before voicemail pickup is determined when you set up voicemail with your ser...

Page 98: ... 1 Press the TAM soft key 2 Press Up key or Down key to choose TAM setup and then press the Select soft key 3 Press the Select soft key TAM ON OFF is selected 4 Press Up key or Down key to choose ON or OFF and then press the Select soft key 5 Press the Back soft key until you arrive at the home screen Toturnonoroffthetelephoneansweringmachine TAM usingthebase Press key on the base unit to enable o...

Page 99: ...minutes To record a personalized outgoing message 1 Press the TAM soft key in standby mode 2 Press Down key to choose Announce press the Select soft key 3 Press the Select key again to choose ANS REC 4 Press Down key to choose Record Mess press the Select soft key 5 You can record your announcement after a tone Recording will stop automatically after 3 minutes You can also confirm and end the reco...

Page 100: ... messages will be played one by one You can use the key to delete the current message or the Back soft key to stop playing and exit To listen to your recorded message using the base unit When you have one or several new messages press the key to play the message s If there are no new messages press this key to play the saved messages Press the key once to re play the current message press it twice...

Page 101: ...Press and hold the key on the base until the current setting is announced 2 Quickly press the key repeatedly to set the correct day of the week Every time you press the key the system will announce the corresponding day of the week 3 Press the key to save the change Note If you remove the battery or pull out the adapter you need to re set the day of the week Restore the default message You can res...

Page 102: ...fault Announce1 Recordtime You are able to select the record time Of you select Unlimited the messages can be recorded until the memory is full 1 Press the TAM soft key in standby mode 2 Press Up key or Down key repeatedly to choose TAM Setting and then press the Select soft key 3 Press Up key or Down key repeatedly to choose Record Time press the Select soft key 4 Use Up key or Down key to select...

Page 103: ...choose TAM Setting and then press the Select soft key 3 Press Up key or Down key repeatedly to choose TAM Language press the Select soft key 4 The languages will be displayed Use Up key or Down key to scroll through the options Each language will be displayed in its own native translation 5 Press the Select soft key to choose the required language and you will hear a confirmation beep ...

Page 104: ...gs before pickup for voicemail service Voicemail pickup is determined by your service provider For more information see page 95 To change the number of rings before pickup 1 Press the TAM soft key in standby mode 2 Press Up key or Down key repeatedly to choose TAM Setting and then press the Select soft key 3 Press Up key or Down key repeatedly to choose Set Ring press the Select soft key 4 Use Up ...

Page 105: ...r telephone service provider the handset s and base store the last calls made to your telephone in the inbound calls list Each handset stores 40 calls Caller name and number are stored if the caller and telephone service providers make them available Voicemail calls ...

Page 106: ...icator Meaning Clear it X New Calls The number of non viwed calls Scroll on the handset through all Caller ID entries One or more nonviewed calls If it flashes your Caller ID list is full and the oldest call in the list has been deleted One or more unheard voicemail messages Listen to all unheard voicemal messages Voicemail calls ...

Page 107: ... after you review the last missed call 3 Press Listen to voicemail messages If you have unheard voicemail messages when you open the line to make a call you hear a stutter dial tone To listen to voicemail messages Call your voicemail access number as specified by your telephone service provider If you are interested in storing your voicemail access number for one touch calling see page 56 for inst...

Page 108: ...ch tone telephone 2 When the Announce1 starts to play you may enter the remote access mode by inputting the remote code 3 After you enter the remote code the system will play the menu of commands You can then follow the commands to operate Note If you enter the remote code incorrectly the answering machine will prompt you to enter the code again You are then given two more attempts to enter the co...

Page 109: ...ng machine on off Record Announce1 When you press key to replay the current message press to play the next message press four times to play back the messages press to stop and exit press to delete the current message After you record the Announce1 press the key or the key to finish The system will play the announcement you have recorded ...

Page 110: ...ing machine is turned on it holds 15 minutes of messages and indicates unheard messages as follows Handset indicators Indicator Meaning Clear it Unheard answering machine message s Listen on the base or handset to all unheard messages Machine messages ...

Page 111: ...thebase Messagesplayonthebasespeakerphone 1 Press The newest message or memo plays 2 Optional Adjust volume or skip replay or delete the message To adjust volume Press along the side of the base To skip ahead to the next memo or message Press To replay the message Press To delete the message Press as the message plays 3 Press The announcements stop ...

Page 112: ... 1 Press the TAM soft key 2 Press the Select soft key to choose Message 3 Press the Select soft key to choose MSG Playback The newest message or memo plays 4 Optional Adjust sound or skip replay or delete the message To turn off the speaker Press To adjust volume Press or To skip ahead to the next memo or message Press To replay the message Press 5 Press The announcements stop ...

Page 113: ...nswering machine messages Using the menu 1 Press the TAM soft key 2 Press the Select soft key to choose Message 3 Press Up key or Down key to choose Delete All press the Select key to confirm 4 The LCD will show Confirm Press the OK key to delete all the messages or press the Back key to exit Using the base unit Press and hold the key to delete all the messages Voice prompting will be heard If you...

Page 114: ... The oldest call automatically drops from the list when the list is full You can remove calls manually if you wish To delete calls from the handset dialed calls list 1 Press The last dialed number appears 2 Press and scroll to a number that you want to delete 3 Press the More soft key 4 Take one of these steps To erase the selected number Press and scroll to Delete and then press the Select soft k...

Page 115: ...113 To erase all numbers in the list a Press and scroll to Delete All and then press the Select soft key b Press the Select soft key again A confirmation tone occurs and Empty appears 5 Press ...

Page 116: ...ct soft key The Caller ID Book is selected 3 Press the More soft key 4 Take one of these steps To erase the selected number Press and scroll to Delete and then press the Select soft key A confirmation tone occurs and the next number appears To erase all numbers in the list a Press and scroll to Delete All and then press the Select soft key b Press the Select key again A confirma tion tone occurs a...

Page 117: ...Handset name Auto answer Date and time You must enter the ClearSounds A700 PIN to reset the defaults The PIN is 0000 To restore handset default settings 1 Press the Menu soft key 2 Press and scroll to Default and then press the Select soft key Pin appears 3 Press numeric keys and enter 0000 and then press the Select soft key Confirm appears 4 Press the Select soft key A confirmation tone occurs Th...

Page 118: ... base you should press and hold the key on the bottom of the base for about 5 seconds To register an additional handset to the base 1 Press the Menu soft key 2 Press Up key or Down key repeatedly to choose the Registration menu Press the Select soft key 3 Press the Select soft key again to choose Base 1 The handset will search for the requested base and the relevant information will flash on the L...

Page 119: ...allows you to select a base from those already registered to the handset You can access the options by scrolling the menu 1 Press the Menu soft key 2 Press Up key or Down key repeatedly to choose HS Settings then press the Select soft key 3 Press Up key or Down key to choose Selected BS menu Press the Select soft key 4 You can use Up key or Down key to select the base you want to use then press th...

Page 120: ...set 1 Press the Menu soft key 2 Press Up key or Down key repeatedly to choose HS Settings then press the Select soft key 3 Press Up key or Down key to choose HS Name then press the Select soft key 4 Press the Erase soft key until all letters are removed 5 Press alphanumeric keys and enter the name and then press the Save soft key 6 Press The new name appears on the home screen ...

Page 121: ... handset page 53 Plug in another phone to the same wall jack to ensure that the phone service is operational No dial tone Connect the phone line cord Checkthatthepoweradapter is properly connected Handset batteries seem to have short lives Use only AAA NiMH rechargeable batteries Never use alkaline batteries Clean the charging contacts When I lift the handset from the base the line doesn t open Tu...

Page 122: ...the wall outlet and securely connect it to the phone Do not plug in other appliances to the same wall outlet Move the phone to a location that is free of interference If you are located near radio towers install a filter No display Check that the handset batteries are installed properly Check that the handset batteries are in full power Check that the handset is on ...

Page 123: ...y have witheld their details Let the phone ring a couple of times as there may be a delay in receiving the Caller ID information Voicemail and call waiting services Symptom Solutions Call waiting does not work Confirm that you subscribe to call waiting service If another handset is engaged on the line call waiting information doesn t show ...

Page 124: ...il while you are talking to the first caller You also have unheard answeringmachinemessages Result New voice mail doesn t appear until you hear all answering machine messages There is no caller ID information on the screen Confirm that you subscribe to caller ID service and to caller ID on call waiting service Some callers withhold details ID information can be delayed Check after the phone rings ...

Page 125: ...6 Plug in the power adapter to the wall outlet and securely connect it to the phone Unplug one or more devices that share the phone line Handset visual ringer indications do not function Turn on the handset light and vibration feature page 54 Dialing Symptom Solutions A memory button does not function Program the number page 53 ...

Page 126: ...list after you locate the number press these keys to select a different format before you dial Press More on the handset page 73 Audio Symptom Solutions Low earpiece or speakerphone v o l u m e o r amplification Plug in the power adapter to the wall outlet and securely connect it to the phone Turn up the volume and amplification settings page 39 By default amplification turns off after each call I...

Page 127: ...se Handset Adjust or Handset Vol and Vol does not work in this instance Incomplete caller messages occur The memory is full Delete some or all messages page 111 I forgot my remote access PIN Your PIN is 0000 When I try to in tercept a caller leaving an an swering machine message I can t break in You must lift the handset and press ...

Page 128: ...rier power 250 mW Channels 120 duplex channels Amplification Up to 40 dB Ambient temperature Normal 59 degrees F to 95 degrees F 15 degrees C to 35 degrees C Extreme 32 degrees F to 104 degrees F 0 degrees C to 40 degrees C Humidity 0 90 Power supply A700 base input 7 5 V 1000 mA Handset input Ni MH 1 2 V x 3 800 mAh Charging time 15 hours Jacks Headset 2 5 mm ...

Page 129: ...learSounds A700 DECT 6 0 Amplified Phone causes harm to the phone network the phone company will notify you in advance that temporary discontinuance of service may be required But if advance notice isn t practical the phone company will notify the customer as soon as possible Also you will be advised of your right to file a complaint with the FCC if you believe it is necessary 3 The phone company ...

Page 130: ...commission public service commission or corporation commission for information 7 If the phone company requests information on what equipment is connected to their lines inform them of a The phone number that this unit is connected to b The ringer equivalence number 1 2b c The USOC jack required RJ11C and d The FCC Registration Number US Items b and d are indicated on the label The ringer equivalen...

Page 131: ...hnical specification This is confirmed by the registration number The abbreviation IC before the registration number signifies that registration was performed based on a Declaration of Conformity indicating that Industry Canada technical specifications were met It does not imply that Industry Canada approved the equipment Before installing this equipment users should ensure that it is permissible ...

Page 132: ...alence Number REN assigned to each terminal device pro vides an indication of the maximum number of terminals allowed to be connected to a phone interface The termination on an interface may consist of any combination of devices subject only to the requirement that the sum of the Ringer Equivalence Numbers of all the devices does not exceed 5 An alternative indication of the REN is the Load Number...

Page 133: ...ranted by ClearSounds against manufacturing defects in material and workmanship under normal use for one 1 year from the date of purchase Should you experience a problem contact our Customer Service department or visit our website at www clearsounds com Be sure to save your sales receipt as the proof of purchase date should you need warranty service The serial number for this product is on the und...

Page 134: ... you using UPS USPS ground shipping at no cost to you The warranty replacement or repair will be warranted for a period of 90 days or the remainder of the original warranty period from original purchase date whichever is longer The warranty does not cover accidents negligence or breakage to any parts This includes shipping damage failure to follow instructions misuse fire floods use of incompatibl...

Page 135: ...o you at your expense All authorized returned products must be accompanied with proof of purchase and a brief explanation of the problem For out of warranty repairs and service please contact our Customer Service department for instructions The repair shall be warranted for 90 days IMPORTANT YOUR RECEIPT IS PART OF YOUR WARRANTY AND MUST BE RETAINED AND PRODUCED IN THE EVENT OF A WARRANTY CLAIM ...

Page 136: ...ck for hands free conversation Requires hearing aid s or cochlear implant s with t coil s CS SHK vibrating pad slides nicely beneath a mattress or cushion and notifies you of incoming calls The CL004 connects your ClearLink and or CLA7V2 Neckloop to your iPod MP3 player CD Players or any other device that has a 3 5mm audio output Accessories ...

Page 137: ...135 Service ServiceinUnitedStatesandCanada ClearSounds Communications Attention Repair Center 1743 Quincy Avenue Suite 143 Naperville IL 60540 USA 800 965 9043 Toll free www ClearSounds com ...

Page 138: ... 2015 ClearSounds CS A700UG Ver 1 ...

Reviews: