background image

Direct: 763.476.6866 • National: 800.422.2537 • www.SeeClearfield.com • [email protected] 

14

FieldShield YOURx-TAP

Installation Manual 

 _________________________________________________________

Manual 018446 REV A - AUG 2017

• 

CLEAN THE FERRULE

…Lightly moisten the fiber optic swab 

(2.5mm/38542F or 1.25mm/38040) by spotting a small amount (about 

1”) of Electro-Wash PX or Electro-Wash MX pen onto the Qbe. Hold the 

swab, 1 side down to the wetted area and hold for a count of 1-2-3-4-5. 

Figure 4

• Insert swab into side of ferrule, wet side to the ceramic ferrule and 

circle around 2-3 times and remove. Turn swab to dry side and repeat. 

Figure 5

Cleaning the mate through a bulkhead adapter AND the 

adapter itself!

• Lightly moisten the fiber optic swab(2.5mm/38542F or 1.25mm/38040) 

by spotting a small amount (about 1”) of Electro-Wash PX or Elec-

tro-Wash MX pen onto the Qbe. Hold the tip of the swab onto the wetted 

area and hold for a count of 1-2-3-4-5.

• Insert the swab into the adapter to the connector, press lightly against 

the connector, twist 2-3 times, remove and discard.

• Dry with a second dry swab.

• Inspect (re-clean if necessary) and test for signal strength.

• Use additional swabs to clean inside the actual adapter. Moisten swab, 

like above, insert through hole and remove while twisting. 

Figure 6

Figure 4

Figure 5

Figure 6

Summary of Contents for FieldShield YOURx-TAP

Page 1: ...FieldShield YOURx TAP Installation Manual _______________________________________________________ Manual 018446 REV A AUG 2017 ...

Page 2: ... Table of Contents Product Packaging 3 Parts List 3 Required Tools 4 Box Mounting 4 Preparing Ports 5 Bottom Deploy Reel Installation 5 Configurations 8 Top Deploy Reel Installation 8 Installing Bulkheads 9 Entering and Exiting Fiber Configurations 10 Storing Slack Fiber on the TAP Slack Reel 11 YOURx TAP Accessories 12 Connector Cleaning Procedure 13 Standard Warranty 16 Proprietary Notice 17 Tec...

Page 3: ...ort clfd net Manual 018446 REV A AUG 2017 Product Packaging StrongFiber Deploy Reels are shipped in a bubble wrap packaging Figure 1 with mounting hardware included in a plastic pouch Figure 2 Figure 1 Figure 2 Find No Quantity Description Image 001 1 SmartFiber Deploy Reel 002 1 Back post 003 5 Self Taping Screws 004 1 Cable Entrance Bulkhead 005 1 Blank Bulkhead Parts List ...

Page 4: ...face using the provided self taping screws Figure 1 Box Mounting Figure 2 Note A pass through hole is provided on the back of the wall box as an option to directly penetrate into the customer premise Figure 2 If this option is used a 1 4 inch hole must be drilled into the home prior to mount ing the TAP box It is also recommended that the hole be sleeved with a piece of 10 6 microduct for unobstru...

Page 5: ...he provided self taping screws Figure 1 Figure 1 Bottom Deploy Reel Installation Step 2 Mount Deploy Reel Align center hole on Deploy Reel with Back Post Figure 2 The surrounding holes will be used to lock the Reel down after installation Press Deploy Reel onto Back Post Figure 3 Figure 2 Figure 3 Step 1 Remove Port Tab Use a pair of pliers to snap off port tab Figure 1 Figure 2 Step 2 Ream Port U...

Page 6: ...or from the reel and remove protective tape Figure 7 Find the integrated pull string on the connector Figure 8 and make a simple loop half hitch in the pull string Figure Figure 7 Figure 8 Step 4 Tie Pull String to SC Connector Loop the pull string around the first notch on the metal crimp tube Figure 10 Figure 11 Thread the end of the pull string under itself using a half hitch knot and pull to t...

Page 7: ...Insert Connector fully into duct before pulling fiber through Figure 16 Figure 16 Step 8 Pull Fiber through Duct Use the Duct Pull String to pull the required length of fiber through the duct to the network access point Step 9 Assemble Connector End Once pulled throught the duct assemble the FieldShield Connecter following instructions provided with the FieldShield Reel Figure 17 Figure 17 Watch t...

Page 8: ...ollowing configurations Figure 2 Figure 3 Configuration 2 Bottom StrongFiber Deploy Reel Top StrongFiber Delpoy Reel Figure 2 Configuration 3 Bottom StrongFiber Deploy Reel Top FLEXdrop Slack Reel Figure 3 Top Deploy Reel Installation Figure 2 Step 2 Mount Deploy Reel Align center hole on Deploy Reel with Back Post Press Deploy Reel onto Back Post Figure 2 Figure 2 Step 1 Install Back Post Use a P...

Page 9: ...ld com techsupport clfd net Manual 018446 REV A AUG 2017 Figure 1 Installing Bulkheads The YOURx TAP is shipped with Qty 1 Cable Entrance Bulkhead Figure 1 Qty 1 Blank Bulkhead Figure 2 Additional Bulkheads are available for custom configurations Figure 2 INSPECT BEFORE YOU CONNECT CLEAN CONNECTOR DIRTY CONNECTOR SEE PAGE 13 FOR RECOMMENDED CLEANING PROCEDURES ...

Page 10: ...e 2 Entering and Exiting Fiber Configurations Fiber can enter or exit the YOURx TAP through the removable bulkheads at the bottom of the unit or through the pass through port at the back ot the unit When entering the YOURx TAP DO NOT assemble SC Connector Outer Housing until fiber has been passed through the port Fully connectorized fiber will not pass through port IMPORTANT Figure 1 Figure 2 Fiel...

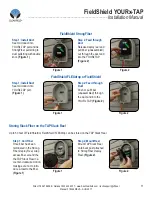
Page 11: ... Seat microduct into YOURx TAP port and tie StrongFiber pull string to duct pullstring with double knot Figure 1 Step 2 Feed through Duct Release deploy reel and pull fiber unassembled out through the duct and into the YOURx TAP Figure 2 Storing Slack Fiber on the TAP Slack Reel Up to 50 feet of FieldShield or FieldShield FLEXdrop can be stored on the TAP Slack Reel Figure 1 Figure 2 Step 1 Coil F...

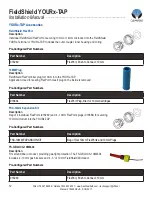
Page 12: ...iding gas tight protection The FS GBLOCK 10MM 04 includes 4 10mm gas blockers and 4 3 of 10mm FieldShield Microduct Pre Configured Part Numbers FSX 10mm Expansion Kit Description Bag of 4 individual FlexPorts 016280 and 4 10mm FlexPorts plugs 018664 for securing 10mm microduct into the YOURx TAP Pre Configured Part Numbers 10MM Plug Description FieldShield FlexPort filler plug for 10mm into the YO...

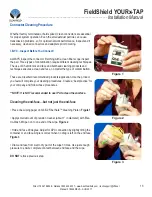
Page 13: ...ts and techniques ensures a clean end face no matter the type of contamination These are Clearfield recommended products application Use the product you feel will complete your cleaning procedures Create a best practice for your company and follow those procedures NOTE It is NOT recommended to use IPA to clean the end face Cleaning the end face but not just the end face Place one wiping paper on Q...

Page 14: ...circle around 2 3 times and remove Turn swab to dry side and repeat Figure 5 Cleaning the mate through a bulkhead adapter AND the adapter itself Lightly moisten the fiber optic swab 2 5mm 38542F or 1 25mm 38040 by spotting a small amount about 1 of Electro Wash PX or Elec tro Wash MX pen onto the Qbe Hold the tip of the swab onto the wetted area and hold for a count of 1 2 3 4 5 Insert the swab in...

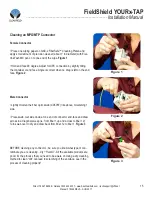
Page 15: ...ng the container or end face Angle is correct when no drag is left on the end face Figure 2 Male Connector Lightly moisten the fiber optic swab CC505F like above moistening 1 side Place swab wet side down at one end of connector end face and draw across in a diagonal sweep ie from fiber 1 up and across to fiber 12 Turn swab over to dry and draw back from fiber 12 to fiber 1 Figure 3 BEFORE cleanin...

Page 16: ...r replacement at the option of Clearfield Inc shall constitute the exclusive sole remedy for a breach of this limited warranty Clearfield shall not be liable under any circumstances for any special consequential incidental punitive or exemplary damages arising out of or in any way connected with the product or with agreement to sell product to buyer including but not limited to damages for lost pr...

Page 17: ...stall the equipment supplied Every effort has been made to keep the information contained in this document current and accurate as of the date of publication or revision However no guarantee is given or implied that the document is error free or that it is accurate with regard to any specification Technical Support Clearfield Inc can be contacted for any issues that arise with the supplied product...

Reviews: