background image

User manual / Bedienungsanleitung

26 


© clearaudio electronic GmbH, 2018/11

Summary of Contents for Verify

Page 1: ...User manual Bedienungsanleitung clearaudio electronic GmbH 2018 11 Made in Germany Verify...

Page 2: ...ith technology and a timeless design enable the best possible sound enjoyment Please read this instruction manual carefully to avoid any damages or loss of warranty This manual will help you for an ea...

Page 3: ...User manual Bedienungsanleitung Made in Germany 3 Contents 1 List of components 4 2 Verify tonearm mounting 5 10 3 Special notes 11 4 Technical data 12 Warranty 24 25...

Page 4: ...contents as shown in picture below and in the list at the bottom of this page 1 2 3 1 Verify tonearm with Direct Wire Plus cable 5 Screws 3 x hex screw M4 x 10 1 x grub screw M6 x 8 2 Clearaudio tone...

Page 5: ...ing ring on the turntable chassis you will need to drill the required holes Please refer to the drilling template shown below Picture 4 for the measurements to mark the exact drilling holes Please be...

Page 6: ...g ring on a non Clearaudio turntable 2 2 Please carefully put the tonearm through the tonearm base Pic 5 Now fix the tonearm with the 2 screws and the hex wrench Pic 6 not to much so that you can fine...

Page 7: ...have reached the correct position tighten the tonearm base again Please use the delivered alignment gauge or for more accurate adjustment the professional cartridge alignment gauge from Clearaudio Ar...

Page 8: ...e after adjusting VTA Pic 9 Adjustment of the tonearm height 2 5 3 Alignment of the tonearm For the further set up of the tonearm you need the cartridge alignment gauge which is included as well Slide...

Page 9: ...tion is done correctly when at the same time the armtube is parallel to the marking lines on the gauge the diamond tip is on the reference point and the leading edge of the cartridge is parallel to th...

Page 10: ...se max 5 turns less Anti Skating With 4 turns Tracking force is 2 2 grams With 3 turn Tracking force is 2 4 gram For a perfect Anti Skating we recommend the Clearaudio Test record LPT43039 available a...

Page 11: ...uld occur 3 3 Service If any servicing or repair of a Clearaudio product is necessary please first contact your dealer or distributor Alternatively contact Clearaudio directly and we will advise you o...

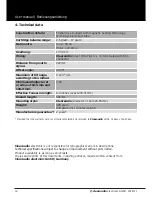
Page 12: ...ctor at a radius of 62 9 mm and 126 9 mm 0 43 Effective Tonearm length 9 4 inches exact 239 31mm Overall length 302mm Mounting style Clearaudio diameter of bore 24 85mm Weight 300 gram 430 gram incl c...

Page 13: ...l montieren k nnen Um alle Vorteile des Verify Tonarms nutzen zu k nnen lesen Sie bitte diese Bedienungsanleitung aufmerksam durch Alle Hinweise dienen dem Aussch pfen der vollen Klangeigenschaften un...

Page 14: ...manual Bedienungsanleitung 14 clearaudio electronic GmbH 2018 11 Inhaltsverzeichnis 1 Verpackungs bersicht 15 2 Montage des Verify Tonarms 16 21 3 Besondere Hinweise 22 4 Technische Daten 23 Garantie...

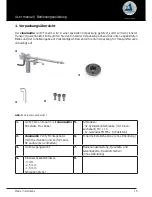
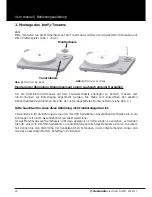
Page 15: ...erpackung f r Transportzwecke unbedingt auf 1 Verify Carbon Tonarm mit clearaudio Directwire Plus Kabel 5 Schrauben 3x Zylinderkopfschraube mit Innen sechskant M4 x 10 1x Gewindestift M6 x 8 Edelstahl...

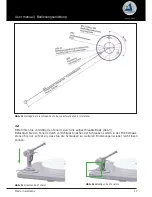
Page 16: ...igung angebracht werden Die Ma e zum Anzeichnen der exakten Bohrlochabst nde entnehmen Sie bitte der unten abgebildeten Bohrschablone siehe Abb 4 Bitte beachten Sie dass diese Abbildung nicht ma stabs...

Page 17: ...bb 3 Befestigen Sie den Tonarm durch vorsichtiges Anziehen der Schrauben seitlich in der Montierbasis Ziehen Sie nur so fest an dass Sie die Schrauben zu weiteren Einstellungen wieder leicht l sen k n...

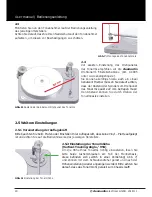
Page 18: ...nstellen Ihrer Auflagekraft dass keine Vinyl Platte aufgelegt ist und achten Sie auf die Bedienhinweise des jeweiligen Herstellers 2 5 2 Einstellung der Tonarmh he Vertical Tracking Angle VTA Um die H...

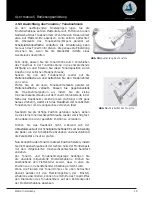
Page 19: ...mrohrunterseite in der N he des Headshells vorsichtig l sen Achtung nicht ganz heraus drehen damit sich das Headshell mit montiertem Tonabnehmer um die L ngsachse verdrehen l sst Nachdem Sie die richt...

Page 20: ...e verdrehen l sst Blicken Sie bei diesen Einstellungen immer im Lot also direkt von oben auf den Tonarm und Tonabnehmer um Parallaxenfehler zu vermeiden Nachdem Sie die richtige Position gefunden habe...

Page 21: ...Einstellung ist auf Ihrem Tonarm von unten betrachtet mit einem schwarzen Strich markiert Sie k nnen das Anti Skating folgenderma en ndern Drehen im Uhrzeiger max 5 Umdrehungen st rkeres Anti Skating...

Page 22: ...davon tragen 3 3 Pflege Wenn eine Wartung oder Reparatur an einem clearaudio Produkt erforderlich ist wenden Sie sich bitte zuerst immer an Ihren H ndler oder Vertriebspartner Alternativ k nnen Sie c...

Page 23: ...45 Abs Maximum des Fehl winkels bezogen auf Radius 0 123 cm Mittlerer Skatingfaktor bei Radien 62 9 mm und 126 9 mm 0 43 Effektive Tonarml nge 239 31 mm Gesamtl nge 302 mm Tonarmaufnahmebohrung clear...

Page 24: ...r la garantie contacter le distributeur local Clearaudio CONSERVER L ATTESTATION D ACHAT L attestation d achat est la preuve permanente d un achat de valeur La conserver en lieu sur pour s y reporter...

Page 25: ...apparecchi verranno riparati presso i nostri Centri di Assistenza Autorizzati Le spese ed i rischi di trasporto sono a carico del cliente La casa costruttrice declina ogni responsabilit per danni dir...

Page 26: ...User manual Bedienungsanleitung 26 clearaudio electronic GmbH 2018 11...

Page 27: ...User manual Bedienungsanleitung Made in Germany 27...

Page 28: ...el 49 9131 40300 100 Fax 49 9131 40300 119 www clearaudio de www analogshop de info clearaudio de Handmade in Germany Technische nderungen vorbehalten Technical specification are subject to change wit...

Reviews: