background image

You can record you performance and then play it back.

1.

 Press the [RECORD] button, the RECORD      

     indicator will be lit, and the beats will flash.

2. 

Play the keyboard or press the [START/STOP] button to start 

     recording. If you want to record the accompaniment, please turn on 

     the A.B.C. function, then play chords in the chord section of the 

     keyboard. 

3. 

Press the [RECORD] button again to stop recording. The RECORD 

     indicator goes out.

4.

 Press and hold the [PLAY] button for 2 seconds to play back the 

     recording. The PLAY indicator will be lit.

5. 

Press and hold the [PLAY] button for 2 seconds again to stop 

     playback. The PLAY indicator goes out.

6.

 During recording, if you press the [PLAY] button, it will stop recording 

     and play back the notes you have recorded.

Note:

The recording data will be lost after power off.

By using the MIDI functions you can expand your musical possibilities. 

This section explains what MIDI is, and what it can do, as well as how 

you can use MIDI on your instrument.

What's MIDI?

MIDI (short for Musical Instrument Digital Interface) allows a wide variety 

of electronic musical instruments, computers and other related devices 

to connect and communicate with one another. MIDI carries event 

messages that specify notation, pitch and velocity, control signals for 

parameters such as volume, vibrato, audio panning, and program 

change information to change the voice selections.

The instrument can output the real-time playback information via MIDI 

and control external MIDI devices. The instrument can also accept 

incoming MIDI messages and generate sound accordingly.

MIDI Connection

The instrument is equipped with a standard USB interface, which allows 

the instrument to be connected to a computer. Most computers will 

automatically recognize the instrument, and allow MIDI messages to be 

transmitted between the instrument and the computer via the USB-MIDI 

jack.

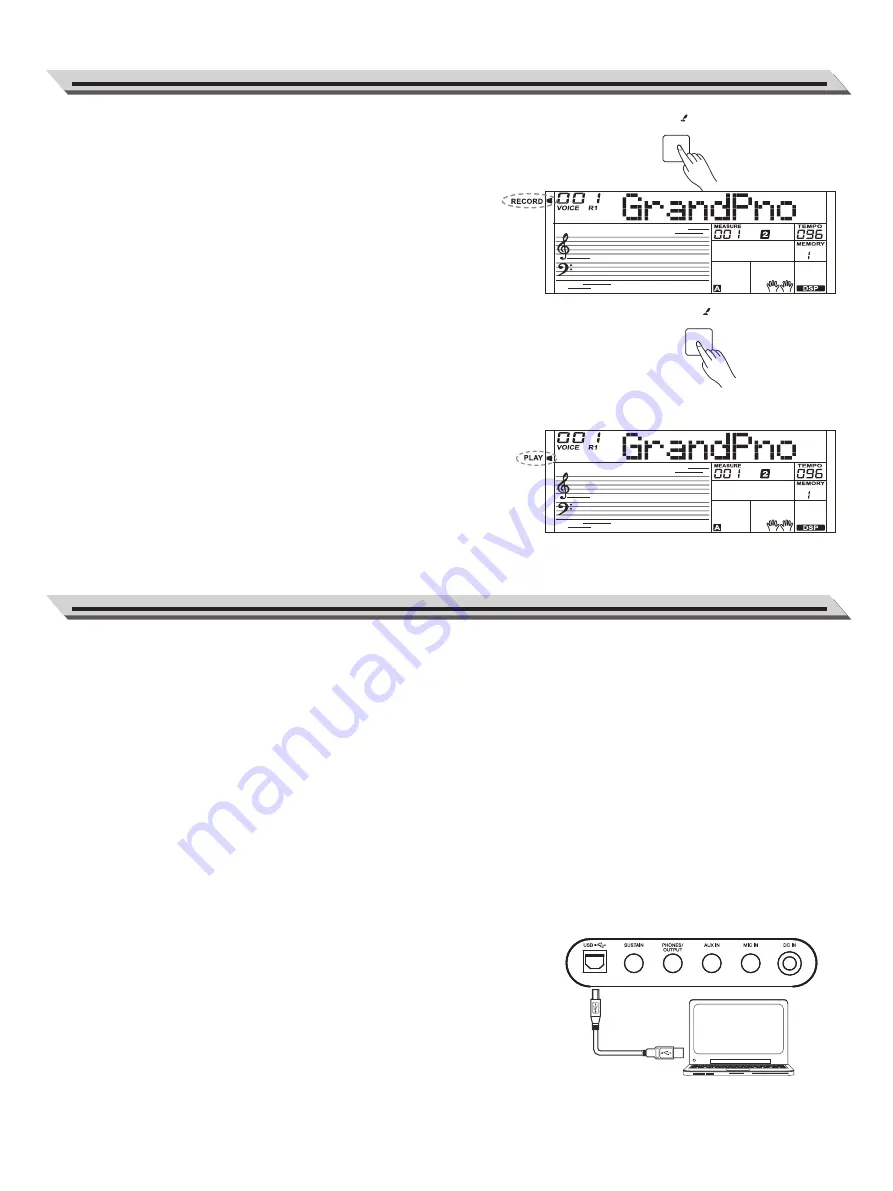
Use a standard USB cable to connect the USB jack of the instrument to 

the USB port of a computer.

Note:

Activate the computer from a sleep/suspended/standby mode before

connecting the USB cable.

Connect the USB cable to the instrument and a computer before

turning the power of the instrument on.

Recording and Playback

21

MIDI Function

PLAY

RECORD

PLAY

RECORD

Summary of Contents for LK-290

Page 1: ...ING FILL A FILL B MI XE R FUNCTIO N PIAN O METR O LOWE R SU S TAIN DUA L M2 M1 M3 M4 O T S 1 2 3 4 5 6 7 8 9 0 TEMP O LES S ON L R FAD E CH ORD D IC T TRANSPO S E CH OR D PL AY AR P BAN K RECOR D Clas...

Page 2: ...the designated DC adaptor to an AC outlet of the correct voltage Do not connect it to an AC outlet of voltage other than that for which your instrument is intended Unplug the DC power adaptor when no...

Page 3: ...tyle 11 Playing a Fill 11 Intro Ending 11 Sync Start 12 Fade In Out 12 Accompaniment Volume 12 Tempo 12 Auto Bass Chord 13 Chord Basics 13 One Touch Setting 14 Metronome Turning on the Metronome 14 Se...

Page 4: ...function on or off 12 START STOP Button Start or stop playing the style or song 13 BANK Button Switch between memory banks STORE Button Register the current panel settings 14 M1 M4 Buttons Recall the...

Page 5: ...B 15 NOTE INDICATION 16 LESSON 17 DUAL LOWER DSP 30 USB Jack Connect to a computer 31 SUSTAIN Jack Connect a sustain pedal 32 PHONES OUTPUT Jack Connect a pair of headphones or an audio equipment 33...

Page 6: ...ings on the cabinet 3 Replace the cabinet cover Make sure it locks firmly in place Notes 1 Do not mix using any used and new batteries 2 Always use the same types of batteries 3 Remove the batteries w...

Page 7: ...ce or late night playing The internal stereo speaker system is automatically shut off when a pair of head phones is plugged into this jack Note Do not listen with the headphones at high volume for lon...

Page 8: ...d please check if the master volume is set too low or if headphones are plugged into the PHONES jack Power Switch and Master Volume 08 The instrument features a variety of demo songs 1 Press the STYLE...

Page 9: ...gain to turn off the dual function Playing Different Voices with Both hands LOWER The Lower function splits the keyboard into two areas so as to create different voices for each of your hands The left...

Page 10: ...ws the current transpose value 2 Use buttons to adjust the transpose value 3 Press the and buttons simultaneously to reset the transposition to 0 Octave The octave function will shift the pitch of the...

Page 11: ...uto accompaniment of the rhythm track 2 In Sycn Start mode if the A B C function is in use you can press a key on the chord range of the keyboard to start playing auto accompaniment of all tracks Intr...

Page 12: ...th ending the volume decreases from high to low Press the FADE button during Style playing LCD will show FADE The Accompaniment Volume will change from the set value to 0 in about 8 seconds and the st...

Page 13: ...here are following basic triad types Chord Inversion We define this chord its root is not in the bass i e is not the lowest note as an inversion chord When the root is in the bass we call the chord ro...

Page 14: ...uch as voice effect etc that match the selected style can be instantly recalled 3 A B C is automatically turned on during O T S mode 4 Press the O T S button again to quit One Touch Setting mode the O...

Page 15: ...onds to turn on the function The corresponding indicator will be lit Press and hold the ARP button for 2 seconds again to turn off the function The corresponding indicator will light off Note Each voi...

Page 16: ...er the range of 2 2 2 Pressing and buttons at the same time will reset the octave value to default 000 Split Point The Point on the keyboard that separates voice L and voice R1 R2 is called the split...

Page 17: ...Modul Use the buttons to switch modulation on or off Note Modulation is not available for percussive voices DSP Repeatedly press the FUNCTION button to select the DSP menu The LCD displays Dsp Use th...

Page 18: ...ll reset the chorus level to default Auto Power Off 1 Repeatedly press the FUNCTION button to select the power off menu The LCD displays PowerOff Use the button to change the time setting 2 Pressing a...

Page 19: ...called when the One Touch Setting function is in use The registration memory will reset to default settings after power off Selecting a Registration Bank 1 Press the BANK button The LCD will display t...

Page 20: ...the LESSON button to enter the lesson mode or select a lesson to practice 2 Press the START STOP button to start the lesson The LCD displays the note that needs to be played 3 Press the START STOP bu...

Page 21: ...ument Digital Interface allows a wide variety of electronic musical instruments computers and other related devices to connect and communicate with one another MIDI carries event messages that specify...

Page 22: ...Cause and Solution This is normal and is no cause for alarm 1 Check if the master volume is set too low 2 Check if headphones are plugged into the PHONES jack Using a mobile phone in close proximity...

Page 23: ...W2 HarpsiO HarpsiO2 HarpsiOf DigiEP DigiEP2 Clavi Clavi2 ClaviS ClaviW ClaviWa SynClav Celesta 54 55 56 57 58 59 60 61 62 63 64 65 66 67 68 69 70 71 72 73 74 75 76 77 78 79 80 81 82 83 84 85 86 87 88...

Page 24: ...naDist AnaDist2 AnDisWah AnDisWa2 GtrHarmo AcoBass AcoBass2 DetAcoBs VelCroBs JazzSty ABs MtGT FngrBs FngrBs2 FngrBs3 FngrBsD DetFngBs VelBass Bs DisGt PickBs 162 163 164 165 166 167 168 169 170 171 1...

Page 25: ...mpet2 TrumpetD TrmpetD2 TrumpetW Trmbone Trmbone2 Tuba Tuba2 MuteTrp MuteTrp2 Horn Horn2 Horn3 StSyBras 5thHorn Brass Unison SynBras SynBras2 SynBras3 SynBras4 SynBras5 SharpBra 271 272 273 274 275 27...

Page 26: ...3 StEleLd4 CalipLd CalipLd2 CalipLd3 Grand Grand2 OctPad ClassLD SawWah ChiffLd ChiffLd2 ChiffLd3 CharnLd CharnLd2 FruityLd FrutyLd2 VoiceLd VoiceLd2 Robot Robot2 ModDist ModDist2 379 380 381 382 383...

Page 27: ...ame Game 2 Fly Into Space Little Funny Funny Hammer Surface Of The Water Water Drop Atmosphere Clouds Clouds 2 Brightness Brightness 2 Life Life 2 Fresh Fresh 2 Goblins Fantasy Space Trojan Ceremony P...

Page 28: ...harston FunkyPop JazzFunk 51 52 53 54 55 56 57 58 59 60 61 62 63 64 65 66 67 68 69 70 71 72 73 74 75 76 77 78 79 80 81 82 83 84 85 86 87 88 89 90 91 92 93 94 95 96 97 98 99 100 101 102 103 104 105 Coo...

Page 29: ...tBld2 Unplug 2 Rock 2 PopRck 2 FastRk 2 SlwRk1 2 SlwRk2 2 RkRoll 2 H Metal2 B Bogie2 Blues 2 Shufle 2 B Shufl2 R Shufl2 Charstn2 FunkPop2 JazzFk 2 CoolFk 2 Soul1 2 Soul2 2 SoulShf2 SoulBlu2 R B 2 6 8G...

Page 30: ...ine BrownJug RiseSun DannyBoy ElCondor Sleeves Heidenro 53 54 55 56 57 58 59 60 61 62 63 64 65 66 67 68 69 70 71 72 73 74 75 76 77 78 79 80 81 82 83 84 85 86 87 88 89 90 91 92 93 94 95 96 97 98 99 100...

Page 31: ...ck The Happy Farmer Etude Dance Of The Four Swans From Swan Lake Jesus Saviour Pilot Me Old Macdonald Had A Farm 2 Part Invention No 13 In A Minor BWV 784 Musette Bourree Carl Czerny 599 NO92 Away In...

Page 32: ...MIDI Implementation Chart 1...

Page 33: ...Kirstein GmbH does not guarantee for the accuracy or completeness of any description photograph or statement contained in this manual Printed colours and specifications may vary slightly from product...

Reviews: