background image


Assembly 

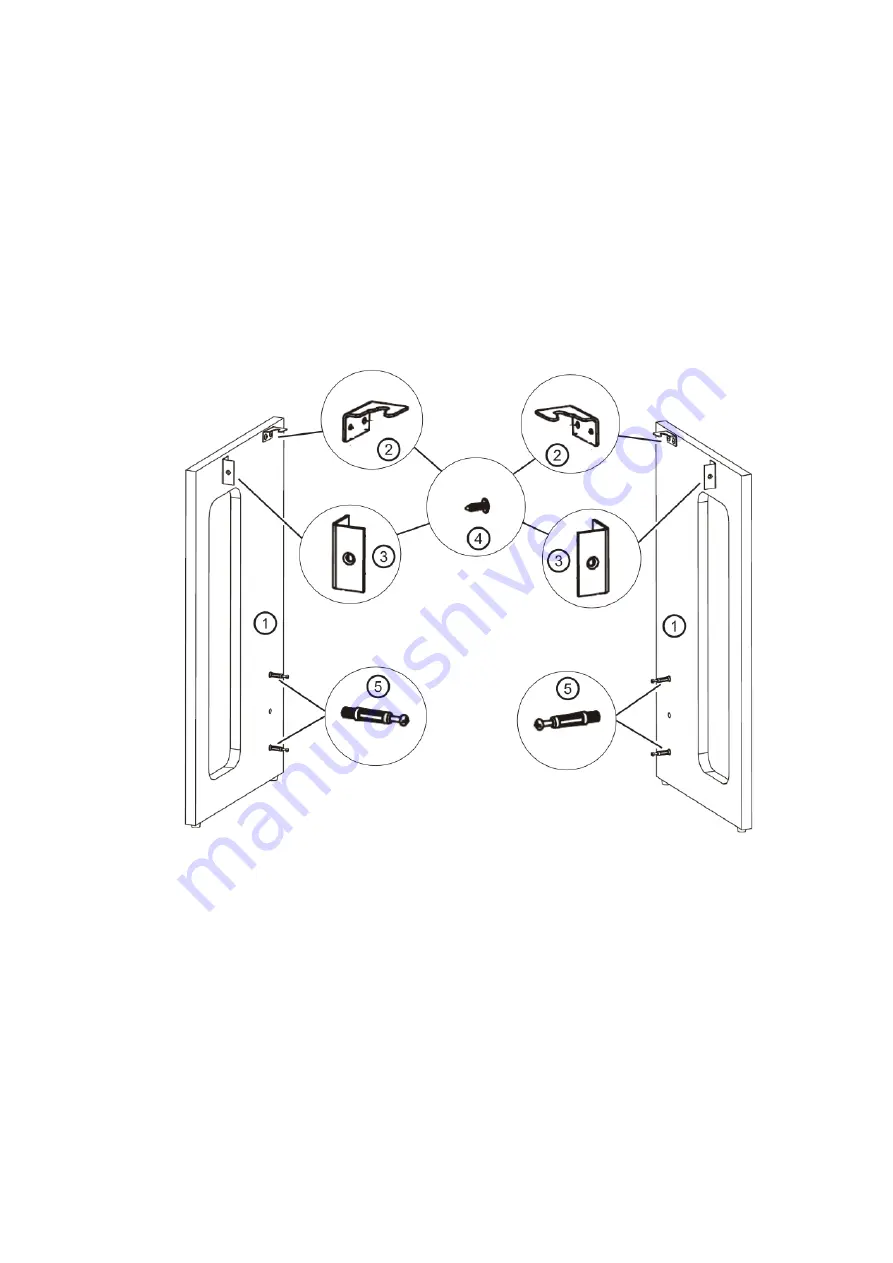
First prepare the two side parts ① of the substructure for assembly.


To do this, attach the brackets ② and ③ to the side parts. Use the short M4x14 screws 
④ for this purpose. Ensure the correct position of the respective angles. 


Screw two furniture connectors ⑤ into each of the two side parts.


Summary of Contents for DP S1

Page 1: ...DP S1 Slimline Digital Piano User Manual Version 09 2021...

Page 2: ...ed gender neutral These operating instructions apply to responsible persons and users who have been supervised by a person responsible for their safety or instructed in the operation of the device and...

Page 3: ...mperatures or dust do not place it next to an air conditioner and avoid direct sunlight Do not place the instrument near other electrical equipment to avoid interference Do not use force when handling...

Page 4: ...ents 10 Left control panel 10 Power 10 Master Vol 10 Function assignment of the keyboard keys 10 Function key 10 Voice 11 Layer Split Splitpoint 11 Twinova 12 Touch sensitivity 13 Transpose 13 Metrono...

Page 5: ...f the substructure for assembly To do this attach the brackets and to the side parts Use the short M4x14 screws for this purpose Ensure the correct position of the respective angles Screw two furnitur...

Page 6: ...e the two long M4x40 screws for this purpose Insert the four eccentric nuts into the openings on the back of the pedal plate Now mount the substructure consisting of pedal plate and side parts and fas...

Page 7: ...ect the pedal cable to the socket on the back of the piano and plug the hollow plug of the power supply into the power supply socket on the back of the instrument It may be useful to keep the packing...

Page 8: ...tor allows you to connect your piano to a music amplifier AUX IN The AUX In input allows you to play music signals from an external music source through your piano s speakers Power supply socket Only...

Page 9: ...to headphone jack 1 the instrument s speakers are deactivated When connecting to the headphone jack 2 the sound of the instrument is given out via the headphones and additionally still via the loudspe...

Page 10: ...y Master Vol This knob allows you to adjust the volume of your piano playing This instrument has an Auto Power Off function To save power the piano will turn itself off if it is not used for an extend...

Page 11: ...ombined and superimposed First select the first of the two desired voices as described in the section Voice Now press the LAYER ON OFF key while holding the function key to activate the Layer function...

Page 12: ...et split point hold down the function key and the SPLIT POINT key and press the key on the keyboard that is to define the new split point The selected setting will be reset when the instrument is rest...

Page 13: ...t s touch sensitivity When touch sensitivity is disabled all notes played will sound at the same volume regardless of the strength of the particular keystroke The TOUCH 1 5 keys allow changing the vel...

Page 14: ...and 4 represents a 4 4 beat Select 0 to play back all metronome beats with equal weighting The speed can be set in different ways The possible values are between 30 and 280 BPM With the metronome act...

Page 15: ...Room 2 Hall1 3 Hall2 4 Church while holding the function button to select D A S DEMO Beep The D A S function Dynamically adjusted sound optimally adapts the dynamic range to the selected volume settin...

Page 16: ...sponding demo To switch off the piano s confirmation tone beep press the BEEP NOTE ON OFF key while holding down the function key While holding the function key press the BEEP NOTE ON OFF key again to...

Page 17: ...headphone adapter from the headphone jack 3 plug the instrument into an electrical outlet The instrument emits noise 1 there are devices with interfering properties freezer washing machine or similar...

Page 18: ...ty 5 Levels and Off Max Polyphonie 64 Voices 10 Demo 1 Piano Demo 10 Voice Demo Pedals 3 Soft Sostenuto Sustain Connections Aux In Line Out USB to Host 2x Headphones 6 35mm Stereo Pedal Power supply S...

Page 19: ...L2 Select effect type 4 CHURCH Select time signature Accent on every 2nd beat e g 2 4 beat Select time signature Accent on every 3rd beat e g 3 4 beat Select time signature no accent Select time signa...

Page 20: ...20...

Page 21: ...ppearance are subject to change without notice All information was correct at the time of printing Musikhaus Kirstein GmbH assumes no responsibility for the accuracy or completeness of the description...

Reviews: