background image

11 

Trouble Shooting 

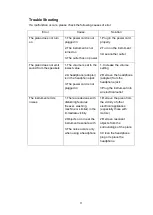
If a malfunction occurs, please check the following causes of error 

Error 

Cause 

Solution 

The piano does not turn 
on 

1.The power cord is not 
plugged in 

2.The instrument is not 
turned on 

3.The outlet has no power 

1.Plug in the power cord 
properly 

2.Turn on the instrument 

3.Use another outlet 

The piano does not emit 
sound from the speakers 

1.The volume is set to the 
lowest value 

2.A headphone (adapter) 
is in the headphone jack 

3.The power cord is not 
plugged in 

1. Increase the volume 
setting 

2.Remove the headphone 
(adapter) from the 
headphone jack 

3.Plug the instrument into 
an electrical outlet 

The instrument emits 
noises 

1.There are devices with 
disturbing features 
(freezer, washing 
machine or similar) in the 
immediate vicinity 

2.Objects on or near the 
instrument resonate with 

3.The noise occurs only 
when using a headphone 

1.Remove the piano from 
the vicinity of other 
electrical appliances 
(especially those with 
motors) 

2.Remove resonant 
objects from the 
surroundings of the piano 

3.Clean the headphone 
plug or replace the 
headphone 

Summary of Contents for DP 230

Page 1: ...DP 230 Bedienungsanleitung User Manual Version 06 2020...

Page 2: ...en in dieser Bedienungsanleitung sind geschlechtsneutral zu betrachten Diese Bedienungsanleitung gilt f r m ndige Personen und Nutzer die von einer f r ihre Sicherheit verantwortlichen Person beaufsic...

Page 3: ...ie keine brennenden Kerzen auf das Instrument Vorsichtsma nahmen Um Sch den am Instrument zu vermeiden stellen Sie es nicht an Pl tze mit hohen Temperaturen oder viel Staub stellen Sie es nicht direkt...

Page 4: ...Vervielf ltigung oder das Kopieren von Bildern auch in ge nderter Form Inhaltsverzeichnis Zusammenbau 6 R ckseitiges Anschlusspanel 7 Audio In Out 7 MIDI In Out 7 USB to Host 7 Netzteilbuchse 7 Kopfh...

Page 5: ...5 Begleitautomatik 10 Single Finger 10 Fingered 11 Trouble Shooting 12 Produktspezifikationen 13 WEEE Erkl rung Waste of Electrical and Electronic Equipment 14...

Page 6: ...festigen Sie den Spieltisch auf dem Unterbau Verbinden Sie das Pedalkabel und drehen Sie die Kunststoff Abstandsschraube unter der Pedaleinheit bis zum Boden heraus Es kann n tzlich sein die Verpackun...

Page 7: ...ost Buchse k nnen Sie Ihr Piano mittels eines USB A B Kabels zu einem Computer verbinden Netzteilbuchse Verwenden Sie das Instrument ausschlie lich mit dem mitgelieferten Netzteil Verbinden Sie zuerst...

Page 8: ...nen Sie die Lautst rke der Begleitautomatik einstellen Power Mit dem Netzschalter nehmen Sie Ihr Instrument in Betrieb Bitte schalten Sie Ihr Instrument bei Nichtbenutzung aus um Energie zu sparen Die...

Page 9: ...beginnt die Wiedergabe des Begleitmusters beim ersten Tastendruck auf die Klaviatur und ersetzt somit die Start Stop Taste zum Starten der Begleitung Die aktivierte SyncStart Funktion wird im Display...

Page 10: ...lbtonschritten nach unten oder oben ver ndern Begleitautomatik Zum Spielen mit Begleitautomatik ist es erforderlich den Akkord der gew nschten Begleitfigur anzugeben Hierzu k nnen bei diesem Instrumen...

Page 11: ...11 Fingered Mit der Fingered Methode ist die Angabe eines Akkordes durch alle beteiligten Akkordt ne m glich Der fortgeschrittene Spieler kann in dieser Methode auch kompliziertere Akkorde abbilden...

Page 12: ...opfh rer adapter steckt in der Kopfh rerbuchse 3 Das Netzkabel ist nicht eingesteckt 1 Erh hen Sie die Lautst rkeeinstellung 2 Entfernen Sie den Kopfh rer adapter aus der Kopfh rerbuchse 3 Stecken Sie...

Page 13: ...chwer mittel leicht aus Max Polyphonie 128 Voices 40 Demo 50 Rhythm 200 Pedale 3 Soft Sostenuto Sustain Anschl sse Audio In Out Cinch MIDI In Out USB to Host 2x Kopfh rer 6 35mm Pedal Netzteil Lautspr...

Page 14: ...ne vorherige Ank ndigung ge ndert werden Alle Angaben waren zum Zeitpunkt der Drucklegung korrekt Die Musikhaus Kirstein GmbH bernimmt keine Gew hr f r die Richtigkeit oder Vollst ndigkeit der in dies...

Page 15: ...considered gender neutral These operating instructions apply to responsible persons and users who have been supervised by a person responsible for their safety or instructed in the operation of the de...

Page 16: ...s Do not place burning candles on the instrument Precautions To avoid damage to the instrument do not place it in places with high temperatures or dust do not place it next to an air conditioner and a...

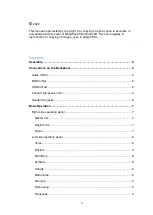
Page 17: ...pying of images even in altered form Contents Assembly 5 Connections on the Backpanel 6 Audio In Out 6 MIDI In Out 6 USB to Host 6 Connect the power cord 6 Headphone jacks 6 Basic Operation 7 Right si...

Page 18: ...4 Auto Chord Funktion 9 Single Finger 9 Fingered 10 Trouble Shooting 11 Product Spezifications 12 WEEE Declaration 13...

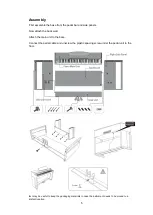
Page 19: ...ls Now attach the back wall Attach the main unit to the base Connect the pedal cable and unscrew the plastic spacing screw under the pedal unit to the floor t may be useful to keep the packaging mater...

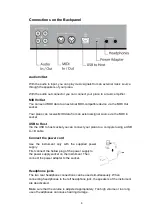
Page 20: ...USB to Host Via the USB to host socket you can connect your piano to a computer using a USB A B cable Connect the power cord Use the instrument only with the supplied power supply First connect the ho...

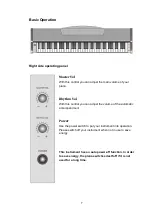
Page 21: ...this control you can adjust the volume of the automatic accompaniment Power Use the power switch to put your instrument into operation Please switch off your instrument when not in use to save energy...

Page 22: ...vated the accompaniment pattern starts playing when the keyboard is pressed for the first time thus replacing the Start Stop key to start the accompaniment The activated SyncStart function is shown in...

Page 23: ...itone steps up or down by pressing the or button Auto Chord Funktion To play with automatic accompaniment it is necessary to specify the chord of the desired accompaniment figure Two methods can be us...

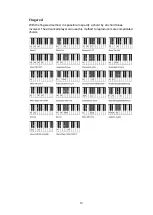
Page 24: ...10 Fingered With the fingered method it is possible to specify a chord by all chord tones involved The advanced player can use this method to reproduce more complicated chords...

Page 25: ...he headphone jack 3 The power cord is not plugged in 1 Increase the volume setting 2 Remove the headphone adapter from the headphone jack 3 Plug the instrument into an electrical outlet The instrument...

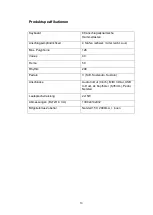
Page 26: ...levels heavy medium light off Max Polyphonie 128 Voices 40 Demo 50 Rhythm 200 Pedals 3 Soft Sostenuto Sustain Connections Audio In Out Cinch MIDI In Out USB to Host 2x Headphones 6 35mm Pedal Power su...

Page 27: ...e are subject to change without notice All information was correct at the time of printing Musikhaus Kirstein GmbH assumes no responsibility for the accuracy or completeness of the descriptions photos...

Reviews: