background image

32

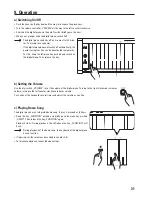
d) Selecting an Instrument

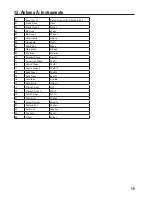
The digital piano has a total of 26 different instruments. They can 

be selected via the piano keys in the area „VOICE“.

Each piano key has two instruments (see label of the upper and 

lower line).
Proceed as follows to select an instrument:

•  Keep the key „FUNCTION“ pushed and then briefly push a pia

-

no key in the „VOICE“ area to select one of the instruments.

•  Release the key „FUNCTION“ again.
•  When pushing the key „FUNCTION“ and pushing the same pia

-

no key again, the respective other instrument is selected. 

•  When  selecting  an  instrument,  the  two-tone  mode  and  split 

mode are switched off automatically.

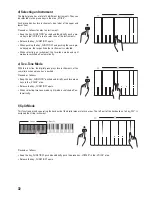
e) Two-Tone Mode

With this function, the digital piano plays two instruments at the 

same time when a piano key is pushed.
Proceed as follows:

•  Keep the key „FUNCTION“ pushed and briefly push two piano 

keys in the „VOICE“ area. 

•  Release the key „FUNCTION“ again.
•  When selecting two-tone mode, split mode is switched off au

-

tomatically.

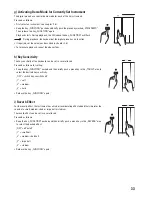
f) Split Mode

This function permits separating the keyboard of the digital piano into two areas. The left part of the keyboard up to key „F#3“ is 

assigned the string instrument.

Proceed as follows:

•  Keep the key „FUNCTION“ pushed and briefly push the piano key „LOWER“ in the „VOICE“ area. 
•  Release the key „FUNCTION“ again.

Summary of Contents for DP 210

Page 1: ...MIDI Classic Cantabile Digitalpiano DP 210 ArtNr 00039141 00039142 00039143 Version 05 2015 Bedienungsanleitung User manual...

Page 2: ......

Page 3: ...icherheitsanweisungen durch um Verletzungen sowie Besch digungen des Ger ts zu vermeiden Bedienungsanleitung deutsch ab Seite 2 Introduction Thank you for your purchase of the Classic Cantabile DP 210...

Page 4: ...rkers 11 d Anschluss eines Wiedergabeger ts an das Digital Piano 11 e Anschluss an einen Computer 12 f Notenblatthalter aufstellen 12 g Anschluss eines Kopfh rers 12 9 Bedienung 13 a Ein Ausschalten...

Page 5: ...eieck weist auf wichtige Hinweise in dieser Bedienungsanleitung hin die unbedingt zu beachten sind Das Pfeil Symbol ist zu finden wenn Ihnen besondere Tipps und Hinweise zur Bedienung gegeben werden s...

Page 6: ...rstrebe 2 Fu pedale 3 Linkes Seitenteil 4 Rechtes Seitenteil 5 4x Griffschraube 6 4x lange Schrauben 7 4x Kunststoffkappe 8 Verbindungskabel 9 4x Gewindestopfen 10 Netzteil Netzkabel Bedienungsanleitu...

Page 7: ...teht Lebensgefahr durch einen elektrischen Schlag Schalten Sie zuerst die Netzspannung f r die Netzsteckdose ab an der das Netzteil Netzkabel angeschlossen ist zu geh rigen Sicherungsautomat abschalte...

Page 8: ...ssen und verwendet wird Dies kann u U mehrere Stunden dauern Achten Sie beim Aufstellen des Produkts darauf dass die Kabel nicht geknickt oder gequetscht werden Betreiben Sie das Produkt nicht unbeauf...

Page 9: ...Stecken Sie zuerst die 4 Gewindestopfen A in die L cher der Querstrebe Achten Sie dabei darauf dass das Gewindeloch in dem Gewindestopfen waagrecht ausgerichtet ist Montieren Sie nun das linke und da...

Page 10: ...8 b Oberteil montieren Setzen Sie das Oberteil auf die beiden Seitenteile auf Mit den vier Griffschrauben kann das Oberteil fixiert werden C C C...

Page 11: ...Pfeil im Bild oben Achten Sie dabei auf die richtige Anordnung des Steckers in der Buchse wenden Sie keine Gewalt an Stellen Sie das Digital Piano anschlie end an der gew nschten Stelle auf W hlen Sie...

Page 12: ...in Effekt 8 Fu pedal f r Sostenuto Effekt 9 Fu pedal f r Soft Effekt 10 Tastenbereich METRONOME 11 Tastenbereich REVERB 12 Tastenbereich CHORUS 13 Tastenbereich TOUCH 14 Tastenbereich EQ 15 Taste DEMO...

Page 13: ...und den Verst rker ein und stellen Sie an beiden Ger ten eine geringe Lautst rke ein berpr fen Sie die Lautst rke indem Sie z B auf der Klaviatur spielen Stellen Sie die Lautst rke nach Wunsch ggf h h...

Page 14: ...ich ein Notenblatthalter dieser muss nur aufgeklappt werden Ein B gel auf der R ckseite fixiert den Notenblatthalter in seiner Position g Anschluss eines Kopfh rers Auf der Unterseite des Digital Pian...

Page 15: ...st rke ber den Drehregler VOLUME k nnen Sie die Lautst rke am Digital Piano einstellen Eine Drehung nach rechts im Uhrzeigersinn erh ht die Lautst rke eine Drehung nach links gegen den Uhrzeigersinn v...

Page 16: ...t ausgew hlt Bei der Auswahl eines Instruments wird der Zweiklang Modus und der Split Modus automatisch ausgeschaltet e Zweiklang Modus Mit dieser Funktion spielt das Digital Piano beim Dr cken einer...

Page 17: ...t Die Anschlagempfindlichkeit der Klaviatur l sst sich in mehreren Stufen einstellen Gehen Sie zur Einstellung wie folgt vor Halten Sie die Taste FUNCTION gedr ckt und bet tigen Sie anschlie end kurz...

Page 18: ...fekt wird das Klangfeld der Instrumente ver ndert Gehen Sie wie folgt vor Halten Sie die Taste FUNCTION gedr ckt und bet tigen Sie anschlie end kurz eine Piano Taste im Bereich EQ so k nnen Sie den ge...

Page 19: ...eschwindigkeit mit den Tasten und im Bereich von 30 280 Takten pro Minute einstellen jeweilige Taste f r eine Schnellverstellung l nger gedr ckt halten Wenn Sie gleichzeitig die Tasten und dr cken wir...

Page 20: ...11 Entsorgung Das Produkt geh rt nicht in den Hausm ll Entsorgen Sie das Produkt am Ende seiner Lebensdauer gem den geltenden gesetzlichen Vorschriften geben Sie es z B bei einer entsprechenden Samme...

Page 21: ...08 Vibraphone Vibraph 09 Marimba Marimba 10 Drawbar Organ DrawOr 11 Percussive Organ PercOr 12 Church Oragn ChurOr 13 Church Oragn 2 ChurOr 2 14 Reed Organ ReedOr 15 Rock Organ RockOr 16 Accordion Aco...

Page 22: ...dapter 29 c Connection of an External Amplifier 29 d Connection of a Playback Device to the Digital Piano 29 e PC Connection 30 f Setting up Sheet Holder 30 g Connection of Headphones 30 9 Operation 3...

Page 23: ...xclamation mark in a triangle indicates important notes in these operating instructions that must be strictly obser ved The arrow symbol indicates that special advice and notes on operation are provid...

Page 24: ...1 Transverse strut 2 Pedals 3 Left side unit 4 Right side unit 5 4x grip screw 6 4x long screws 7 4x plastic cap 8 Connection cable 9 4x threaded plug 10 Mains adapter Mains cable Operating instructi...

Page 25: ...d do not touch it Danger to life from electric shock First switch off the mains voltage for the mains socket to which the mains adapter mains cable is connected switch off the corresponding circuit br...

Page 26: ...reach room temperature before connecting and using it This may take several hours When setting up the product make sure that the cables are neither bent nor pinched Never operate the product unattend...

Page 27: ...trut and Pedal First plug the 4 threaded plugs A into the holes of the transverse strut Observe that the threaded hole is horizontally aligned with the threaded plug Now install the left and right sid...

Page 28: ...26 b Installing the Upper Part Put the upper part onto the two side parts Fasten the upper part with the four grip screws C C C...

Page 29: ...socket at the top part see arrow in the figure above Observe proper alignment of the plug with the socket do not apply any force Then put the digital piano up in the desired location Select a sufficie...

Page 30: ...stain effect 8 Pedal for Sostenuto effect 9 Pedal for Soft effect 10 Key area METRONOME 11 Key area REVERB 12 Key area CHORUS 13 Key area TOUCH 14 Key area EQ 15 Key DEMO play demo song 16 Key BEEP to...

Page 31: ...suitable cable Do not use the PHONO input Switch on the digital piano and the amplifier and set a low volume on both devices Check the volume by playing e g on the keyboard Increase the volume as you...

Page 32: ...e is a sheet holder that only needs to be folded up A bracket at the rear fastens the sheet holder in its position g Connection of Headphones At the bottom of the digital piano there are two jack plug...

Page 33: ...he digital piano Then release the key b Setting the Volume Use the dial switch VOLUME to set the volume of the digital piano Turning to the right clockwise increases volume turning to the left counter...

Page 34: ...When selecting an instrument the two tone mode and split mode are switched off automatically e Two Tone Mode With this function the digital piano plays two instruments at the same time when a piano ke...

Page 35: ...itivity The key sensitivity of the keyboard can be set in several levels Proceed as follows for setting Keep the key FUNCTION pushed and then briefly push a piano key in the TOUCH area to select the d...

Page 36: ...alizer Effect The equalizer effect changes the sound field of the instruments Proceed as follows Keep the key FUNCTION pushed and then briefly push a piano key in the EQ area to select the desired eff...

Page 37: ...atively you can set the speed with the keys and in the area from 30 280 times per minute keep the respective key pushed for longer If you push the keys and at the same time the tempo of the metronome...

Page 38: ...e household waste At the end of its service life dispose of the product according to the relevant statutory regulations e g return it to the corresponding collection office 12 Technical Data a Digital...

Page 39: ...Vibraphone Vibraph 09 Marimba Marimba 10 Drawbar Organ DrawOr 11 Percussive Organ PercOr 12 Church Oragn ChurOr 13 Church Oragn 2 ChurOr 2 14 Reed Organ ReedOr 15 Rock Organ RockOr 16 Accordion Acordi...

Reviews: