background image

5

E

n

g

li

s

h

STANBY

MUTE

AUDIO

FM

1

2

3

4

5

6

7

8

9

0

10+

F

USB/SD

iPod

MO/ST

TIME

►►

►►I

II

◄◄

I◄◄

TONE

MENU

VOL-

VOL+

SEARCH

RSD

STOP

SAVE

VIDEO

18

19
20

21

22

23

24

25

26

27

28

29

30

31

32

33

34
35
36

37

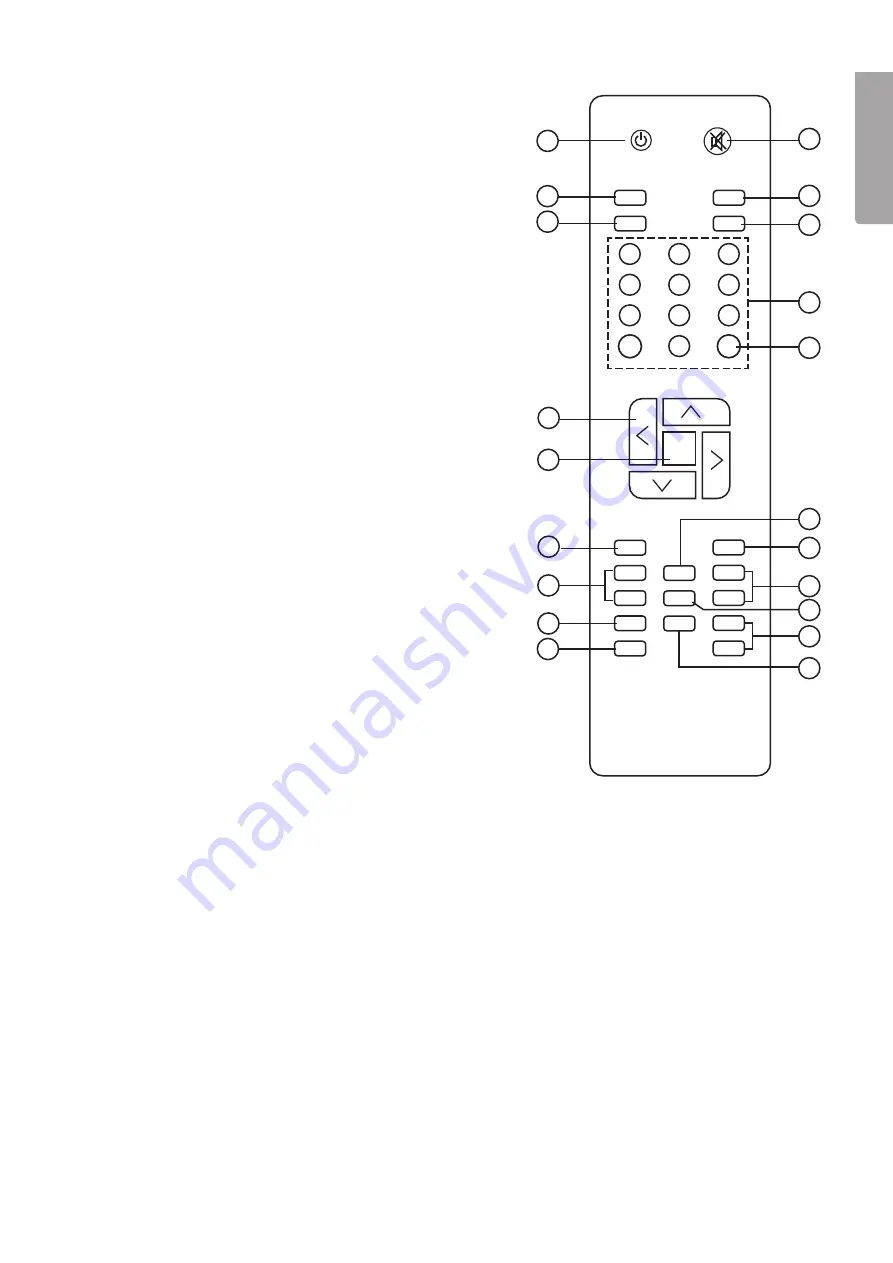
Remote Control 

18. [STANDBY] – On/off
19. [AUDIO] – Activates the Audio input connected device
20. [USB/SD] – Activates the connected USB or SD memory

21. [ v, 

^, 

<, > ] Arrow keys for moving the iPod cursor.

22. [

II 

] Starts and pauses playback.

23. [SEARCH] – Activates scanning mode. 
24. [

►►

] and [

◄◄

] Fast-forward and rewind (in USB or SD mode), 

press again to resume playback. Depress and hold to fast-
forward or rewind (iPod mode). Scans radio stations, forwards 
and backwards (radio mode). Note! Buttons don’t work with 
devices connect to the Audio-in connection.

25. [TIME] – Sets time, alarm, automatic-on, automatic shut-off. 
26. [TONE] –  Press sequentially to adjust treble (TR), bass (BS)  

or subwoofer (SW). Adjusts [Vol +] [Vol +] volume. 

27. [MUTE] – Press to mute. Press again to un-mute. 
28. [FM] – Turns on the FM-radio. 
29. [iPod] – Activates iPod. 
30. [0] – [10+] –  Number keys.
31. [F] – Sets the radio station.
32. [RDS/STOP] – Activates/shuts-off RDS.
33. [MO/ST] – Mono/stereo and c and –
34. [ 

I

◄◄

] and [

►►

] – Goes to next or previous track.

35. [SAVE/VIDEO] – Save/confirm or select output.
36. [VOL+/-] – Volume control.
37. [MENU] – Accesses menu. 

Inserting batteries into the remote control 

1.  Pinch the locking tabs and remove the battery cover.
2.  Insert 2 x LR03/AAA batteries according to the polarity markings.
3.  Replace the battery cover.  

Summary of Contents for dm96

Page 1: ...E n g l i s h Sv e n s ka N o r s k Suomi iPod Speaker iPod h gtalare iPod h yttaler iPod kaiutin Art no Model 38 3943 DM96 Ver 201008...

Page 2: ...2...

Page 3: ...the device to moisture or damp Do not expose the device to direct sunlight or high temperatures Do not disassemble or modify the product Repairs must be carried out by a qualified tradesman or worksh...

Page 4: ...d 3 I Goes to next track 4 Audio Input 5 Time 6 II Starts and pauses playback 7 iPod dock 8 On off 9 Fast forward 10 Increases volume 11 Decreases volume 12 Stops playback 13 Display 14 USB port 15 SD...

Page 5: ...forwards and backwards radio mode Note Buttons don t work with devices connect to the Audio in connection 25 TIME Sets time alarm automatic on automatic shut off 26 TONE Press sequentially to adjust...

Page 6: ...Component POWER LINK ETHERNET POWER LINK ETHERNET P O W E R L I N K E T H E R N E T P O W E R L I N K E T H E R N E T FM antenna R CD DOWN POWER UP VOLUME CD DVD DIVX MULTIMEDIA PLAYER 5 Connections...

Page 7: ...2 Set a radio station by using the number keys to 30 to enter the radio station s frequency channel 3 Press SAVE VIDEO 35 to save the station to memory Scanning for stations 1 Scan for stations manua...

Page 8: ...arm To set the time alarm and automatic on off press TIME 25 The available settings are as follows Set time 1 Set the hours using VOL VOL 36 press 21 2 Set the minutes in in the same way 3 Press TIME...

Page 9: ...ltage 220 240 V 50 Hz power consumption 60 W Remote control batteries 2 x AAA LR03 not included Output power 15 W x2 30 W RMS Inputs iPod iPod iPhone connection charging and file transfer SD SD memory...

Page 10: ...a temperaturer Demontera aldrig produkten p egen hand Reparationer m ste utf ras av kvalificerad serviceman eller verkstad Om inte apparaten ska anv ndas under en l ngre tid dra ur stickproppen ur v g...

Page 11: ...ler g r paus 7 iPod docka 8 Av p 9 Snabbspola fram t 10 ka volymen 11 S nk volymen 12 Stoppa uppspelning 13 Display 14 Anslutning f r USB enhet 15 Anslutning f r SD minne 16 Anslutning f r n tkabel 17...

Page 12: ...g nger f r att justera diskant TR bas BS eller subwoofer SW Anv nd Vol Vol f r att justera 27 MUTE St nga av ljudet tillf lligt tryck igen f r att aktivera ljudet igen 28 FM Aktivera FM radio 29 iPod...

Page 13: ...g Anslut till r d gr n och bl RCA kontakt RED GREEN BLUE R L ANT ANT Pr Y Pb VIDEO AUDIO 1 AUDIO2 RED GREEN BLUE R L Pr Y Pb VIDEO AUDIO 1 AUDIO2 COMPONENTVIDEO OUT AUDIO IN FM COMPONENTVIDEO OUT AUDI...

Page 14: ...1 Tryck p F 31 2 St ll in en radiostation som har k nd frekvens genom att knappa in frekvensen med sifferknapparna 30 Tryck p SAVE VIDEO 35 f r att spara frekvensen i minnet S k radiostation 1 S k st...

Page 15: ...la in tid alarm och automatiskt till fr nslag tryck p TIME 25 Det finns f ljande inst llningar i alarm Set time tid St ll in tid 1 St ll in timmar med VOL VOL 36 2 Tryck 21 och st ll in minuter p samm...

Page 16: ...50 Hz effektf rbrukning 60 W Batterier till fj rrkontroll 2 x AAA LR03 medf ljer ej Uteffekt 15 W x2 30 W RMS Ing ngar iPod Anslutning f r iPod iPhone laddning och fil verf ring SD Anslutning f r SD m...

Page 17: ...ler v sker Utsett ikke produktet for h ye temperaturer eller direkte sollys Produktet m ikke demonteres av ukvalifiserte Reparasjoner m utf res av kyndig servicepersonell eller p verksted Hvis ikke pr...

Page 18: ...fil 4 Audio Input 5 Klokke 6 II Starte avspilling eller ta pause 7 iPod dokkingstasjon 8 Av p 9 Hurtigspole framover 10 Heve volumet 11 Senke volumet 12 Stopp avspilling 13 Skjerm 14 Uttak for usb en...

Page 19: ...ver i radio modus Obs Knappene fungerer ikke n r en enhet er koblet til Audio in 25 TIME Stille inn klokkeslett alarm automatisk p slag automatisk frakobling 26 TONE Trykk flere ganger for justere dis...

Page 20: ...R LINK ETHERNET P O W E R L I N K E T H E R N E T P O W E R L I N K E T H E R N E T FM antenne R CD DOWN POWER UP VOLUME CD DVD DIVX MULTIMEDIA PLAYER 5 Tilkoblinger iPod For tilkobling av iPod iPhone...

Page 21: ...t kanal 1 Trykk p F 31 2 Still inn en radiostasjon som har en frekvens du kjenner ved taste inn frekvensen med talltastene Trykk p SAVE VIDEO 35 for lagre frekvensen i minnet S k radiostasjon 1 S k st...

Page 22: ...ille inn klokkeslett alarm og automatisk til fraslag trykk p TIME 25 Velg mellom f lgende innstillinger Set time tid Stille inn klokkeslett 1 Stille inn timer med VOL VOL 36 trykk 21 2 Still inn minut...

Page 23: ...k 60 W Batterier til fjernkontrollen 2 x LR03 AAA batterier medf lger ikke Uteffekt 15 W x 2 30 W RMS Innganger iPod For tilkobling av iPod iPhone lading og filoverf ring SD Tilkoblingspunkt for minne...

Page 24: ...isuus l anna laitteen kostua tai kastua Suojaa laite suoralta auringonvalolta ja korkeilta l mp tiloilta Tuotetta ei saa purkaa eik siihen saa tehd muutoksia Tuotteen saa korjata vain koulutettu huolt...

Page 25: ...vaan tiedostoon 4 Audio Input 5 Aika 6 II Aloita toisto tai tauota 7 iPod telakka 8 Pois p lt p lle 9 Pikakelaus eteenp in 10 Lis nenvoimakkuutta 11 V henn nenvoimakkuutta 12 Pys yt toisto 13 N ytt 14...

Page 26: ...n radiotilassa Huom N pp imet eiv t toimi yksik ss joka on liitetty Audio sis ntuloon 25 TIME Aseta aika nimerkki automaattik ynnistys automaattisammutus 26 TONE Paina useamman kerran s t ksesi diskan...

Page 27: ...WER LINK ETHERNET POWER LINK ETHERNET P O W E R L I N K E T H E R N E T P O W E R L I N K E T H E R N E T FM antenn R CD DOWN POWER UP VOLUME CD DVD DIVX MULTIMEDIA PLAYER 5 Liit nn t iPod iPod iPhone...

Page 28: ...oaseman taajuus n pp ilem ll taajuus numeron pp imill 30 3 Paina n pp int SAVE VIDEO 35 tallentaaksesi taajuuden muistiin Radioaseman haku 1 Hae asema manuaalisesti k ytt m ll n pp imi 8 ja 7 24 2 Pai...

Page 29: ...nistys ja sammutus asetetaan painamalla n pp int TIME 25 nimerkkiin voidaan valita seuraavia asetuksia Set time aika Aseta aika 1 Aseta tunnit n pp imill VOL VOL 37 2 Paina n pp int 21 ja aseta minuut...

Page 30: ...W Kaukos timen paristot 2 x AAA LR03 ei mukana Ulosteho 15 W x2 30 W RMS Sis ntulot iPod iPod iPhone liit nt lataus ja tiedostonsiirto SD SD muistikortin liit nt USB USB liit nt USB 2 0 Audio 1 Ulkois...

Page 31: ...31 Suomi...

Page 32: ...0 E post kundesenter clasohlson no Internett www clasohlson no Post Clas Ohlson AS Postboks 485 Sentrum 0105 OSLO Suomi Asiakaspalvelu Puh 020 111 2222 S hk posti info clasohlson fi Internet www claso...

Reviews: