background image

4

E

n

g

li

s

h

Assembly 

Note!

 Make sure that the wall onto which you intend to mount the wall bracket can support the combined weight of 

the TV, wall mount and fixings.

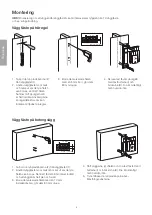
Mounting onto wooden studding

70 mm

Ø 3/16


(5 mm)

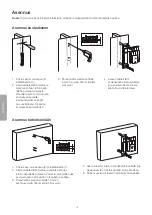
1.  Remove the plastic covers (2) 

from the wall mount (1).

2.  Use the wall mount as a 

template to mark out where  
the four mounting holes are to 
be drilled. Make sure that they 
are in the centre of the studding 
batten and are horizontal.  
A stud detector can be used  
to help locate the centre of  
the batten.

3.  Use a 5 mm drill bit to make 

the holes 80 mm deep. 

UP

4.  Attach the mount to  

the batten using the anchor 
screws (I) and washers (K). 
Screw on securely,  
but do not overtighten.

Mounting onto a masonry wall

1.  Remove the plastic covers (2) from the wall mount (1).
2.  Use the wall mount as a template and mark out where 

the four holes are to be drilled. Make sure that the 
mount is horizontal and that the wall is flat and solid.

3.  Use a 10 mm drill bit to make the holes 80 mm deep.

UP

4.  Insert the wall plugs (J) into the holes and secure 

the mount using the screws (I) and washers (K). 
Screw on securely, but do not overtighten.

5.  Push the plastic covers back over the fastening 

points.

70 mm

Ø 3/8


(10 mm)

Summary of Contents for 38-4220

Page 1: ...E n g l i s h Sv e n s ka N o r s k Suomi Motorized Wall Mount Motordrivet v ggf ste Motordrevet veggfeste Moottoroitu sein teline Art no Model 38 4220 ETW202 Ver 201102...

Page 2: ...2...

Page 3: ...product in very dusty environments Do not mount the product very close to hot radiators cookers or other sources of heat Never immerse the product in water Make sure that no cables are squashed when t...

Page 4: ...e of the batten 3 Use a 5 mm drill bit to make the holes 80 mm deep UP 4 Attach the mount to the batten using the anchor screws I and washers K Screw on securely but do not overtighten Mounting onto a...

Page 5: ...back of your TV 4 Use suitable bolts E G the spacers L and the four square washers H The holes in the washers are big enough for several sizes of bolts 5 Screw on securely but do not overtighten Conn...

Page 6: ...5 save and then press button 2 once To store position 2 when the mount is in the desired position hold in button 5 save and then press button 6 once To move the mount to one of the memorized positions...

Page 7: ...i mycket dammiga milj er Montera inte produkten mycket n ra heta element spisar eller andra v rmek llor S nk aldrig ner produkten i vatten Se till att inga kablar kommer i kl m n r f stet man vreras M...

Page 8: ...ade h len med en 5 mm borr g r dem 80 mm djupa UP 4 Skruva fast f stet p regeln med f stbultarna I och brickorna K Dra t ordentligt men verdra inte V ggf ste p betongv gg 1 Ta bort de tv plastk porna...

Page 9: ...TV f stet ver h len p baksidan av TV n 2 Anv nd passande skruv E G distanserna L och de fyra fyrkantiga brickorna H H len i brickorna r anpassade f r olika skruvdimensioner 3 Dra t ordentligt men verd...

Page 10: ...napp 2 F r att lagra position 2 n r f stet r i den nskade positionen h ll in knapp 5 spara och tryck en g ng p knapp 6 F r att senare komma till de lagrade positionerna h ll in minnesknappen 9 och try...

Page 11: ...m er veldig st vete Monter ikke produktet n r sv rt varme ovner komfyrer eller andre varmekilder Senk aldri produktet ned i vann v ske P se at ingen kabler kommer i klem n r festet man vreres Monter p...

Page 12: ...dens senter 3 Bor de merkede hullene med et 5 mm bor og med en dybde p 80 mm UP 4 Skru festet fast p stenderen med festeboltene I og skivene K Trekk alle skruer godt til men ikke for hardt Veggfeste p...

Page 13: ...rer tv festet over hullene p tv apparatets bakside 2 Bruk en passende skrue E G distansehylsene L og de fire firkantede skivene H Hullene i skivene er tilpasset forskjellige skruedimensjoner 3 Trekk a...

Page 14: ...innefunksjon Veggfestet kan lagre to posisjoner i minnet For lagre posisjon 1 N r festet er i den nskede posisjonen holdes tasten 5 inne lagre og trykk en gang p tast 2 For lagre posisjon 2 N r festet...

Page 15: ...aikoja l asenna tuotetta hyvin p lyisiin paikkoihin l asenna tuotetta kuumien l mp pattereiden liesien tai muiden l mm nl hteiden l heisyyteen l laita tuotetta veteen Varmista ett johtoja ei j puristu...

Page 16: ...hdille 5 mm n poralla Tee rei ist 80 mm syv t UP 4 Ruuvaa teline kiinni koolaukseen kiinnityspulteilla I ja aluslaatoilla K Kirist kunnolla mutta l liikaa Asennus betonisein n 1 Poista kaksi muovikupu...

Page 17: ...slevy television takana olevien reikien p lle 2 K yt sopivia ruuveja E G v likkeit L ja nelj nelikulmaista aluslaattaa H Aluslaattojen rei t sopivat erikokoisille ruuveille 3 Kirist kunnolla mutta l l...

Page 18: ...ntoa Asennon 1 tallentaminen kun teline on haluamassasi asennossa pid painike 5 tallenna painettuna pohjaan ja paina kerran painiketta 2 Asennon 2 tallentaminen kun teline on haluamassasi asennossa pi...

Page 19: ...19...

Page 20: ...0 E post kundesenter clasohlson no Internett www clasohlson no Post Clas Ohlson AS Postboks 485 Sentrum 0105 OSLO Suomi Asiakaspalvelu Puh 020 111 2222 S hk posti info clasohlson fi Internet www claso...

Reviews: