background image


Clarke

®


Manual del operador 

(ES)  -  FOCUS  C28  and  C33

                                                                        - 27 -

ES

ESPAÑOL

Especificaciones de la máquina

ESPECIFICACIONES:

Modelo

C33

C28

Motor de vacío

de 1HP (67kw)

de 1HP (67kw)

de descarga tangencial

de descarga tangencial

de tres etapas

de tres etapas

Fuente de alimentación

24 voltios (baterías de 6-6V)

24voltios (baterías de 6-6V)

242AH, 310AH

242AH, 310AH

Depósito de solución

30 galones (114 litros)

30 galones (114 litros)

Depósito de recuperación

30 galones (114 litros)

30 galones (114 litros)

Motores, cepillos (2)

1 hp PM (0,74kw)

1 hp PM (0,74kw)

Tracción del motor

0,50 hp PM (0,37kw)

0,50 hp PM (0,37kw)

Cepillos (2)

17 pulgadas (43cm)

14 pulgadas (36cm)

con 5" (1,5 cm) de superposición

con 5" (1,5 cm) de superposición

Velocidad del cepillo

200 rpm

200 rpm

Presión del cepillo

150 lbs.

150 lbs.

Velocidad hacia delante

Variable, hasta 230 ft./min. (70 m/min)

Variable, hasta 230 ft./min. (70 m/min)

Velocidad hacia atrás

Variable, hasta 180 ft/min. (54 m/min)

Variable, hasta 180 ft/min. (54 m/min)

Cargador

24V, 25A, 115V/60hz

24V, 25A, 115V/60hz

Longitud

67 pulgadas (170 cm)

65 pulgadas (165 cm)

Anchura - Máquina

35,70 pulgadas (91 cm)

30 pulgadas (76 cm)

Altura

43,75 pulgadas (112cm)

43,75 pulgadas (112cm)

Tasa de limpieza

35.000 pies cuadrados/hora

29.700 pies cuadrados/hora

(3252 metros cuadrados/hora)

(2750 metros cuadrados/hora)

Amplitud de limpieza

33 pulgadas (84 cm)

28 pulgadas (71 cm)

Limpieza en pendiente

Inclinación de 6°

Inclinación de 6°

Peso con baterías (310AH)

1015 lbs.   460kg

1005 lbs.   456kg

Peso de envío

1318 lbs.   598kg

1308 lbs.   593kg

con baterías (310AH)

Summary of Contents for Focus C23

Page 1: ...the operation of this machine before using it If your operator s cannot read this manual have it explained fully before attempting to operate this machine All directions given in this book are as see...

Page 2: ...e Squeegee 15 How To Fill The Solution Tank 15 How To Traverse Machine 16 How To Clean A Floor 16 Maintenance 17 How To Correct A Problem 22 Accessories 23 Section II Parts and Service Manual Solution...

Page 3: ...DANGER Lead acid batteries generate gases which can cause an explosion Keep sparks and flames away from batteries Do not smoke around the machine Charge the batteries only in an area with good ventila...

Page 4: ...nvironmental Protection Agency has established certain regulations regarding discharge of waste water Also city and state regulations regarding this discharge may be in your area Understand and follow...

Page 5: ...nch 43cm 14 inch 36cm w 5 1 5 cm overlap w 5 1 5 cm overlap Brush Speed 200 rpm 200 rpm Brush Pressure 150 lbs 150 lbs Speed Forward Variable to 230 ft min Variable to 230 ft min Speed Reverse Variabl...

Page 6: ...n the key switch OFF 11 Fasten the machine to the vehicle How To Remove The Machine From A Van Or Truck 1 Make sure there are no obstructions in the area 2 Make sure the unloading ramp is at least eig...

Page 7: ...FOCUS C28 and C33 7 SYMBOLS USED ON FOCUS C28 C33 Hazard Alert Symbol On Off Key Switch BrushUp Down Solution Control Power Traverse Speed Control Charge Battery Meter Warning Label with parking brak...

Page 8: ...he left switch can be used Reverse Switch See Figure 1 Item F The reverse switch when used in conjunction with one of the forward switches causes the machine to reverse direction The reverse speed is...

Page 9: ...EN ENGLISH Clarke Operator s Manual EN FOCUS C28 and C33 9 Figure 1 MACHINE CONTROL PANEL C28 C33 E F B E A G H I J K L M D C...

Page 10: ...attery to apply the brake There is a mechanical lever located on the brake This lever is an override To manually release the brake rotate the lever toward the rear of machine counter clockwise To retu...

Page 11: ...e the batteries in the solution tank as shown in figures 6a and 6b WARNING Lifting batteries without help could result in an injury Get help to lift the batteries The batteries are heavy WARNING Worki...

Page 12: ...ow fromthecells Alwaystopoff the cells with distilled water after charging CAUTION Irreversible damage will occur to the batteries if the electrolyte level doesnotcovertheplates Keepthe electrolyte at...

Page 13: ...walls and other objects Make sure there are no objects near the vents on the bottom of the charger 4 Disconnect the battery pack connector from the batteries 5 Connect the DC connector on the charger...

Page 14: ...horpaddriverunderthebrushmotorplate See figure 10 7 Alignthelugsonthemotorgimbalwiththeslotsinthe brushgimbal 8 Pull the brush up until the gimbal locks 9 Repeat steps 6 7 and 8 to install the second...

Page 15: ...the solution tank follow this procedure 1 Remove the solution tank lid See figure 15 2 Fill the solution tank with water 3 Add a cleaning chemical to the water for the correct amount follow the direct...

Page 16: ...othe side 8 Whenyoustopthemachine turnthekeyswitch OFF How to Clean a Floor WARNING Water solutions or cleaning materi als used with this type of machine can leave wet areas on the floor surfaces Thes...

Page 17: ...figure 20 4 MakesuretheScreenfilteroverthevacuummotor is clean and in position see figure 20 5 Make sure the valve on the recovery drain hose is clean Tightly close the valve 6 Make sure brush housing...

Page 18: ...nkorhose Putthe water hose into the drain hose 4 Leavethetanksandthedrainvalvesopentodryinthe air 5 Check the squeegee blade Use a cloth to clean the squeegee blade If the squeegee blade is damaged or...

Page 19: ...battery after installa tion NOTE Alwaysturnoffkeyswitchbeforeservicingthe machine WARNING Always wear eye protection and protective clothing when working near batteries NO SMOKING 1 To inspect batter...

Page 20: ...y however they may require slight adjustment Adjusting Squeegee Pressure To adjust the pressure refer to Figure 27 Proper adjustment will produce a uniform flare along the rear blade when the machine...

Page 21: ...irs must be done by authorized per sonnel only Consult your Clarke Authorized Service Person to dotheserviceprocedures Use only genuine Clarke parts How to Clean the Solution Line If the solution line...

Page 22: ...on or repair the damage Check for tripped breaker Have an authorized service person make repairs Connect the hose Turn or replace the squeegee blade Correctly install the squeegee blade Adjust the pre...

Page 23: ...it Medium 11431B 14 Grit Lite 10383A 14 Soft Nylon 11429B Pad Drivers Size Part No 17 17520C 14 17521C Optional Squeegee Blades Machine Blade Type Material Length Part No 28 Inner Optional Urethane Ri...

Page 24: ...V C28 C33 30 Controles y funciones de la m quina 32 Preparaci n de la m quina para el funcionamiento 33 Instalaci n de las bater as 33 Mantenimiento de las bater as 34 Carga de las bater as 35 Instala...

Page 25: ...ropiedad No haga funcionar la m quina hasta que no est completamente ensamblada Inspeccione cuidadosamente la m quina antes de ponerla en funcionamiento PELIGRO Las m quinas pueden causar una explosi...

Page 26: ...tipo de m quina pueden dejar mojadas algunas zonas del piso Estas reas pueden resultar peligrosas para el operador o para otras personas Coloque siempre avisos de Precauci n alrededor y cerca del rea...

Page 27: ...uperposici n con 5 1 5 cm de superposici n Velocidad del cepillo 200 rpm 200 rpm Presi n del cepillo 150 lbs 150 lbs Velocidad hacia delante Variable hasta230ft min 70m min Variable hasta230ft min 70m...

Page 28: ...gado 11 Asegure la m quina en el veh culo Sacar la m quina de una furgoneta o un cami n 1 Aseg rese de que no haya ninguna obstrucci n en el rea 2 Aseg rese de que la rampa de descarga tenga al menos...

Page 29: ...ELOS FOCUS C28 C33 S mbolo de alerta de riesgo Interruptor de llave On Off encendido apagado Cepillo Arriba Abajo Control de soluci n Alimentaci n Control de velocidad de desplazamiento Etiqueta de ad...

Page 30: ...Interruptor de movimiento en reversa consulte la figura 1 elemento F El interruptor de movimiento en reversa cuando se utiliza junto con uno de los interruptores de movimiento hacia adelante hace que...

Page 31: ...Clarke Manual del operador ES FOCUS C28 and C33 31 ES ESPA OL Figura 1 PANEL DE CONTROL DE LA M QUINA C28 C33 E F B E A G H I J K L M D C...

Page 32: ...a mec nica ubicada sobre el freno Es una palanca de transferencia de mando Para liberar el freno de forma manual rote la palanca hacia la parte poste rior de la m quina en sentido contrario a las aguj...

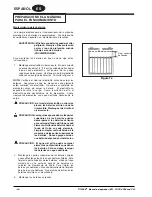
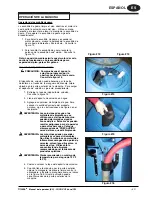
Page 33: ...l dep sito de soluci n como se indica en las figuras 6a y 6b ADVERTENCIA Si se levantan las bater as sin ayuda puede provocarse una lesi n Solicite ayuda para levantar las bater as Las bater as son pe...

Page 34: ...ordarse de los elementos Cubra siempre los elementos con agua destilada despu s de la carga PRECAUCI N si el nivel del electrolito no cubre las placas las bater as sufrir n un da o irreversible Manten...

Page 35: ...laci n laterales y las paredes o cualquier otro objeto Compruebe que no haya ning n objeto cerca de los orificios situados en la parte inferior del cargador 4 Desconecte el empalmador del grupo de bat...

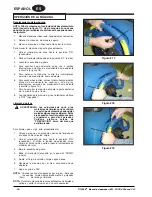
Page 36: ...ela figura10 7 Alineelasleng etasenlasuspensi ncard nicadel motor con las ranuras de la suspensi n card nica del cepillo 8 Levante el cepillo hasta que la suspensi n card nica se trabe 9 Repita los pa...

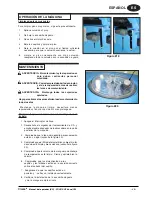
Page 37: ...ci n siga este procedimiento 1 Extraiga la tapa del dep sito de soluci n Consulte la figura 15 2 Llene el dep sito de soluci n con agua 3 Agregue un qu mico de limpieza al agua Para conocer la cantida...

Page 38: ...empuje la parte posterior de la misma hacia el lado 8 Cuando detenga la m quina gire el interruptor de llave a OFF apagado Limpieza de pisos ADVERTENCIA Las soluciones de agua o los materiales de limp...

Page 39: ...antenimiento todos los d as Mantenga la m quina limpia necesitar menos reparaciones y tendr una vida til m s prolongada Efect eestosprocedimientosalcomienzodelper odode trabajo 1 Apague el interruptor...

Page 40: ...est n obstruidos use alta presi n de agua para lavarlos Coloque la manguera de agua dentro de la manguera de drenaje 4 Deje las v lvulas de drenaje y los dep sitos abiertos para que se sequen con el a...

Page 41: ...erruptor de llave antes de reparar o mantener la m quina ADVERTENCIA utiliceprotecci noculary r o p a de protecci n cuando trabaje cerca de bater as PROHIBIDOFUMAR 1 Para examinar las bater as voltee...

Page 42: ...n peque as modificaciones Ajuste de la presi n de la escobilla de goma Para ajustar la presi n consulte la figura 27 Un ajuste correcto producir un ancho uniforme a lo largo de la hoja posterior cuand...

Page 43: ...as a cabo nicamente por personal autorizado Consulte con el personal t cnico autorizado de Clarke para realizar los procedimientos de servicio Utilice nicamente repuestos originales de Clarke Limpieza...

Page 44: ...el da o Busque el disyuntor disparado Haga que una persona del servicio t cnico autorizado realice las reparaciones Conecte la manguera Reemplace o gire la hoja de la escobilla de goma Instalelahojade...

Page 45: ...it Lite 10383A 14 Soft Nylon 11429B Impulsores de almohadillas Tama o Pieza N 17 17520C 14 17521C Hojas opcionales de la escobilla de goma M quina Hoja Tipo Material Longitud Pieza N 28 Interna Opcion...

Page 46: ...s pi ces 77 Montage du bras pivotant de la raclette 78 Nomenclature des pi ces 79 Montage du syst me de d placement 80 Nomenclature des pi ces 81 Montage de la brosse 82 Nomenclature des pi ces 83 Mot...

Page 47: ...rsqu elles sont utilis es proximit de mat riaux inflammables et de vapeurs N utilisez pas cette machine en pr sence ou proximit de combustibles de poussi re agro alimentaire de solvants de diluants ou...

Page 48: ...queuses ou les produits de nettoyage utilis s avec ce type de machine peuvent laisser des zones humides au sol Ces zones peuvent s av rer dangereuses pour l op rateur et pour les autres personnes Veil...

Page 49: ...lacement 0 50 ch PM 0 37 kW 0 50 ch PM 0 37 kW Brosses 2 43 cm 36 cm 1 5 cm chevauch 1 5 cm chevauch Vitesse de la broose 200 rpm 200 rpm Pression de la brosse 68 kg 68 kg Vitesse en marche avant Vari...

Page 50: ...commutateur cl en position OFF 11 Fixez la machine sur le v hicule Retrait de la machine d une camionnette ou d un camion 1 Assurez vous que la zone ne comporte aucun obstacle 2 Assurez vous que le pl...

Page 51: ...Symbole d avertissement d un danger Commutateur cl Marche Arr t Abaissement rel vement des brosses Niveau de solution Alimentation Contr le de la vitesse de d placement Indicateur de charge des batter...

Page 52: ...iliser le commutateur de gauche ou celui de droite Commutateur de marche arri re Cf figure 1F Lorsqu il est utilis conjointement avec l un des deux commutateurs de marche avant ce commutateur permet d...

Page 53: ...FR FRAN AIS Clarke Manuel de l utilisateur FR FOCUS C28 and C33 53 Figure 1 PANNEAU DE COMMANDE DES MODELES C28 C33 E F B E A G H I J K L M D C...

Page 54: ...evier m canique est situ sur le frein Ce levier est une commande d urgence Pour rel cher manuellement le frein faites pivoter le levier vers l arri re de la machine dans le sens inverse des aiguilles...

Page 55: ...sezler servoirder cup ration 6 Placezlesbatteriesdansler servoirde solution commeindiqu danslesfigures6aet6b AVERTISSEMENT En soulevant les batteries sans aide vous risquez de vous blesser Faites vous...

Page 56: ...cons quent l lectrolyte risque de d border des compartiments Ne compl tez le remplissage des compartiments avec de l eau distill e qu apr s le chargement MISE EN GARDE Les batteries risquent d tre irr...

Page 57: ...ventilation lat raux et les murs ou tous autres objets V rifiez qu il n y a pas d objets pr s des orifices situ s dans la partie inf rieure du chargeur 4 D connectez le connecteur de l ensemble batte...

Page 58: ...sses Cf figure 10 7 Alignez les saillies sur l axe de cardan du moteur l aide des fentes situ es sur l axe de cardan des brosses 8 Poussez la brosse vers le haut jusqu ce que les axesseverrouillent 9...

Page 59: ...uivante pour remplir le r servoir de solution 1 Retirez le couvercle du r servoir de solution Cf figure 15 2 Remplissez le r servoir de solution avec de l eau 3 Ajoutez un agent nettoyant dans l eau C...

Page 60: ...rsque vous arr tez la machine mettez le commutateur cl en position OFF Nettoyaged unsol AVERTISSEMENT Lessolutionsaqueusesoules produits de nettoyage utilis s avec ce type de ma chine peuvent laisser...

Page 61: ...procedimientosdemantenimiento todos los d as Mantenga la m quina limpia necesitar menos reparaciones y tendr una vida til m s prolongada Efect eestosprocedimientosalcomienzodelper odode trabajo 1 Apag...

Page 62: ...rincer le r servoir ou le flexible Mettezletuyaud eaudansleflexibledevidange 4 Laissez les r servoirs et les valves des flexibles s cher l air libre 5 V rifiez le balai de la raclette Utilisez un chi...

Page 63: ...QUE Mettez toujours le commutateur cl en position off avantdeproc der uneop rationdemain tenance sur la machine AVERTISSEMENT Portez toujours des lunettes de protection et des v tements adapt s lorsqu...

Page 64: ...ment R glage de la pression de la raclette R f rez vous la figure 27 pour r gler la pression de la raclette Unr glagecorrectg n reunecourburer guli re du balai arri re lorsque la machine avance Pour a...

Page 65: ...L entretienetles r parations ne doivent tre effectu s que par un technicien agr Consultezvotrepersonneld entretienagr Clarke poureffectuerlesproc duresd entretien N utilisez que des pi ces d origine...

Page 66: ...le disjoncteur qui s est d clench Faites r parer la machine par un technicien agr Connectez le flexible Remplacez ou retournez les balais de la raclette Installez correctement le balai de la raclette...

Page 67: ...Lite 10 383A 14 Soft Nylon 11 429B Entra neurs de disque Taille N de pi ce 17 17520C 14 17521C Balais de raclette en option Machine Balai Type Mat riau Longueur N de pi ce 28 Int rieur En option Ur t...

Page 68: ...Page 68 Clarke Operator s Manual FOCUS C28 and C33 NOTES...

Page 69: ...Clarke Operator s Manual FOCUS C28 and C33 69 24V Models C28 and C33 Section II Parts and Service Manual 70951A U S Patent No 6 760 947 No 6 105 192 No 6 493 896 Deluxe Machines Patent Pending...

Page 70: ...al FOCUS C28 and C33 Clarke FOCUS C28 and C33 Solution Tank Assembly Drawing 11 06 1 2 3 5 6 7 8 9 10 11 12 13 14 15 18 17 16 19 20 44 22 23 24 21 25 26 27 21 24 21 28 29 30 31 32 31 30 33 34 35 36 37...

Page 71: ...acket 1 20 59614A Battery Drain Valve 1 21 53571A HoseClamp 4 22 30453A Hose 1 23 822802 Elbow 1 24 30445A SolutionHose 2 25 50358A Connector 1 26 838517 FilterScreen 1 27 830214 HoseAdapter 1 28 5035...

Page 72: ...s Manual FOCUS C28 and C33 Clarke FOCUS C28 and C33 Recovery Tank Assembly Drawing 7 07 Form 10983A 1 2 3 4 5 3 6 7 8 9 10 11 12 13 14 15 16 16A 17 18 11 19 20 21 22 23 9 24 20 25 26 27 28 29 30 31 20...

Page 73: ...Vac Motor order 2 each 11 and 19 1 16A 50996A Brush Carbon 2 17 87026A Washer 1 4Flat 3 18 85728A Screw 1 4 20 x 4 Hex 3 19 43401A Housing Black 2 20 872010 Clamp 3 21 674110 Vac Exhaust Hose 1 22 962...

Page 74: ...C33 Clarke FOCUS C28 and C33 Electrical Panel Assembly Drawing 2 07 Form 10985A 1 4 6 3 7 8 22 11 7 12 13 5 14 5 6 15 16 5 20 17 18 19 31 30 21 20 24 25 5 18 27 28 29 32 9 18 26 33 34 35 36 5 2 37 10...

Page 75: ...54764A Insert 1 4 20 4 21 54763A Insert 8 32 2 22 40780B MainWiringHarness Std 1 23 962980 Screw 6 32 x 1 2 24 41810A Contactor Brush 1 25 41811A Contactor Main 1 26 61682A Cable Upper 1 27 40782A Con...

Page 76: ...perator s Manual FOCUS C28 and C33 Clarke FOCUS C28 and C33 Control Panel Assembly Drawing 10 07 Form 10985A 1 2 3 4 3 5 6 7 7 9 8 10 12 13 15 16 17 18A 18B 33 35 9 36 32 31 30 37 42 43 30 41 38 26 25...

Page 77: ...luded w 18A 1 17 40786K Key included w 18B 1 18A 40883A Switch Key 3 4 O D Chrome Nut 1 18B 40786A Switch Key 7 8 O D Black Nut 1 24 962957 Screw 10 16 x 1 2 4 25 70950A Label Control used w key switc...

Page 78: ...Page 78 Clarke Operator s Manual FOCUS C28 and C33 Clarke FOCUS C28 and C33 Squeegee Swing Arm Assembly Drawing 11 07 35 36 37 38 41 39 40 42 27 43 44 53 45 46 47 48 49 50 51 52 54...

Page 79: ...ight be necessary to loosen screw 52 install and secure blades with clamp 47 then retighten screw 52 This will allow for different thickness Ref Part No Description Qty 28 81217A Nut 20 1 29 920208 Nu...

Page 80: ...rke Operator s Manual FOCUS C28 and C33 Clarke FOCUS C28 and C33 Traverse System Assembly Drawing 3 05 Form 10984A 12 13 31 32 30 13 21 20 15 14 3 19 28 19 9 29 30 11 16 18 8 10 27 26 25 24 23 7 6 7 2...

Page 81: ...Transaxle Imperial 1 see page 87 for parts 15 85730A Screw Hex 4 16 59969A Wheel Assembly 2 59955A Wheel Foam Filled opt 2 18 81221A Lug Nut 50 20 UNF 6 19 980614 Washer Star Lock 25 3 20 61594A Main...

Page 82: ...d C33 Clarke FOCUS C28 and C33 Brush Head Assembly Drawing 5 05 Form 10986A 10987A 1 2 3 4 5 6 7 8 9 10 11 12 14 15 16 17 18 13 19 13 20 21 22 17 24 25 26 27 28 29 30 31 32 33 34 35 36 37 38 39 40 41...

Page 83: ...asher Lock 375 8 All Ref Part No Description Qty Model 30 962495 Screw 25 20x1 00PnHd 6 All 31 838301 BrushHolderSpring 2 All 32 833802 Gimbal Female 2 All 33 962737 Screw 10 16x 88 6 All PadDriverOnl...

Page 84: ...Page 84 Clarke Operator s Manual FOCUS C28 and C33 Clarke FOCUS C28 and C33 Brush Motor 44809B 3 05 13 SeamLocation 7 12 15 4 5 6 1 2 3 14 16 17 12 13 8 9 10 11...

Page 85: ...rush BRD Assembly Leads 6 50520A Commutator Bracket 1 7 56480A Strain Relief 2 8 962546 Brush Board Screw 2 9 50517A Brush Board Assembly w Springs Brushes 1 10 448396 Brush Spring 4 11 40826A Brush A...

Page 86: ...6A Ring Snap 1 2 507641 Seal Oil Small 1 3 52050A CapEnd 1 4 56668A O Ring 1 5 51176A Bearing Large 1 6 58316A Shaft Gear Gearbox 1 7 902605 Bearing Small 1 8 54883A Housing 1 9 58144A Seal Oil Large...

Page 87: ...53375A Axle Bearing 4 4 5 53376A Short Axle 1 1 6 53377A Output Gear 1 1 7 53378A Input Plug 1 1 8 53379A Outer Pinion Bearing 1 1 9 53380A Pinion 1 1 10 53381A Inner Pinion Bearing 1 1 11 52663A Ste...

Page 88: ...Page 88 Clarke Operator s Manual FOCUS C28 and C33 Clarke FOCUS C28 and C33 Control Panel Connection Diagram 5 05 Clarke FOCUS 24V28 and 24V33 Front of Machine Connection Diagram 2 05...

Page 89: ...Clarke Operator s Manual FOCUS C28 and C33 89 Clarke FOCUS C28 and C33 Electrical Plate Connection Diagram 11 06...

Page 90: ...Page 90 Clarke Operator s Manual FOCUS C28 and C33 Clarke FOCUS C28 and C33 Control Housing Connection Diagram 3 05...

Page 91: ...Clarke Operator s Manual FOCUS C28 and C33 91 Clarke FOCUS C28 and C33 Electrical Schematic 11 06...

Page 92: ...NOTES...

Page 93: ...O Nederland B V Postbus 65 3370 AB Hardinxveld Giessendam The Netherlands 31 184 677 200 ALTO Sverige AB Molndal Sweden Aminogatan 18 Box 4029 S 431 04 Molndal 46 31 706 73 00 ALTO Norge A S Oslo Norw...

Page 94: ...the then current list price plus transportation costs Warranty is rendered null and void if battery is not kept filled to the proper level with DISTILLED WATER CLARKE POLYDUR AUTOMATICSCRUBBERSOLUTION...

Reviews: