background image

8

Parts & Service: 020 8988 7400 / E-mail: [email protected] or [email protected]

OPERATION

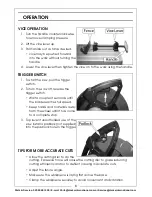
VICE OPERATION

1. Turn the handle counterclockwise 

to remove clamping pressure. 

2. Lift the vice lever up. 

3. Pull handle out as far as desired. 

• vice may be pushed forward 

into the work without turning the 
handle. 

4. Lower the vice lever then tighten the vice on to the work using the handle.

TRIGGER SWITCH 

1. To start the saw, pull the trigger 

switch.

2. To turn the saw off, release the 

trigger switch. 

• Wait a couple of seconds until 

the blade reaches full speed.

• Keep hands and materials away 

from the wheel until it has come 
to a complete stop.

3. To prevent unauthorized use of the 

saw, install a padlock (not supplied) 
into the padlock hole in the trigger.

TIPS FOR MORE ACCURATE CUTS

• Allow the cutting disc to do the 

cutting. Excessive force will cause the cutting disc to glaze reducing 
cutting efficiency and/or to deflect causing inaccurate cuts.

• Adjust the fence angle.

• Make sure the workpiece is laying flat across the base.

• Clamp the workpiece securley to avoid movement and vibration.

Summary of Contents for CCO14C

Page 1: ...OPERATION MAINTENANCE INSTRUCTIONS LS0618 ISS 2 ORIGINAL INSTRUCTIONS ABRASIVE CUT OFF SAW MODEL NO CCO14C PART NO 6470161 ...

Page 2: ...ase keep your receipt which will be required as proof of purchase This guarantee is invalid if the product is found to have been abused or tampered with in any way or not used for the purpose for which it was intended Faulty goods should be returned to their place of purchase no product can be returned to us without prior permission This guarantee does not effect your statutory rights ENVIRONMENTA...

Page 3: ...act with earthed or grounded surfaces such as pipes radiators ranges and refrigerators There is an increased risk of electric shock if your body is earthed or grounded c Do not expose power tools to rain or wet conditions Water entering a power tool will increase the risk of electric shock d Do not abuse the cable Never use the cable for carrying pulling or unplugging the power tool Keep cable awa...

Page 4: ...mes This enables better control of the power tool in unexpected situations f Dress properly Do not wear loose clothing or jewellery Keep your hair clothing and gloves away from moving parts Loose clothes jewellery or long hair can be caught in moving parts g If devices are provided for the connection of dust extraction and collection facilities ensure these are connected and properly used Use of d...

Page 5: ...u are thoroughly familiar with metal cutting saws If there is any doubt whatsoever you should consult a qualified person 2 Do not operate the machine until it is completely assembled and this entire manual has been read and understood 3 Ensure the proper electrical regulations are followed 4 Ensure the abrasive disc is securely mounted in accordance with these instructions before connecting to a p...

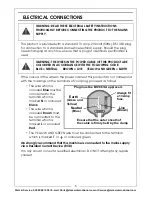
Page 6: ...ich is coloured Brown must be connected to the terminal which is marked L or coloured Red The YELLOW AND GREEN wire must be connected to the terminal which is marked E or or coloured green We strongly recommend that this machine is connected to the mains supply via a Residual Current Device RCD If in any doubt consult a qualified electrician DO NOT attempt any repairs yourself WARNING READ THESE E...

Page 7: ...rm 1 Push down on the handle 1 2 Pull the locking pin out slightly 2 to unlock the motor arm 3 Release the pressure on the handle The motor arm will then raise into position Reverse step 2 when locking the motor arm down for storage MATERIAL CLAMPING AND SUPPORT Angle iron should be clamped and cut with both legs resting against the base of the saw A spacer block slightly narrower than the workpie...

Page 8: ...igger switch 2 To turn the saw off release the trigger switch Wait a couple of seconds until the blade reaches full speed Keep hands and materials away from the wheel until it has come to a complete stop 3 To prevent unauthorized use of the saw install a padlock not supplied into the padlock hole in the trigger TIPS FOR MORE ACCURATE CUTS Allow the cutting disc to do the cutting Excessive force wi...

Page 9: ...ckness of the workpiece and the miter angle Other aids such as spring bar or C clamps will be necessary to secure the workpiece to the fence when making these cuts SQUARING THE FENCE TO THE BLADE 1 Disconnect the power supply 2 Loosen the two fence bolts push the arm down until the cutting disc lowers into the base 3 Place a set square against the cutting disc and adjust the fence to rest against ...

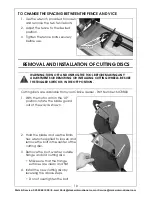
Page 10: ...ke dealer Part Number 6470800 1 With the motor arm in the UP position rotate the blade guard out of the way as shown 2 Hold the blade and use the 8mm hex wrench supplied to loosen and remove the bolt in the center of the cutting disc 3 Remove the bolt washer outside flange and old cutting disc Make sure that the flange surfaces are clean and flat 4 Install the new cutting disc by reversing the abo...

Page 11: ...AUTION WHEN CHANGING TO A NEW CUTTING DISC READJUST THE DEPTH STOP TO THE ORIGINAL POSITION TO PREVENT CUTTING INTO THE SUPPORTING SURFACE WARNING BLOW DIRT AND DUST OUT OF ALL AIR VENTS WITH CLEAN DRY AIR AT LEAST ONCE A WEEK TO MINIMIZE THE RISK OF EYE INJURY ALWAYS WEAR ANSI Z87 1 APPROVED EYE PROTECTION WHEN PERFORMING THIS TASK WARNING NEVER USE SOLVENTS OR OTHER HARSH CHEMICALS FOR CLEANING ...

Page 12: ...f brushes should be renewed 3 Replace the brushes taking care that the tabs on the end of the spring retainer B correctly enter the elongated chamber as you push it in and screw on the cap C SPECIFICATIONS Voltage 230V AC 50Hz Input power 2200W Current Rating 9 5A No load speed 3900 rpm Weight 14 1 kg Dimensions L x W x H 455 head lowered x 403 x 272 mm Max cutting dimensions mm Round 115 dia 90 9...

Page 13: ...13 Parts Service 020 8988 7400 E mail Parts clarkeinternational com or Service clarkeinternational com PARTS DIAGRAM ...

Page 14: ... 68 Hinge Pin 11 Rubber Pad 40 Woodruff Key 4x13 69 Stator Wire Plate 12 Rubber Pad 41 Bearing 70 Bolt Spring Washer 13 Threaded Rod 42 Front Cover 71 Handle Body Right 14 Vice Block 43 Primary Gear 72 Nut M5 15 Roll Pin 44 Circlip 8 73 M Screw M5x32 16 Vice Lever 45 Bearing 74 M Screw M5x42 17 Vice Pad 46 Middle Cover 75 Handle Body Left 18 Fence 47 Self lock Pin Spring 76 M Screw St3 9x16 19 Vic...

Page 15: ...15 Parts Service 020 8988 7400 E mail Parts clarkeinternational com or Service clarkeinternational com DECLARATION OF CONFORMITY ...

Page 16: ......

Reviews: