background image

10

Parts & Service: 020 8988 7400 / E-mail: [email protected] or [email protected]

OPERATION

OPERATING THE AIR DRILL

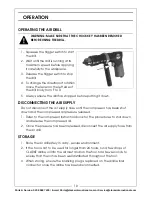
1. Squeeze the trigger switch to start 

the drill.

2. Wait until the drill is running at its 

maximum speed before applying 
it carefully to the workpiece.

3. Release the trigger switch to stop 

the drill.

4. To change the direction of rotation 

move the lever on the left side of 
the drill body from F to R.

5. Always ensure the drill has stopped before putting it down.

DISCONNECTING THE AIR SUPPLY

Do not disconnect the air supply hose until the compressor has been shut 
down and the compressed air pressure released.

1. Refer to the compressor instruction book for the procedures to shut down 

and release the compressed air.

2. Once the pressure has been released, disconnect the air supply hose from 

the air drill.

STORAGE

1. Store the air drill safely in a dry, secure environment.

2. If the tool is not to be used for longer than 24 hours, run a few drops of 

CLARKE airline oil into the air inlet and run the tool for a few seconds to 
ensure that the oil has been well distributed throughout the tool.

3. When storing, ensure the blanking plug is replaced on the airline inlet 

connector once the airline has been disconnected.

WARNING: MAKE SURE THAT THE CHUCK KEY HAS BEEN REMOVED 
BEFORE USING THE DRILL.

Summary of Contents for CAT123

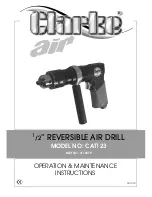
Page 1: ...OPERATION MAINTENANCE INSTRUCTIONS GC1110 1 2 REVERSIBLE AIR DRILL MODEL NO CAT123 PART NO 3110879 ...

Page 2: ...ufacture for a period of 12 months from the date of purchase Please keep your receipt which will be required as proof of purchase This guarantee is invalid if the product is found to have been abused or tampered with in any way or not used for the purpose for which it was intended Faulty goods should be returned to their place of purchase no product can be returned to us without prior permission T...

Page 3: ...he influence of alcohol drugs or medication 2 Always wear eye protection when using the drill Eye protectors must provide protection from flying particles from the front and the side 3 Always wear ear protection when using the drill 4 Do not over reach Keep proper footing and balance at all times 5 Never use any type of bottled gas as a source of power for the drill 6 Do not connect the air supply...

Page 4: ... drill They add weight and could fail due to vibration 17 Do not force or misuse the drill It will do a better and safer job at the rate for which it was designed 18 Do not remove any labels Damaged labels should be replaced 19 This tool vibrates with use Vibration may be harmful to your hands or arms Stop using the tool if discomfort a tingling feeling or pain occurs Seek medical advice before re...

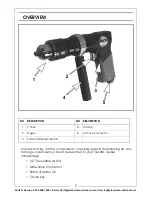
Page 5: ...and lay out the components checking against the following list Any damage or deficiency should be reported to your CLARKE dealer immediately 1 2 Reversible Air Drill Male Snap Connector Bottle of Airline Oil Chuck Key NO DESCRIPTION NO DESCRIPTION 1 Chuck 4 Handle 2 Trigger 5 Air hose connector 3 Forward Reverse Switch ...

Page 6: ...ndle Clamping Ring Operators Manual this document ACCESSORIES A wide range of accessories are available including Filter Regulators Airline Lubricators High Pressure Hoses 5 to 50 Metres adaptors and connectors etc Contact your CLARKE dealer for further information or CLARKE International Sales Department on 01992 565 333 ...

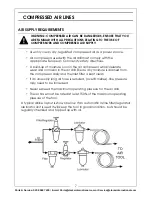
Page 7: ... from the compressor daily and the inlet filter is kept clean If an unusually long air hose is required over 8 metres line pressure may need to be increased Never exceed the maximum operating pressure for the air drill The air hose must be rated at least 150 of the maximum operating pressure of the tool A typical airline layout is shown below If an automatic in line filter regulator lubricator uni...

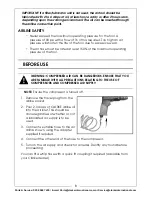
Page 8: ...ted at least 150 of the maximum operating pressure of the tool BEFORE USE NOTE Ensure the compressor is turned off 1 Remove the travel plug from the airline socket 2 Pour 2 3 drops of CLARKE airline oil into the air inlet This should be done regardless of whether or not a lubricated air supply is to be used 3 Connect a suitable hose to the air drill as shown using the adapter supplied if required ...

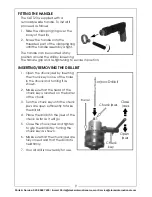
Page 9: ...secure in position INSERTING REMOVING THE DRILL BIT 1 Open the chuck jaws by inserting the chuck key in one of the holes in the chuck and turning it as shown 2 Make sure that the head of the chuck key is located on the barrel of the chuck 3 Turn the chuck key until the chuck jaws are open sufficiently to take the drill bit 4 Place the drill bit in the jaws of the chuck as far as it will go 5 Close...

Page 10: ...se until the compressor has been shut down and the compressed air pressure released 1 Refer to the compressor instruction book for the procedures to shut down and release the compressed air 2 Once the pressure has been released disconnect the air supply hose from the air drill STORAGE 1 Store the air drill safely in a dry secure environment 2 If the tool is not to be used for longer than 24 hours ...

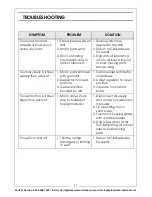
Page 11: ...lowly Air flows weakly from exhaust 1 Motor parts jammed with gum dirt 2 Regulator in closed position 3 General airflow blocked by dirt 1 Examine inlet air filter for cleanliness 2 Adjust regulator to open position 3 Operate tool in short bursts Tool will not run Air flows freely from exhaust 1 Motor vanes stuck due to buildup of foreign material 1 Disconnect air supply and rotate tool assembly ma...

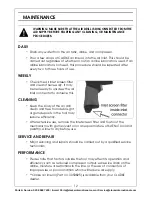
Page 12: ...om debris grit or gum deposits in the tool may reduce efficiency After extensive use remove the inlet screen filter and flush out the mechanism with gum solvent oil or an equal mixture of SAE No10 oil and paraffin Allow to dry before use SERVICE AND REPAIR Major servicing and repairs should be carried out by a qualified service technician PERFORMANCE Please note that factors outside the tool may e...

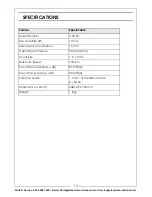
Page 13: ...ion Model Number CAT123 Min Hose Size ID 10 mm Average Air Consumption 16 cfm Operating Air Pressure 90 psi 6 2 bar Chuck Size 1 5 13 mm Maximum Speed 700 rpm Sound Pressure Level LpA dB 81 9 dB A Sound Power Level LwA dB 92 9 dB A Vibration Levels 1 2 m s2 at the Main Handle K 34 44 Dimensions L x W x H 208 x 49 x 150 mm Weight 1 8 kg ...

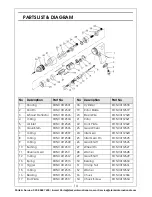
Page 14: ...ont Plate RONCAT12322 6 Valve Stem RONCAT12306 23 Gear Wheel RONCAT12323 7 O Ring RONCAT12307 24 Idle Gear RONCAT12324 8 O Ring RONCAT12308 25 Idler Gear Pin RONCAT12325 9 O Ring RONCAT12309 26 Gear Shaft RONCAT12326 10 Bushing RONCAT12310 27 Wheel Pin RONCAT12327 11 Reverse Gear RONCAT12311 28 Washer RONCAT12328 12 O Ring RONCAT12312 29 Gear Shaft RONCAT12329 13 Spring RONCAT12313 30 Bearing RONC...

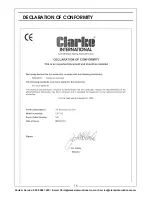
Page 15: ...15 Parts Service 020 8988 7400 E mail Parts clarkeinternational com or Service clarkeinternational com DECLARATION OF CONFORMITY ...

Page 16: ......

Reviews: