background image

15

Parts & Service: 020 8988 7400 / E-mail: [email protected] or [email protected]

You can use the slip roll to create a 
bend with the correct radius so that 
the two ends meet, forming a 150 
mm diameter cylinder (Figure 20).

NOTE: 

Performing multiple passes 

through the machine with 
gradual reductions in the 
curve radius produces better 
results than trying to make 
the curve in one or two 
passes.

TO CREATE A CYLINDER:

1. Use the diameter adjustment knobs to fully lower the rear roller below the 

level of the bottom roller, then rotate the thickness adjustment leaf bolts 
counterclockwise until the upper roller can be lifted with enough 
clearance for the workpiece.

2. Insert the workpiece between the 

upper and lower rollers and just 
over the rear roller, as illustrated in 
Figure 21, then snug the thickness 
adjustment leaf bolts down to 
secure the workpiece. Make sure 
you tighten the leaf bolts the 
same amount.

3. Turn the hand crank clockwise to 

feed the workpiece through the 
machine until it is approximately 
half way through the upper and lower rollers.

4. Turn the diameter adjustment 

knobs clockwise knobs to lift the 
rear roller until the desired radius 
bend is reached, as illustrated in 
Figure 22. Make sure to turn the 
knobs equal amounts so the rear 
roller is always parallel with the 
other rollers. Failure to do so will 
create a larger radius on one end 
than the other, resulting in a cone 
shape.

NOTE: 

Always err on the side of making the radius too large rather than too 

small. It is easy to decrease the radius but very difficult to increase the 
radius later.

Fig. 20

Fig. 21

Fig. 22

Summary of Contents for 6560000

Page 1: ...OPERATION MAINTENANCE INSTRUCTIONS LS0620 ISS 3 3 IN1 SHEET METAL MACHINE MODEL NO SBR305 PART NO 6560000 ...

Page 2: ...vice GUARANTEE This product is guaranteed against faulty manufacture for a period of 12 months from the date of purchase Please keep your receipt which will be required as proof of purchase This guarantee is invalid if the product is found to have been abused or tampered with in any way or not used for the purpose for which it was intended Faulty goods should be returned to their place of purchase...

Page 3: ...S AWAY from the work area 8 MAKE WORKSHOP CHILDPROOF Use padlocks master switches and remove start switch keys 9 DO NOT USE IN DANGEROUS ENVIRONMENTS DO NOT use machinery in damp wet locations or where any flammable or noxious fumes may exist 10 KEEP WORK AREA CLEAN AND WELL LIGHTED Clutter and dark shadows may cause accidents 11 MAINTAIN MACHINERY WITH CARE Keep blades sharp and clean for best an...

Page 4: ...loves eye protection and leather boots with extra toe protection when using this machine 6 BODY POSITION To avoid injury due to slipping or falling ALWAYS maintain secure footing and a comfortable body position when using this machine 7 GOOD WORKING CONDITION To reduce the risk of personal injury ALWAYS inspect the working parts of this machine for cracks burrs loose fasteners or any other damage ...

Page 5: ...ED BY LACK OF FAMILIARITY OR FAILURE TO PAY ATTENTION USE THIS MACHINE WITH RESPECT AND CAUTION TO DECREASE THE RISK OF OPERATOR INJURY IF NORMAL SAFETY PRECAUTIONS ARE OVERLOOKED OR IGNORED SERIOUS PERSONAL INJURY MAY OCCUR CAUTION NO LIST OF SAFETY GUIDELINES CAN BE COMPLETE EVERY WORKSHOP ENVIRONMENT IS DIFFERENT ALWAYS CONSIDER SAFETY FIRST AS IT APPLIES TO YOUR INDIVIDUAL WORKING CONDITIONS U...

Page 6: ...6 Parts Service 020 8988 7400 E mail Parts clarkeinternational com or Service clarkeinternational com PARTS IDENTIFICATION Fig 1 ...

Page 7: ...e parts must be removed For optimum performance clean all moving parts or sliding contact surfaces Avoid chlorine based solvents such as acetone or brake parts cleaner that may damage painted surfaces Always follow the manufacturer s instructions when using cleaning products A Sheet Metal Machine 1 B Shear Brake Rear Work Stop 1 C Hand Crank 1 D Crank Handle Lock Knobs 2 E Hex Wrenches 5 6mm 1 Eac...

Page 8: ...inimum working clearances MOUNTING The base of this machine has holes that allow it to be mounted to a workbench For a safe and smooth operation of this machine it MUST be securely mounted to an appropriate workbench or stand The strongest mounting option is a Through Mount Figure 5 where holes are drilled all the way through the workbench and hex bolts washers and hex nuts are used to secure the ...

Page 9: ...install the cap screw removed in Step 1 then thread and tighten a lock knob into the center hole of the end cap to secure the hand crank in place Tip When needed extend one end of the hand crank from the hub for greater leverage 3 Thread the rods into either the upper or lower mounting holes as shown in Figure 8 Only hand tighten the rods NOTE Install the rods in the upper mounting holes to use th...

Page 10: ...f the shearing blades is covered in the Shearing Blade Gap Adjustment on page 26 3 Make sure the finger receiver and upper shear blade move up and down smoothly retighten the hex bolts just until they are snug then back them off approximately turn 4 Use the hand crank to position the brake finger receiver close to the brake fingers as shown in Figure 12 5 Loosen the gib cap screws to release the f...

Page 11: ... on the wood Make sure the tops of the fingers are between the gib and the casting NOTE Install the widest finger to the right then repeat with each smaller finger 8 Make sure the fingers are slightly loose between the gib and the casting then use the hand crank to raise the receiver to fully seat the fingers up against the casting behind the gib as shown in Figure 14 9 Re tighten all of the gib c...

Page 12: ...an exact radius is a trial and error process Performing multiple passes through the machine with gradual reductions in the curve radius produces better results than trying to make the curve in one pass To avoid pitted workpieces and damage to the roller surfaces always make sure the workpiece and the rollers are free of grit and any foreign material before every use Unless the operation requires a...

Page 13: ...te the thickness adjustment leaf bolts counterclockwise until the upper roller can be lifted with enough clearance for the workpiece NOTE Performing multiple passes through the machine with gradual reductions in the curve radius produces better results than trying to make the curve in one or two passes 2 Insert the workpiece between the upper and lower rollers and just over the rear roller as illu...

Page 14: ...ne tighten one adjustment knob more than the other 5 Repeat Step 4 until you have produced the desired curve CREATING CYLINDERS If you know the diameter of the cylinder you want to create use the formula below to calculate the length of material needed C πD C Circumference Length of Material Needed π Pi Approximately 3 142 D Diameter Example Suppose you want to create a 150 mm diameter cylinder Yo...

Page 15: ...ece between the upper and lower rollers and just over the rear roller as illustrated in Figure 21 then snug the thickness adjustment leaf bolts down to secure the workpiece Make sure you tighten the leaf bolts the same amount 3 Turn the hand crank clockwise to feed the workpiece through the machine until it is approximately half way through the upper and lower rollers 4 Turn the diameter adjustmen...

Page 16: ...eps 4 7 until you have produced the desired cylinder see the illustration in Figure 25 If the ends of the cylinder do not meet lift the rear roller equally at both ends then process the entire cylinder through the slip roller again Repeat as necessary If the ends of the cylinder overlap remove the cylinder as described in Removing the workpiece from the rollers on page 17 Then either attempt to in...

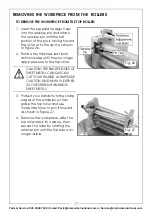
Page 17: ...Figure 26 2 Rotate the thickness leaf bolts anticlockwise until they no longer apply pressure to the top roller 3 Protect your hands from the sharp edges of the workpiece then grasp the top roller and use moderate force to pull it forward as shown in Figure 27 4 Remove the workpiece slide the top roller back into place then secure the roller by rotating the retainer pin until the flat side is no l...

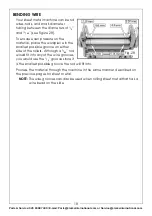
Page 18: ...re on the material place the workpiece in the smallest possible groove on either side of the rollers Although a 7 64 rod would fit into any of the wire grooves you would use the 1 8 groove since it is the smallest possible groove the rod will fit into Process the material through the machine in the same manner described on the previous pages for sheet metal NOTE The wire grooves can also be used w...

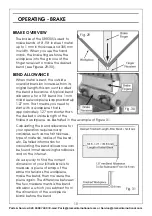
Page 19: ...e is approximately 1 27 mm That means you need to start with a workpiece that is approximately 1 27 mm shorter than the desired outside length of the finished workpiece as illustrated in the example of Figure 31 Calculating the bend allowance for your operation requires many variables such as metal thickness type of material radius of the bend etc Detailed information for calculating the bend allo...

Page 20: ...place 2 Use the hand crank to lower the finger receiver until you can position the workpiece underneath the fingers with the bend line aligned with the tips as shown in Figure 32 NOTE When performing the same bending operation on multiple parts use the rear work stop to save time positioning the workpieces 3 While holding the workpiece steady use the hand crank to raise the finger receiver to perf...

Page 21: ...ation loosen the cap screws on the brake finger gib and configure the fingers for your operation Remove the fingers you do not need OPERATING SHEARING SHEARING OVERVIEW The SBR305 has a set of reversible blades that shear mild steel up to 1 mm in thickness and 305 mm in width When you use the hand crank to perform a shear the upper movable blade is lowered past the fixed table blade creating a she...

Page 22: ... the shearing blades to accommodate your workpiece refer to the Shearing Blade Gap Adjustment on page 26 for detailed instructions NOTE If you are using the rear work stop adjust the stop so that at least one square edge of the workpiece is against it 4 Use the hold down adjustment bolts to adjust the holddown bar so that it firmly holds the workpiece in place without marking or denting it 5 Keepi...

Page 23: ...ng bolts Check replace damaged rollers Check replace cracked or damaged brake fingers or receiver Sharpen replace dull or nicked shearing blades Any other unsafe condition MONTHLY MAINTENANCE Lubricate the gears and hand crank bushings SEMI ANNUAL MAINTENANCE Lubricate the roller bushings CLEANING PROTECTING Cleaning the SBR305 is relatively easy Use a cloth and degreasing spirits to wipe down the...

Page 24: ...hand crank hub see Figure 39 then use a grease gun to add a small amount of multi purpose grease to the hand crank bushings ROLLER BUSHINGS Remove the top roller from the machine then remove the bushings from the ends of the roller see Figure 40 Use a cloth and degreasing spirits to clean the bushings and the ends of the roller then apply a thin coat of multi purpose grease to the roller ends and ...

Page 25: ...lable through the Clarke spares department TO REVERSE OR REPLACE THE SHEARING BLADES 1 Remove the hex bolts and springs that secure the shear holddown bar see Figure 42 2 Remove the four cap screws that secure the blade then carefully remove it from the machine see Figure 43 Tip When removing or installing the upper shear blade remove the cap screw at one end then insert a small hex wrench or simi...

Page 26: ...While keeping your fingers clear of the shear blades shear a piece of scrap material that is the same as your workpiece along the full length of the blade as shown in Figure 44 then inspect the cut If the machine correctly cuts to your satisfaction along the entire length of the blades no adjustments are necessary If the cut is clean at one end and not the other perform the following ADJUSTING THE...

Page 27: ...USTING THE BLADE BOW The adjustment bolt of the blade bow is used to remove any slight bow in the cast iron cross beam that the brake finger receiver and upper shear blade are attached to see Figure 46 TO ADJUST THE BLADE GAP WITH THE BLADE BOW 1 Hold the adjustment bolt still then turn the jam nut to adjust the center of the cross beam in or out see Figure 46 If the shear test cut was clean on th...

Page 28: ...igure 47 4 Lower the brake fingers until one just rests on the metal bar as shown in Figure 47 5 Starting at one end visually check the gap between the brake fingers and the metal bar 6 If you find a gap at one end of the brake loosen the cap screw shown in Figure 47 on that end then turn the adjustment bolt counterclockwise until the gap disappears 7 Re tighten the cap screw remove the metal bar ...

Page 29: ...n the workpiece and rollers Polish out any nicks burrs in the rollers or replace them PROBLEM CAUSE SOLUTION Heavy resistance during bending Machine capacities are exceeded Operate within the listed capacities of the machine Bend radius is not consistent across workpiece Machine capacities are exceeded Operate within the listed capacities of the machine Fingers and receiver not aligned Properly al...

Page 30: ...ough gap between blades Increase blade gap Cuts are not square Uneven contact with guide or work stop Maintain proper contact with guide and work stop Blade gap unequal across length Properly adjust blade gap for material Too much bow in blade Properly adjust blade bow Inadequate holddown pressure Properly adjust holddown pressure Poor quality of cuts with ripping or tearing Dull blades Reverse sh...

Page 31: ...31 Parts Service 020 8988 7400 E mail Parts clarkeinternational com or Service clarkeinternational com EXPLODED DIAGRAM PARTS LIST ...

Page 32: ...5 26 Handle TGSBR30526 27 Thumb Screw TGSBR30527 28 Roller Bushing TGSBR30528 29 Eccentric Bushing TGSBR30529 30 Gear TGSBR30530 31 Driving Roller TGSBR30531 32 Driven Roller TGSBR30532 33 Protecting Cover TGSBR30533 34 Pin M6x10 TGSBR30534 35 Eccentric Shaft TGSBR30535 36 Key TGSBR30536 37 Jacket TGSBR30537 38 Flat Key 6x 20mm TGSBR30538 39 Hex Head Bolts M6 X 16mm TGSBR30539 40 Hex Socket Cap Sc...

Page 33: ...er 6560000 Weight 43 kg Width Depth Height 550 x 390 x 390 mm Capacities Maximum Workpiece Width 305 mm Maximum Workpiece Thickness 1 mm Pan Box Brake Minimum Reverse Bend 9 mm Pan Box Brake Maximum Side Height 90 42 mm Slip Roll Minimum Cylinder Diameter 39 mm Slip Roll Wire Sizes L to R 2 29mm 3 66mm 6 1mm 5 16mm 4 4mm 3 05mm ...

Page 34: ...34 Parts Service 020 8988 7400 E mail Parts clarkeinternational com or Service clarkeinternational com DECLARATION OF CONFORMITY ...

Page 35: ...35 Parts Service 020 8988 7400 E mail Parts clarkeinternational com or Service clarkeinternational com NOTES ...

Page 36: ......

Reviews: