background image

7

Parts & Service: 020 8988 7400 / E-mail: [email protected] or [email protected]

4. Turn on the air supply and check for air leaks. Rectify any found before 

proceeding.

• PTFE tape may be useful for sealing threaded connections.

5. If required, connect an in-line mini oiler to the tool.

• A mini oiler helps to prolong the life of the air tool.

6. If a mini-oiler is not being used, run a few drops of oil through the tool 

before use. It can be entered through the airline connector or via the hose 
at the nearest connection to the air supply.

7. Ensure the trigger is NOT depressed when connecting the air line.

USING THE NEEDLE SCALER

1. Hold the tool with both hands and bring towards the work at an angle of 

approx. 60-70

o

. With the airline pressure set to 90 psi (621bar), squeeze the 

trigger and allow the needles to come into contact with the work.

2. Moving slowly across the work surface, proceed to remove scale, rust or 

other contaminants taking care not to damage the surface. Regulate the 
air supply pressure and locking groove setting to adjust the performance of 
the tool.

3. Release the trigger to stop operation, noting that the tool may run briefly 

after the trigger is released.

DISCONNECTING THE AIR SUPPLY

1. Do not disconnect the compressed air supply hose until the air supply has 

been shut down or isolated at the shut off valve and the compressed air 
expelled by running the tool until it stops.

2. Refer to the compressor instruction manual for the procedure to shut down 

and release the compressed air.

3. Once the pressure has been released, disconnect the air supply hose from 

the needle scaler.

Summary of Contents for 3120187

Page 1: ...OPERATING MAINTENANCE INSTRUCTIONS ORIGINAL INSTRUCTIONS GC0417 NEEDLE SCALER MODEL NO CAT170 PART NO 3120187 ...

Page 2: ...eriod of 12 months from the date of purchase Please keep your receipt which will be required as proof of purchase This guarantee is invalid if the product is found to have been abused or tampered with in any way or not used for the purpose for which it was intended Faulty goods should be returned to their place of purchase no product can be returned to us without prior permission This guarantee do...

Page 3: ...verreach Keep proper footing and balance at all times USE OF POWER TOOLS 1 Never use oxygen carbon dioxide combustible gasses or any type of bottled gas as a source of power for this tool 2 Do not connect the air supply hose with your finger on the trigger 3 Do not exceed the maximum pressure for the tool of 90 psi 6 2 bar 4 Keep the air supply hose away from heat oil and sharp edges 5 Do not fit ...

Page 4: ...d safer job at the rate for which it was designed 16 Do not remove any labels Damaged labels should be replaced 17 This tool vibrates with use Vibration may be harmful to your hands or arms Stop using the tool if discomfort a tingling feeling or pain occurs Seek medical advice before resuming use 18 Always use both hands to control the tool 19 Always ensure the tool has stopped before putting it d...

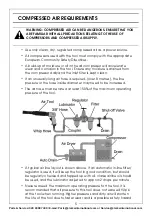
Page 5: ... to be increased The air hose must be rated at least 150 of the maximum operating pressure of the tool A typical air line layout is shown above If an automatic in line filter regulator is used it will keep the tool in good condition but should be regularly checked and topped up with oil clarke airline oil should be used and the lubricator adjusted to approx 2 drops per minute Never exceed the maxi...

Page 6: ...t position achieved by turning the body and the retaining lug anticlockwise creates the greatest needle force the second position achieved by pushing harder against spring pressure and turning the body clockwise creates a slightly lesser force and the third position achieved in a similar manner creates even less 3 Select a position depending upon your work requirements dictated by the finish requi...

Page 7: ... an angle of approx 60 70o With the airline pressure set to 90 psi 621bar squeeze the trigger and allow the needles to come into contact with the work 2 Moving slowly across the work surface proceed to remove scale rust or other contaminants taking care not to damage the surface Regulate the air supply pressure and locking groove setting to adjust the performance of the tool 3 Release the trigger ...

Page 8: ...his condition can be corrected by cleaning the air inlet strainer and flushing out the tool with gum solvent oil or an equal mixture of SAE No10 oil and paraffin 3 Failing this the tool should be disassembled thoroughly cleaned dried and reassembled You may prefer to take the tool to your CLARKE dealer if internal maintenance is required 4 If the sander becomes sluggish and the air supply is of go...

Page 9: ...dealer for repair 2 Drip air tool lubricating oil into air inlet Allow oil to soak moving parts before using Tool runs slowly Air flows weakly from exhaust 1 Moving parts jammed with gum dirt 2 Air line regulator in closed position 3 General airflow blocked by dirt 1 Examine inlet air filter for blockage Drip a few drops of air tool lubricat ing oil into air inlet 2 Adjust in line regulator to ope...

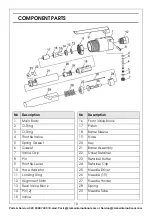
Page 10: ... Block 2 O Ring 17 Piston 3 O Ring 18 Barrel Sleeve 4 Throttle Valve 19 Nose 5 Spring Gasket 20 Key 6 Gasket 21 Barrel Assembly 7 Valve Cap 22 Driver Retainer 8 Pin 23 Retainer Buffer 9 Throttle Lever 24 Retainer Clip 10 Hose Adaptor 25 Needle Driver 11 Locking Ring 26 Needle 19 12 Alignment Shim 27 Needle Holder 13 Rear Valve Block 28 Spring 14 Pin 2 29 Needle Tube 15 Valve ...

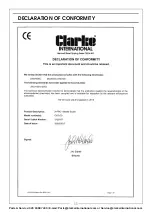
Page 11: ...11 Parts Service 020 8988 7400 E mail Parts clarkeinternational com or Service clarkeinternational com DECLARATION OF CONFORMITY ...

Page 12: ......

Reviews: