background image

40

VX406AU

English

English

Owner’

s Manual

English

Owner’

s Manual

15. TUNER OPERATIONS

Listening to the Tuner

1.  Touch the 

[Tuner]

 button on the main menu display. 

The tuner mode screen is displayed.

2.  Touch the [FM1/FM2/FM3/AM] button to select the 

radio band. Each time the button is touched, the 
radio reception band changes in the following order: 
FM1->FM2->FM3->AM->FM1...

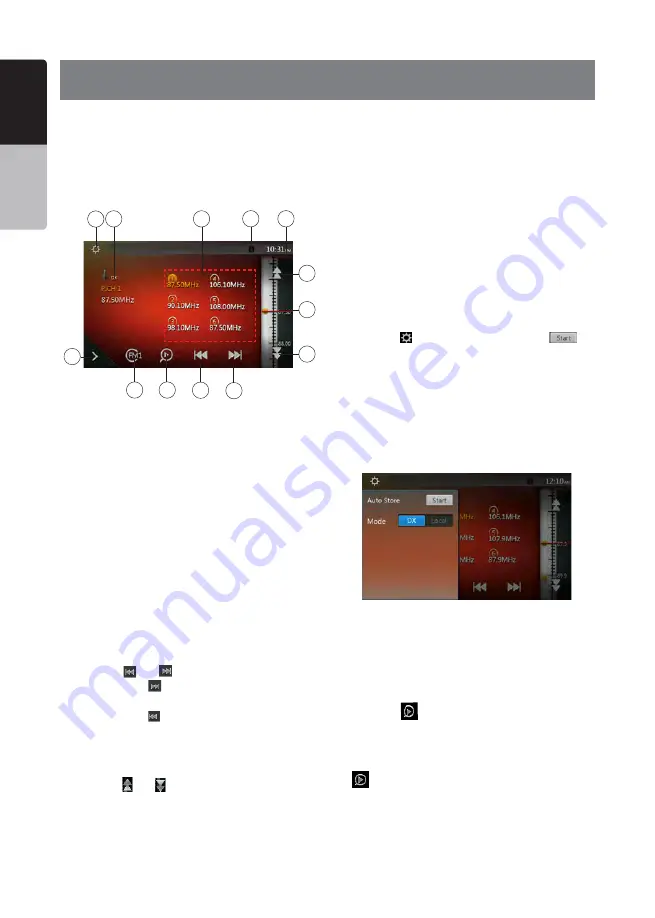
  1 - Preset Scan button
  2 - Seek down button
  3 - Seek up button
  4 - Step down button
  5 - Step up button
  6 - Frequencies display
  7 - System time
  8 - Bluetooth status indicator
  9 - Preset channel list
10 - DX/Local indicator
11 - Band button
12 - Shortcut button
13 - Option button

Seek Tuning

1. Touch the [FM1/2/3/AM] button to select the radio 

band (FM or AM).

2. Touch the 

[ ]

 or 

[

]

 button 

• When touch the 

[

]

 button, the station is searched

   in the direction of higher frequency.
• When touch the 

[ ]

 button, the station is searched 

in the direction of lower frequency.

Step Tuning

1. Touch the [FM1/2/3/AM] button to select the radio 

band (FM or AM).

2. Touch the 

[ ]

 or 

[ ]

 button in frequency menu to 

tune up or down by one step.

Recalling a preset station

1. Touch the 

[FM1/2/3/AM]

 button to select the desire 

band (FM or AM) on the tuner.

2. Press the preset station (1 to 6) on Preset list.

Manual memory

1. Touch the desired band button to select the band 

you wish to store.

2. Tune to a station you want to store using the seek 

tuning, step tuning, or preset tuning.

3. Touch and hold the desired Preset button you want 

to store for about 2 seconds.

Auto Store

The Auto Store is a function for storing up to 6 stations 
that are automatically searched sequentially. If the 
number of receivable stations cannot reach to 6, the 
previous stored station remains.
1. Touch the 

[FM1/2/3/AM]

 button to select the 

desired band. (FM or AM)

2. Touch the 

[ ]

 button, and then touch the 

[

]


button to start the Auto Store.

A beep sounds and the stations with good reception 
are stored automatically to the preset list.

Notes:

1. After auto store, the previous stored stations will be 

overwritten.

2. The unit has 4 bands, but FM3 and AM can store by 

Auto Store function.

Preset Scan

The Preset Scan receives the stations stored in the 
preset memory in order. This function is useful when 
searching for the desired station in memory.
1. Touch the [FM1/2/3/AM] button to select the desired 

band. (FM or AM)

2. Touch the 

[

]

 button to start the Preset Scan.

The unit starts scanning each station for 10 seconds 
sequentially. But the station stored is not a valid 
station; the scanning time is only 2 seconds.
3. When the desired station is tuned in, touch the 


[

]

 button again to stay in that station.

DX/Local Setting

The DX/Local setting changes the tuner sensitivity in 
order to separate closely spaced stations. This feature 
is useful in areas that have many radio stations in 
close proximity.

11

12

7

8

9

10

2

3

4

6

5

1

13

Summary of Contents for vx406au

Page 1: ...DVD MULTIMEDIA STATION WITH 6 0 TOUCH PANEL CONTROL VX406AU Owner s manual ...

Page 2: ... Player Mode Screen 20 Operate the CD Player Menu 20 Listening to Compressed Audio 21 Tag Display Function 21 Playback MP3 WMA AAC menu 22 9 USB SD AUDIO OPERATIONS 23 Notes on Using USB SD Memories 23 Select USB SD Audio Mode 23 Playing Audio Files in USB SD Memory 24 10 USB SD VIDEO OPERATIONS 25 Notes on Using USB SD Memories 25 Select USB SD Video Mode 25 Playing Video Files in USB SD Memory 2...

Page 3: ...erations 37 Using Siri Eyes Free Function 39 15 TUNER OPERATIONS 40 16 HDMI MODE 41 Wire Connection of HDMI Mode 41 Select HDMI Source 42 Select DISP Source 42 Operate Waze from VX406AU Android phone only 42 17 AUX 43 18 CAMERA INPUT OPERATIONS 43 19 REAR SOURCE OPERATIONS 44 DVD Video in Rear 44 DVD Video Rear Source Control Info Mode 44 DVD Video Rear Source Control Direct Mode 44 iPod Video Rea...

Page 4: ...ee Lossless Audio Codec Compatible with ID3 TAG Display Built in Bluetooth Handsfree HFP and Audio Streaming A2DP AVRCP Front Panel Auxiliary Input and 6ch RCA Output with Subwoofer Control iPod Expanding Visual Features Rear Monitor Rear Vision Camera Expanding Audio Features External Power Amplifier iPhone USB Memory Bluetooth Telephone iPhone Smartphone via HDMI ...

Page 5: ...e emergency services The database does not contain a complete listing of emergency services such as police stations fire halls hospitals and walk in clinics Please show discretion and ask for directions in such instances As the driver you alone are responsible for your driving safety In order to avoid a traffic accident do not operate the system while driving In order to avoid a traffic accident o...

Page 6: ... optical parts of the player do not use the player for about one hour The condensation will disappear naturally allowing normal operation 2 Driving on extremely bumpy roads which cause severe vibration may cause the sound to skip 3 This unit uses a precision mechanism Even in the event that trouble arises never open the case disassemble the unit or lubricate the rotating parts VX406AU CES 8 1 1 技术...

Page 7: ...some neutral detergent diluted in water to a soft cloth wipe off the dirt gently then wipe again with a dry cloth Do not use benzene thinner car cleaner etc as these substances may damage the cabinet or cause the paint to peel Also leaving rubber or plastic products in contact with the cabinet for long periods of time may cause stains Cleaning the liquid crystal panel The liquid crystal panel tend...

Page 8: ...from its storage case press down on the center of the case and lift the disc out holding it carefully by the edges Do not use commercially available disc protection sheets or discs equipped with stabilizers etc These may damage the disc or cause breakdown of the internal mechanism Storage Do not expose discs to direct sunlight or any heat source Do not expose discs to excess humidity or dust Do no...

Page 9: ...to meet Apple performance standards Apple is not responsible for the operation of this device or its compliance with safety and regulatory standards Please note that the use of this accessory with iPod or iPhone may affect wireless performance iPhone iPod and Siri are trademarks of Apple Inc registered in the U S and other countries Lightning is a trademark of Apple Inc AndroidTM is the trademark ...

Page 10: ...tton to display main menu press again to return current source Press and hold this button for 2 seconds to turn off the monitor Press any place of the screen to turn on the monitor again RESET Button Press this button to hardware reset the unit Note When the RESET button is pressed frequencies of radio stations titles etc stored in memory are cleared microSD slot Note The microSD card is for music...

Page 11: ...se ensure the tray is inserted in the correct direction Keep the battery out of the reach of children Should the battery be swallowed consult a doctor immediately Batteries battery pack or batteries installed must not be exposed to excessive heat such as sunshine fire or the like Signal transmitter Operating range 30 in all directions 0 9 SRCH BACK TITLE ZOOM MUTE AUDIO POWER SRC VOLUME SET PIC TA...

Page 12: ...tton Press this button to enter the MAIN MENU or return current resource PIC Button Press and hold this button to change your monitor Dimmer ENT Button Press to fix the entered data in the Key Pad screen or enter the item the cursor is on TAG Button No function TITLE Button Press to go to the title menu on the DVD ROOT Button Press to go to the root menu on the DVD RPT Button Press to perform chap...

Page 13: ... in CD USB Video USB Audio mode Buttons Press to manually select the next lower or higher station in Tuner modes Press to perform fast backward or fast forward searching Press again to change the speed to 2x 4x 8x or 16x ZOOM Button Press to turn on and zoom in while playing DVD You can zoom in up to 3x No all DVD disc supports this function AUDIO Button Press to switch the AUDIO channel of the di...

Page 14: ...deo Touch the button to display the Disc Video mode 12 Camera Touch the button to display the Camera mode 13 AUX1 Touch the button to display the AUX1 mode 14 AUX2 Touch the button to display the AUX2 mode 15 Setting button Touch the button to display the Setting menu 16 Monitor off Touch the button to turn off the monitor 17 Day Night Touch the button to change the dimmer 18 Audio off Touch the b...

Page 15: ... R unit and CD RW unit Cause disc characteristics cracks dust dirt dust dirt on player s lens etc If a CD R or CD RW disc that has not been finalized is played it will take a long time to start playing Also it may not be possible to play depending on its recording conditions You cannot play SuperAudio CD The CD player is not supported even if it is a hybrid disc About MP3 WMA AAC playback This uni...

Page 16: ... parental level Kid Safe Kid Safe G General Audiences PG Parental Guidance Suggested PG 13 Parents Strongly Cautioned PG R Parental Guidance Restricted R Restricted NC 17 No One 17 And Under Admitted Adult Only Adult The contents that the parental level restricts vary with the country code Note The rating can be selected only under the password unlocked status and the limits can be set only under ...

Page 17: ...k Chapters are skipped down or up from current locations as many times as the button is touched and playback starts Skip use seek bar Touch the triangle on seek bar and drag it to any position where you want to start playback Fast Forward Fast Backward 1 Touch or button and hold 2 seconds to start fast backward or fast forward during playback The playback speed starts at 2x then will increase to 4...

Page 18: ...ecorded For details see the mark of the disc Indicates that 8 audios have been recorded When the power is turned on and when the disc is changed to a new one the language set as the factory default is selected If that language has not been recorded on disc the language is specified on the disc Depending on the disc switching may be completely impossible or impossible on some scenes Switching Subti...

Page 19: ...eration plays back video files recorded on the disc repeatedly The repeat set as the factory default is Repeat all 1 Showing the video files player menu touch button 2 Touch button once for Repeat Track again for Repeat Folder 3 Touch button again for Repeat All Switching Audio Some video files will have two or more audio channels you can switch among the audio channels during playback 1 Touch but...

Page 20: ...er s Manual mp4 files format MPEG4 Visual Simple L1 Picture size 720 x 405 Audio format AAC Audio sampling frequency 32 44 1 48 KHz mpg files format MPEG2 Picture size 720 x 480 Audio format MP3 Audio sampling frequency 32 44 1 48 KHz ...

Page 21: ...file Touching button starts playback from the beginning of the next track Touching button starts playback from the beginning of the current track When this button is touched again within 5 seconds playback starts from the beginning of previous track Fast Forward Fast Backward 1 Touch or button and hold more than 2 seconds to start fast backward or fast forward during playback The playback speed st...

Page 22: ... mp3 to an MP3 file and WMA or wma to a WMA and m4a to a AAC file by using single byte letters If you add a file extension other than specified or forget to add these file extension the file cannot be played In addition if you use upper case and lower case letters capital and small letters mixed for file extensions normal play may not be possible 2 Files other than MP3 WMA AAC data cannot be playe...

Page 23: ... Repeat Folder Repeat All and Repeat Track Repeat Folder and Repeat All 2 Current Folder Showing title of current folder The number on the folder symbol is the number of files and folders number in current folder Touch the title of current folder playlist will show files and folders in upper folder Other operations about playing MP3 WMA AAC are almost same as CD Player mode Stop Playback 1 Touch b...

Page 24: ...44 1 96KHz file extension flac Notes on the folder structure The folder hierarchy must be within 8 hierarchical levels Otherwise playback may be impossible The maximum allowable number of folders is 65535 including root directory and folders with no MP3 files WMA AAC FLAC file The maximum allowable number of files in a folder is 65535 You can store the MP3 WMA AAC FLAC files together in a folder T...

Page 25: ...n to search with alphabet in current list Album Art work If MP3 audio file contains album art image in ID3 the picture will be displayed in this area ID3 Information Area This area display ID3 information of playing file Skip Using Seek Bar Touch on seek bar and drag it to any position where you want to start playback Select a Folder on Display List Touch the folder title on the display list the d...

Page 26: ...deo mode and starts playback from the previous position or from the beginning Note You can select the desired USB SD by touching the list of USB SD root menu This system indicate the USB SD as My USB My SD on the list Playing Video Files in USB SD Memory If the video is playing touch the screen of the playing video to display Operation buttons The display will return to the playback screen if you ...

Page 27: ...reen playback status is pause Touch button to resume playback The screen will go to video screen automatically Switch to Previous Next file Touch or button during playback to play previous next file Touch button to starts playback from the beginning of the next track Touch button to starts playback from the beginning of the current track when this button is touched again within about 5 seconds pla...

Page 28: ...one is connected to this unit when the internal battery of iPod iPhone has run down this function may not operate correctly You must connect the iPod iPhone after charging the battery if it has run down iPod Audio Menu Operations Connect your iPod iPhone to the USB connector The system will automatically detect the connected device and the iPod Audio button will be enabled for operation on the Mai...

Page 29: ...uffle Playback 1 Touch button to shuffle the tracks in playing folder during playback 2 Touch this button again to turn off the feature Album Art work If current audio file contains album art image in ID3 the picture will be displayed in this area ID3 Information Area This area display ID3 information of playing file song title artist information album information Genre playlist and release time C...

Page 30: ...lecting a list item from a list screen 1 Touch the list screen and flick up or down to scroll the list 2 Touch a desired list item on the screen to display the corresponding list of tracks 3 Touch the desired track name on the list to play it iPod Video Menu Operations Connect your iPod iPhone to the USB connector The system will automatically detect the connected device and the iPod Video button ...

Page 31: ...once for Repeat One again for Repeat All again for Repeat Off Album Art work If current video file contains album art image in ID3 the picture will be displayed in this area ID3 Information Area The area is display the title of the playing file Category List Select different category movies to play The category is same as the iPod iPhone iPod Video List Mode Screen This operation is same as this i...

Page 32: ...io mode Please refer to the iPod Audio Mode operation Note Video playback is not available on all iPod iPhone devices Please contact your Clarion dealer for details An optional connection cable or accessory may be required for this feature Note Video is not displayed when the automobile is moving Image data may not be played back according to the status of the iPod iPhone The volume setting of vid...

Page 33: ... tracks are skipped and starts playback from the beginning of the next track Note Some track are not able to be skipped If skip limit has been reached Skip 6 tracks in 1H this function will not available Track rating Touch or button to Thumbs down or Thumbs up current track and the button will light Note Touch button will skip to next track skip limit has not been reached Some track is not able to...

Page 34: ...rts this system chooses the previously connected device Android or iOS When it is connected Android BT iPhone BT or USB together and Do not show again is not checked display the popup of chosen device 3 When connecting the mobile phone by Bluetooth or USB when in the Pandora mode there is a case the change device button works correctly We recommend that after finished the Pandora mode then connect...

Page 35: ...ress MENU button on Operational Panel to return to the Main Menu When the connection with blue icon a Bluetooth audio player has been established the icon is displayed at the top of the screen Bluetooth Audio Player Settings You can confirm various information concerning about the Bluetooth Interface features 1 Touch the button to display the information on the screen 2 When you finish confirming ...

Page 36: ...evice 3 Touch the desired Device button you wish to use Touch button to select it as your active device The corresponding cellular phone is set as current telephone 4 Touch the button to return to the previous screen Controlling the Bluetooth Audio Player Note Occasionally depending on the environment playback sounds may be fragmented or switch noises may be generated Playing Music After the conne...

Page 37: ...re displayed at the top of the screen Bluetooth Telephone Settings You can confirm various information concerning about the Bluetooth Interface features 1 Touch the button to display the information on the screen 2 Perform setting for the desired item See the following sections for detail 3 When you finish confirming the Bluetooth information touch the button to return to the previous screen Setti...

Page 38: ... the display returns to the Telephone screen To delete the cellular phone registration 1 Touch the button to delete the device A confirmation screen is displayed 2 Touch the button to confirm delete Select the Cellular Phone To change the current cellular phone to the other device which is already registered perform the following operation 1 Touch the button to display the Device Select screen 2 T...

Page 39: ...function the Phone Book data must be sent from the cellular phone Only the Phone Book items with at least one telephone number registered in the captured Phone Book data are displayed on the Phone Book screen 1 Touch the button to display the Phone Book screen 2 Touch the desired name button you wish to dial Flick the list up and down to scroll the list 3 Touch the button to call the specified num...

Page 40: ...Siri setting of your iPhone 2 Press and hold the VOICE button until you hear the warning tone The indicator change as follows 3 Talk to Siri the same way as using it on the iPhone 4 To finish Siri Eyes Free function touch the button Notes Siri Eyes Free is available on iOS 6 1 or higher Please use external mic when you use the Siri Eyes Free function ...

Page 41: ...want to store using the seek tuning step tuning or preset tuning 3 Touch and hold the desired Preset button you want to store for about 2 seconds Auto Store The Auto Store is a function for storing up to 6 stations that are automatically searched sequentially If the number of receivable stations cannot reach to 6 the previous stored station remains 1 Touch the FM1 2 3 AM button to select the desir...

Page 42: ...s iPhone 5c iPhone 6 and iPhone 6 Plus can be connected by using the connector cable supplied with the iPhone 4 iPhone 4s iPhone 5 iPhone 5s iPhone 5c iPhone 6 and iPhone 6 Plus and HDMI cable sold in the market and digital AV adapter Note The following is part of the wiring example Depending on the device there is a case to connect to the device directly with the CCA 771 Depending on the adapter ...

Page 43: ...at black frame appears around the screen Select DISP Source Press DISP button to display the HDMI video screen Operate Waze from VX406AU Android phone only You can operate Waze map application from VX406AU 1 Search for Waze and TP Calibration from the Google playTM and install this your Android phone 2 Connect VX406AU with your Android phone via Bluetooth and HDMI cable 3 Touch the HDMI menu butto...

Page 44: ...utton on Main Menu The LCD will display the external camera video The screen will display No Video Signal message if a valid camera is not connect to this head unit Press MENU button on Operational Panel to return to the Main Menu Setting Camera audio Select ON button in the Camera Audio setting of the General setting The audio from camera will heard when back gear is on The volume control is avai...

Page 45: ... 2 Zone off button to close the Rear Source Note 1 If the source is selected as the front the source in rear can t be selected 2 If the source is selected as the rear the source in front can t be selected 3 Touch the Front button to access the main menu but not close the Rear Source DVD Video in Rear 1 Option button 2 Show Cursor keys 3 Previous Chapter Fast Backward button 4 Play Pause button 5 N...

Page 46: ...peat button Same as iPod function of front source 7 Front Rear button If the screen displays Rear Source touch to switch to Front Source If the screen displays Front Source touch to switch to Rear Source iPod Video Rear Source ID3 Mode NOTE If the source is selected as the front the source in rear can t be selected If the source is selected as the rear the source in front can t be selected Touch t...

Page 47: ... Choose the desired wallpaper There are three optional images which you can import from USB Select Imported 1 2 3 and touch Import The format should be jpeg of less than 5M bytes Illumination Color Set the illumination color on the panel Input Aux Sense AUX input switch including Low Middle High Tel Speaker There are two options Left and Right For example if current setting is Right when BT phone ...

Page 48: ...e G PG PG 13 PG R R NC 17 Adult Audio Language Set the Language for DVD Audio Subtitle Language Set the Language for DVD subtitle Blinking LED Set blinking LED On or Off Screen Calibrate The function of it is to select the TS Calibrate YES or NO Factory Default The function is to select to load factory default or not Set the Anti Theft Code 1 If your unit is unlocked hold the button more than 2 se...

Page 49: ...mote control unit it may not work The battery of the remote control unit is dead or there is no battery in the remote control unit Check the battery of the remote control unit Problem Cause Measure Disc cannot be loaded A disc is already loaded Eject the disc before loading the new one There is foreign matter already in the disc slot Remove the foreign matter or consult a service station Sound ski...

Page 50: ...e Sound skips or is noisy MP3 WMA files are not encoded properly Use MP3 WMA files encoded properly The video image of iPod iPhone is disturbed The TV Signal setting of the iPod iPhone is not set correctly Set the TV Signal setting NTSC PAL of the iPod iPhone correctly Bluetooth Problem Cause Measure Cannot pair the Bluetooth enable device with the car audio system The device does not support the ...

Page 51: ...e temperature 25 C or so and check it again The headlight of the vehicle is lit The display is made dark at night to prevent the glare When the headlight of the vehicle is lit in the daytime the display gets dark There are red green and blue points in display This is not a failure but a phenomenon peculiar to a liquid crystal panel The liquid crystal panel is produced according to technology with ...

Page 52: ...lay Cause Measure BAD DISC A disc cannot be played due to scratches etc Replace with a non scratched non warped disc Invalid Disc A disc is loaded upside down inside the DVD deck and does not play Eject the disc then reload it properly PARENTAL VIOLATION Parental level error Set the correct Parental level Region code error Region code error Eject the disc and replace correct region code disc ...

Page 53: ...1 3 Vrms Audio Video output Video output voltage 1 0 Vp p 75 Screen Size 6 0 wide type Pixels 1 152 000 Resolution 800 x 480 x 3 RGB Bluetooth Specification Bluetooth Ver 4 0 Profile HFP1 5 Hands Free Profile HSP1 0 Headset Profile A2DP Advanced Audio Distribution Profile AVRCP1 2 1 3 1 4 AV Remote Control Profile PBAP Phone Book Access Profile SPP Serial Port Profile Power Class 2 USB Specificati...

Page 54: ...53 VX406AU English E n glish Owner s Manual VX406AU dimensions VX406AU weight 2 3 kg m m 0 0 1 m m 8 7 1 165mm 172mm ...

Page 55: ...e installing be sure to disconnect the negative cable of the car battery In the optional devices the RCA cables and the Connector cables are separately sold items When connect the HDMI and USB cable be sure to fix with the clamp CCA 748 sold separately Refer to next page ...

Page 56: ...55 VX406AU English E n glish Owner s Manual Note 1 Connecting the PHONE INTERRUPT terminal The phone interrupt will mute the audio if the lead receives a negative or ground signal ...

Page 57: ...Clarion Co Ltd All Rights Reserved Copyright 2015 Clarion Co Ltd 2015 9 ...

Reviews: