VX387AU 37
English
English
Owner’s Manual
Setting Operations
1
2
8
7
6
5
4
3
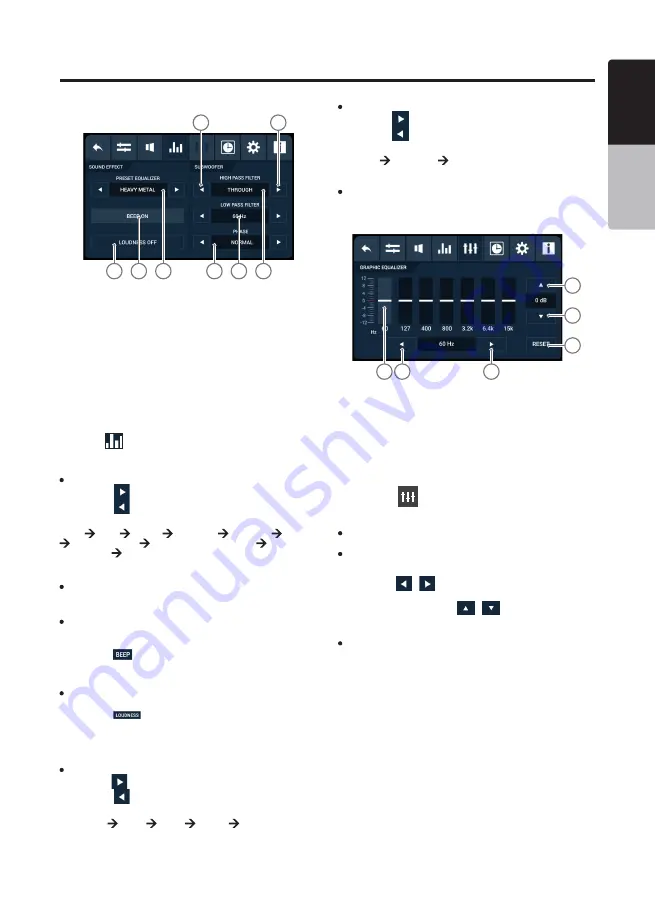
Sound Effect Controls
1. Previous Item/Decrease Value Button
2. Next Item/Increase Value Button
3. Subwoofer High Pass Filter Control
4. Subwoofer Low Pass Filter Control
5. Subwoofer Phase Control
6. Preset Equalizer Control
7. Beep Button
8. Loudness Button
Press the
button in the top menu to select the Sound
Effect tab. The display will change accordingly.
Preset Equalizer
1. Press the
button to select the next preset tone.
2. Press the
button to select the previous preset tone.
3. The ascending order of the available preset tones is:
FLAT POP ROCK CLASSIC HIP HOP DANCE
HEAVY METAL CUSTOM 1 (not preset) CUSTOM 2
(not preset) FLAT…
Notes:
CUSTOM 1 and CUSTOM 2 allow manual adjustment of the audio
via a graphic equalizer.
Beep Function
The beep function produces a beep sound whenever any
button with a valid operation is pressed.
1. Press the
button to toggle the beep function on or off.
The button display will change accordingly.
Loudness Function
The loudness function amplifies the audio on the unit.
1. Press the
button to toggle the loudness function on
or off. The button display will change accordingly.
Subwoofer Controls
High Pass and Low Pass Filters
1.Press the
button to select a higher frequency value.
2. Press the
button to select a lower frequency value.
3. The ascending order of the phase options are:
THROUGH 60 Hz 90 Hz 120 Hz THROUGH…
Phase Selection
4. Press the
button to select the next phase option.
5. Press the
button to select the previous phase option.
6. The ascending order of the available phases is:
NORMAL REVERSE NORMAL…
Note:
This feature is not available in Phone mode.
Graphic Equalizer
1. Increase Gain Button
2. Decrease Gain Button
3. Reset Button
4. Next Band Button
5. Previous Band Button
6. Gain Pointer Display
1. Press the
button at the top menu. The display will
change accordingly.
Notes:
Graphic equalizer is only available if the CUSTOM preset tone is
selected.
A series of 7 frequency bands are available for customization. The
default gain for each band is 0. Each band has an adjustable range
of -12 to 12.
2. Press the
/
buttons to select a frequency band to
adjust the audio gain.
3. At each band, press the
/
buttons to increase or
decrease the audio gain.
Note:
This feature is not available in Phone mode.
4
5
1
2
3
6


