background image

73

VRX765VD

280-8358-00

English

IN

ST

AL

LA

TION

 AND 

WIR

CONNE
CT

ION MA

NUAL

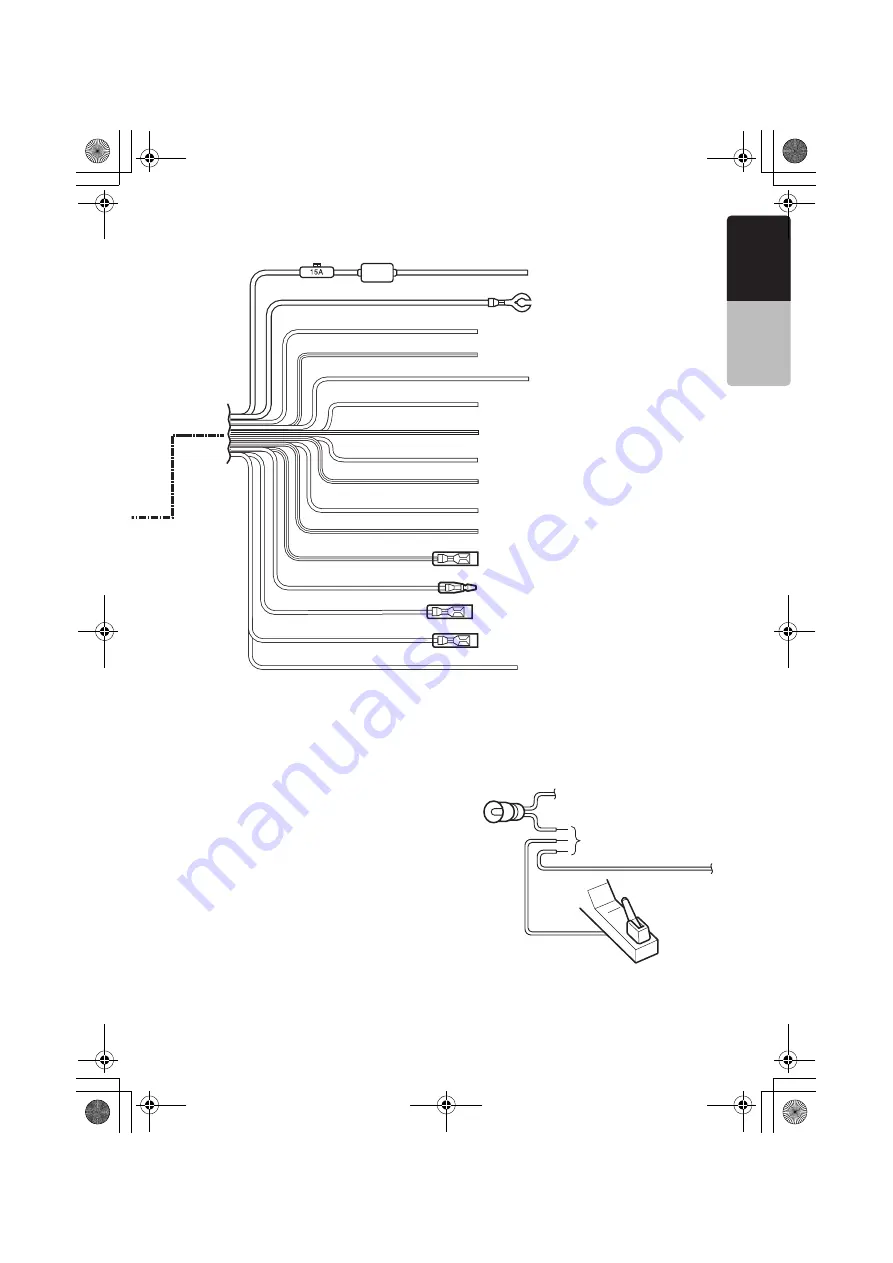
Connecting the parking brake lead

Connect the lead to parking brake lamp ground in 
the meter panel.

Note:

Connecting the parking brake lead to lamp ground 
allows you to watch TV/VTR/DVD video/video CD 
when the parking brake is engaged.

When the parking brake lead is not connected, the 
monitor will not turn on.

If “

AUDIO ONLY

” appears on the screen just after 

turning on the ACC power of the car, release the 
parking brake while confirming safety, and then 
engage the parking brake again.

Yellow

Black

Purple

Purple/Black

Grass-green

Gray

Gray/Black

White

White/Black

Green

Green/Black

Blue/White

Orange/White

Red

Brown

Blue

+12V main power

Ground

Rear right 

+

Rear right 

-

Parking brake lead

Front right 

+

Front right 

-

Front left 

+

Front left 

-

Rear left 

+

Rear left 

-

Amplifier turn-on lead

Illumination

+12V accessory

Phone mute (*1) 

Auto antenna

*1 Connecting the PHONE MUTE terminal

The lead included with the unit must be connected to the specified 
position of the vehicle’s connector in order to use the “

Triggered 

audio mute for cellular telephones

” function.

Parking brake

Parking brake lamp

+

 lead to battery

Connect these three leads.

-

 cord 

parking 
brake sig-
nal lead

Parking brake lead 
(grass-green)

Eng.book  73 ページ  2005年12月27日 火曜日 午後11時36分

Summary of Contents for VRX765VD

Page 1: ...DE DVD RADIO CON CONTROL CeNET Owner s manual Installation manual Mode d emploi et manuel d installation Manual de instrucciones y de instalación All Rights Reserved Copyright 2006 Clarion Co Ltd Printed in Japan Imprimé au Japon Impreso en Japón 2006 1 Y YI QC 6823B 280 8358 00 Clarion Co Ltd VRX765VD 001 cover E 1 ...

Page 2: ...s 6 5 OUTLINE OF BUTTON AND TOUCHKEY OPERATION 7 6 REMOTE CONTROL 13 Functions of Remote Control Unit Buttons 14 7 DCP 17 8 CAUTIONS ON HANDLING 18 Liquid crystal panel Generalities 18 Cleaning 18 Handling Discs 19 9 DVD VIDEO SYSTEM 20 DVD Video Features 20 Discs 21 About the registered marks etc 21 10 OPERATIONS 22 Basic Operations 22 Radio Operations 31 DVD Video Player Operations 33 Other Func...

Page 3: ...y bumpy roads which cause severe vibration may cause the sound to skip 3 This unit uses a precision mechanism Even in the event that trouble arises never open the case disassemble the unit or lubricate the rotating parts 4 TV broadcast reception when the optional TV tuner is connected When receiving the TV broadcast the strength of the signals changes since the car is moving so in some cases it ma...

Page 4: ...de Use this button to move to the next folder in the MP3 WMA mode Use this button to switch to the next disc in the changer modes Keep pressing this button more than 1 second to play all tracks in the iPod mode iPod button Press this button to switch to the iPod mode CONT button Press this button to show hide the key pad on the menu screen of DVD video Video CD MENU button Press this button to sho...

Page 5: ...de Use this button to move to the next folder in the MP3 WMA mode Use this button to switch to the next disc in the changer modes Keep pressing this button more than 1 second to play all tracks in the iPod mode iPod button Press this button to switch to the iPod mode CONT button Press this button to show hide the key pad on the menu screen of DVD video Video CD MENU button Press this button to sho...

Page 6: ...mely bumpy roads which cause severe vibration may cause the sound to skip 3 This unit uses a precision mechanism Even in the event that trouble arises never open the case disassemble the unit or lubricate the rotating parts 4 TV broadcast reception when the optional TV tuner is connected When receiving the TV broadcast the strength of the signals changes since the car is moving so in some cases it...

Page 7: ...ource menu Screen during DVD mode when automobile moving DVD PLAYER mode screen Option menu DVD SETUP menu Note 6 When displaying movies in DVD video mode touching the screen surface will cause the DVD PLAYER mode screen to be displayed Eng book 9 ページ 2005年12月27日 火曜日 午後11時36分 ...

Page 8: ...0 English Owner s manual Adjusting audio feature settings ADJUST mode menu AUDIO menu BAL FAD screen BAL FAD AUDIO EXT menu When a 5 1 ch Surround Decoder is connected From any screen Eng book 10 ページ 2005年12月27日 火曜日 午後11時36分 ...

Page 9: ...11 VRX765VD 280 8358 00 English Owner s manual AUDIO menu STATUS screen SPEAKER SEL menu STATUS SPEAKER SEL AUDIO EXT menu Eng book 11 ページ 2005年12月27日 火曜日 午後11時36分 ...

Page 10: ...the other system settings Bright Color Hue Dimmer From any screen ADJUST mode menu MONITOR menu Switched by touching this key repeatedly GENERAL menu CLOCK Hour Minute am pm CLOCK screen MONI ADJ Monitor Adjust screen Eng book 12 ページ 2005年12月27日 火曜日 午後11時36分 ...

Page 11: ...ode Take note of the following points When replacing batteries replace both batteries with new ones Do not short circuit disassemble or heat batteries Do not dispose of batteries into fire or flames Dispose of spent batteries properly MUTE VOLUME P TIME BAND SRC 0 9 DISC SEL SEARCH MODE MENU RTN SET UP TOP MENU 2 ZONE PBC RDM SLOW ANGLE SCN RPT AUDIO SUB TITLE ENT ISR Signal transmitter Operating ...

Page 12: ...red data in the Key Pad screen r f buttons Press to select the next higher or lower preset station in TUNER and TV Satellite Radio mode SCN button Press to perform preset scans in the TUNER and TV Satellite Radio modes For the Satellite Radio mode keep pressing more than 1 second Press to perform category scans in the Satellite Radio mode Keep pressing more than 1 second to perform the auto store ...

Page 13: ...and track scans in CD and MP3 WMA modes Keep pressing more than 1 second to perform folder scans in MP3 WMA mode RPT button Press to perform chapter repeat in the DVD video mode and track repeat in CD and MP3 WMA modes Keep pressing more than 1 second to perform folder repeat in MP3 WMA mode RDM button Press to play tracks at random in CD and MP3 WMA modes Keep pressing more than 1 second to play ...

Page 14: ... time to be displayed DISC SEL button Press to show hide the Disc List screen 0 9 buttons Press to enter track numbers in the Key Pad screen Press to select the disc number in the Disc List screen E e T t buttons Press to scroll the Disc Track List screen SCN button Press to perform track scan Keep pressing more than 1 second to perform disc scan RPT button Press to perform track repeat Keep press...

Page 15: ... OFF be sure to close the liquid crystal panel for safe before removing the DCP Attaching the DCP 1 Hook the right side of the DCP to the right side of the main unit 2 Settle the left side of the DCP to the main unit CAUTION CAUTION This unit uses a magnet to fix the DCP For the items that can be affected by magnetism such as magnetic cards be sure to keep them away from this unit The DCP can easi...

Page 16: ...sensor is exposed to direct sunlight In extremely cold weather the display movement may slow down and the display may darken but this is not a malfunction The display will work normally when the temperature increases Small black and shiny spots inside the liquid crystal panel are normal for LCD products The liquid crystal panel may stop temporarily when it opens or closes when the engine stops or ...

Page 17: ...quipped with stabilizers etc These may damage the disc or cause breakdown of the internal mechanism Storage Do not expose discs to direct sunlight or any heat source Do not expose discs to excess humidity or dust Do not expose discs to direct heat from heaters Cleaning To remove fingermarks and dust use a soft cloth and wipe in a straight line from the center of the disc to the circumference Do no...

Page 18: ...le of choice The number of recorded angles are indicated by the icon shown below Subpicture subtitles function A DVD video can record subtitles for up to 32 languages and you can select the language of the subtitles you wish to see The number of recorded subtitle languages are indicated by the icon shown below Multi story function When a DVD video contains more than one story for a film you can se...

Page 19: ...ecording conditions You cannot play Super Audio CDs Playback of the CD player is not supported even if it is a hybrid disc About MP3 WMA playback This unit can play back CD R CD RW DVD R RW and DVD R RW discs on which MP3 WMA music data have been recorded For a detailed information see the section entitled Listening to an MP3 WMA page 43 Note on region numbers The DVD video system assigns a region...

Page 20: ...d hold the SRC button for more than 1 second Selecting a mode When the liquid crystal panel is open 1 Press the SRC button to display the Source menu External equipment not connected to this unit is not displayed 2 Touch the desired mode key When the liquid crystal panel is closed 1 Press the SRC button to change the operation mode Each time you press the SRC button the operation mode changes in t...

Page 21: ...id crystal panel s maximum angle of inclination can be adjusted to match the installation configuration within the automobile Perform this with the panel in its closed position 1 Keep pressing the P OPEN button more than 5 seconds The electronic beep will be heard After the beep sounds twice the panel will come out and stand up to the maximum angle After completion of the calibration the panel wil...

Page 22: ...liquid crystal panel horizontal Air conditioner operation mode When the way the liquid crystal panel is mounted hinders the operation of the air conditioner the position of the panel can be turned horizontal temporarily 1 Keep pressing the P OPEN button more than 2 seconds when the liquid crystal panel is open A beep sounds and the liquid crystal panel turns horizontal Press the P OPEN button agai...

Page 23: ...e sound from the left speakers Emphasized the sound from the right speakers 2 1 Touch the key of the BASS item 3 1 When the AUDIO BASS screen is displayed touch the or key for the desirable type to adjust to a desirable level GAIN 6 to 8 The factory default setting is 0 FREQ 50Hz 80Hz 120Hz The factory default setting is 50Hz Q 1 1 25 1 5 2 The factory default setting is 1 2 1 Touch the key of the...

Page 24: ...ode is selected 2 1 Touch the C key to display the next menu screen 3 1 Touch ON or OFF of the M B EX item to turn the Magna Bass Extend effect on or off The factory default setting is OFF 2 1 Touch the key of the MONI ADJ item to display the MONI ADJ screen This screen can also be displayed directly by pressing the MONI button 2 2 Touch the Bright key repeatedly to select the adjustment type Ever...

Page 25: ...turn to the previous screen In the following sections only the details regarding adjustments are described procedures to select items are skipped Clock Adjustment Setting the BEEP The sound heard when you make operations is called beep The unit can be set up so that it does not produce this beep sound The factory default setting is BEEP ON 2 1 Touch the ON or OFF key of the CAMERA WARNING item to ...

Page 26: ...l devices other than a navigation system NONE when no external device is connected The factory default setting is NONE 2 1 Touch the NAVI OTHER or NONE key of the CONNECT item to set the function to NAVI OTHER or NONE 2 1 Touch the ON or OFF key of the BLINK LED item to turn the function on or off The factory default setting is OFF 2 1 Touch the key of the SYSTEM CHECK item The available operation...

Page 27: ...aneously be used in the MAIN and SUB zones Though the same equipment can be specified simultaneously If the 5 1 channel surround decoder DVC940 is connected this function is disabled When an external equipment is specified for the SUB zone the 2 ZONE function is turned off if the function of audio mute for cellular phone is turned on or off The SUB zone cannot be controlled when the function of au...

Page 28: ...isplays image of device connected to the Visual terminal Displays image of mode selected from the Source menu Rear monitor optional Displays image of mode selected from the Source menu 2 Audio output Sound from mode selected from the Source menu is output from 4ch speaker NON FADER and AUDIO OUT Front monitor lock ON Front monitor lock OFF Visual connection OTHER 1 Visual connection NAVI 1 Visual ...

Page 29: ...equency This function displays the Key Pad on the screen allowing you to tune by entering a frequency 1 Press the BAND button or touch the Band key to select the desired band FM or AM 2 Touch the Search key to display the Key Pad screen 3 Touch the 0 9 key corresponding with the frequency you desired When you input the wrong number touch the CLR key to delete the last input number 4 Touch the ENT ...

Page 30: ...e received a previously stored station remains unoverwritten at the memory position 1 Touch the Band key to select the desired band FM or AM 2 Touch the List key 3 Touch and hold the AS key for more than 2 seconds A beep sounds and the stations with good reception are stored automatically to the preset channels Preset scan Preset scan receives the stations stored in preset memory in order This fun...

Page 31: ...et up the screen size according to the rear view monitor which is connected to this unit When watching through a conventional type of the rear view monitor 4 3 N PS The leftmost and rightmost areas of the screen are cut off This function allows displaying the important part of image fully on the screen In some cases image is displayed while being panned scrolled N LB A black zone is created in the...

Page 32: ...setting is ENGLISH 4 1 Touch the key of AUDIO LANGUAGE item The AUDIO LANGUAGE menu is displayed 4 2 Touch the key to select a desired language to set it The factory default setting is ENGLISH 4 1 Touch the key of SUBTITLE LANGUAGE item The SUBTITLE LANGUAGE menu is displayed 4 2 Touch the key to select a desired language to set it The factory default setting is ENGLISH 4 1 Touch the key of PASSWO...

Page 33: ...n be heard The picture can only be watched when the car is stopped and the parking brake is applied If AUDIO ONLY appears on the screen just after turning on the ACC power of the car release the parking brake while confirming safety and then engage the parking brake again Pausing play 1 Press the p button or touch the p key to pause play PAUSE appears in the display 2 To resume disc play press the...

Page 34: ...ing on the DVD software The same operation can be performed by touching the Menu key from the DVD PLAYER mode screen Example showing DVD menu display Operating the DVD menu You can select the button items displayed in the DVD menu by directly touching it If the button items are hard to select correctly you can also operate them by displaying Key Pad on the screen When the Key Pad is displayed dire...

Page 35: ...ng About chapter Chapter means a small segment to divide the data area of the disc 1 Press the R or F button during playback Chapters are skipped as many as the times the button is pressed and playback starts Pressing the F button starts playback from the beginning of the next chapter Pressing the R button starts playback from the beginning of the current chapter When this button is pressed again ...

Page 36: ...will be displayed After scan playback of all chapters on the disc chapter scanning through the same disc is performed again Depending on the disc the menu may appear again after scan playback of all chapters within the title 3 Press the R button to turn off the scan playback Repeat playback This operation plays back chapters recorded on the DVD Video repeatedly 1 Showing the DVD PLAYER mode screen...

Page 37: ...isc switching may be completely impossible or impossible on some scenes It may take time to switch among subtitles 3 Touch the Back key to return to the previous screen To turn off subtitles 1 Repeat touching the Sub Title key until Sub Title OFF is displayed on the screen Subtitles are turned off Switching angles On DVD discs in which video images have been recorded in two or more angles you can ...

Page 38: ...ene where playback is paused Slow playback 1 Press the p button then press and hold the F button While pressing the button slow playback continues at the speed 1 3 times the normal playback Slow playback cannot be performed in the backward direction In addition audio cannot be reproduced during slow playback Skipping a track searching 1 Press the R or F button during playback The track is skipped ...

Page 39: ...ill be displayed on the playback screen On Off of Playback Control On Video CDs equipped with Play Back Control function you can turn it on off The factory default setting is ON 1 Touch the screen to display the VIDEO CD mode screen 2 Each time you touch the PBC key you can switch between on and off When the PBC is turned on or off the disc plays from the beginning Playback control PBC This contro...

Page 40: ...y Playback starts from the track of the input track number If the input track number does not exist or searching with a track number is not allowed the screen image will not change 4 Touch the Back key Selecting a track on the Track List screen This function allows you to select tracks from a displayed list 1 Touch the List key The Track List screen is displayed 2 When the desired track is not dis...

Page 41: ...to a WMA file by using single byte letters If you add a file extension other than specified or forget to add these file extension the file cannot be played In addition if you use upper case and lower case letters capital and small letters mixedly for file extensions normal play may not be possible 2 Files other than MP3 WMA data cannot be played Logical format File system 1 When writing an MP3 WMA...

Page 42: ...aining no MP3 WMA files are not recognized Only folders containing tracks 1 to 4 in illustration are given numbers and displayed on the list Pausing playback 1 Press the p button or touch the p key during playback Playback pauses 2 To resume playback press the p button or touch the p key again Playback resumes Skipping a track searching 1 Press the R or F button during playback Tracks are skipped ...

Page 43: ...ouch the Back key Other various play functions 1 Touch the Option key 2 Touch the touch key of the function you want to play Track Scan track scan playback This operation scans and plays back all tracks recorded on the disc the first 10 seconds for each T SCN is displayed on the screen Folder Scan folder scan playback This operation plays back the first tracks of all folder on the MP3 WMA disc the...

Page 44: ...e 8 Touch and hold the Memo key for more than 2 seconds to store the title into memory The display returns to the original mode screen Title list play You can display a list of titles then select the CD track disc or broadcast station to listen to from that list You cannot display a title list with the unit in Seek Preset Scan Auto store Tuner or TV mode Cancel those operation modes before display...

Page 45: ...ng 4 3 the image can be shown without being cut or deformed Note When a 4 3 scale image non wide screen image is displayed part of the image may be out of view or the image may be distorted when in wide mode or full wide mode Please use normal mode for viewing such images with the proper aspect ratio During superimposed display it becomes a full wide mode Internal amplifier cancel function This fu...

Page 46: ...e functions are available or not depends on the iPod version The iPod is used with the equalizer function turned OFF Precautions regarding battery consumption When the iPod s internal battery becomes depleted the recharge warning indicator will appear in the iPod s display In this condition the iPod cannot be played even if attached to the VRX765VD Also the VRX765VD s recharging function cannot be...

Page 47: ...es Skipping a track searching 1 Press the R or F button during playback Tracks are skipped as many as the times the button is pressed and playback starts Pressing the F button starts playback from the beginning of the next track Pressing the R button starts playback from the beginning of the current track When this button is pressed again within about 2 seconds playback starts from the beginning o...

Page 48: ... optional connector cable for iPod with video released soon you can enjoy the video data and slideshow data stored in the iPod showing them on the liquid crystal panel of this unit and the rear monitor if connected Note Do not connect the iPod to this unit when a Video Playlists item is selected on the iPod 1 Touch and hold the MENU key on the iPod menu screen for more than 1 second The screen wil...

Page 49: ...yer loads checks the magazine If NO DISC appears in the display eject the magazine and insert discs into each slot Then reinsert the magazine back into the CD changer Pausing play 1 Press the p button or touch the p key during playback Playback pauses and PAUSE appears in the screen 2 To resume playback press the p button or touch the p key Playback resumes Displaying the CD TEXT titles This opera...

Page 50: ...revious track Fast forward and fast backward 1 Press and hold the R or F button during playback The playback speed becomes 5 time faster first and then 20 time faster 3 seconds later Releasing the button resumes to the normal speed playback Other various play functions 1 Touch the Option key 2 Touch the touch key of the function you want to play Track Scan track scan playback This scan play locate...

Page 51: ...ard The picture can only be watched when the car is stopped and the parking brake is applied If AUDIO ONLY appears on the screen just after turning on the ACC power of the car release the parking brake while confirming safety and then engage the parking brake again 1 Press the SRC button and touch the TV VTR key 2 Press the BAND button or touch the Band key to select the desired TV band TV1 or TV2...

Page 52: ...s can be stored 6 TV1 and 6 TV2 There are 2 ways available to recall the preset station Using the R or F button 1 Press the BAND button or touch the Band key to select the desired TV band TV1 or TV2 2 Press the R or F button to recall a stored TV station Using the Preset List screen 1 Touch the screen to display the menu then touch the List key 2 Touch the corresponding Preset key to recall the st...

Page 53: ...sequentially 3 When the desired channel is received touch the PS key again Setting the TV diver You can change the reception setting for the TV antenna connected to the TV tuner This function is enabled only when the panel is open Normally use the TV diver with the ON position 1 Touch the screen to display the TV VTR menu then touch Option key 2 Touch the ON or OFF key of the TV DIVER item to turn...

Page 54: ...l without a broadcast has been selected XM CH SIRIUS INVALID CHANNEL A channel not covered by your contract XM UPDATING SIRIUS CALL 888 539 SIRI alternated When your contract is expired SUB UPDATE Confirming your Radio ID XM 1 Touch the Search key to display the Key Pad screen 2 Touch the 0 key then touch the ENT key Your Radio ID 8 digits number will be displayed 3 To return to the previous scree...

Page 55: ...continues to seek channels below or above the current channel while touching the key When the key is released the receiver receives the channel received at that time Recalling a preset station A total of 18 satellite radio stations can be stored 6 XM1 6 XM2 and 6 XM3 for XM or 6 SR1 6 SR2 and 6 SR3 for SIRIUS This allows you to store your favorite satellite radio stations in memory for later recal...

Page 56: ...how a channel name that differs from the stored name A channel stored in memory may be discontinued at the option of the broadcast station Scan function There are two scan modes the category scan mode and the preset scan mode During scanning channels are displayed in abbreviated form the display mode cannot be switched Category scanning In a category scan broadcast channels in the same category as...

Page 57: ...e described procedures to select setting items are skipped SPEAKER SEL speaker selection This function determines center speaker surround speaker and sub woofer connection Dolby PL II CONTROL This function is available only when the MUSIC MODE is selected for Dolby PL II For setup details see Selecting the Dolby PL II Dolby Pro Logic II type 3 1 Touch the key of the SPEAKER SEL item to show the su...

Page 58: ...ER HPF This function can be set to the following three settings 50 Hz 80 Hz and 120 Hz 120 Hz is the default value SURROUND HPF This function can be set to the following four settings 50 Hz 80 Hz 120 Hz or THRGH through THRGH is the default value SUB WOOFER LPF This function can be set to the following three settings 50 Hz 80 Hz and 120 Hz 120 Hz is the default value 3 1 Touch the key of the SPEAK...

Page 59: ...d in the music source Setting and storing P EQ Properties 1 Press the ADJ button and touch the AUDIO key 2 Touch the key of the P EQ item to display the submenu 3 Touch the key for the desirable type to select The P EQ adjustment contents are as follows SIGNAL This function selects MUSIC or P NOISE The factory default setting is P NOISE SPEAKER SELECT This function selects FRONT CENTER or SURROUND...

Page 60: ...TAIL item to display the submenu 3 Perform the following adjustments Subwoofer volume adjustment Center volume adjustment Balance Fader adjustment 3 1 Touch the or key of the SUBWOOFER VOL item to adjust to desirable level Setting range 6 to 3 The factory default setting is 0 3 1 Touch the or key of the CENTER VOL item to adjust to desirable level Setting range 6 to 0 The factory default is 0 3 1 ...

Page 61: ...he remote controller it may not work The batteries of the remote controller unit are dead or there is no battery in the remote controller unit Check the batteries of the remote controller unit The Reset button Problem Cause Measure Disc cannot be loaded Another disc is already loaded Eject the disc before loading the new one There is a foreign matter already in place Eject the foreign matter forci...

Page 62: ...setting Set the NTSC PAL properly according to the VTR When the TV tuner is connected the image gets unclear Bad receiving condition A radio wave may not reach sufficiently due to obstruction of mountains or buildings Check it again at a place where a radio wave can be received properly The TV tuner has a double or triple image Bad receiving condition It may be under the influence of radio wave re...

Page 63: ...ERROR 2 A CD is caught inside the CD deck and is not ejected This is a failure of CD deck s mechanism and consult your store of purchase ERROR 3 A CD cannot be played due to scratches etc Replace with a non scratched non warped disc ERROR 6 A CD is loaded upside down inside the CD deck and does not play Eject the disc then reload it properly Problem Cause Measure ERROR 2 A CD inside the CD changer...

Page 64: ...Vp p output impedance 75 Ω LCD Monitor Screen Size 7 inch wide type 6 Width 152 mm 3 5 16 Height 85 mm Display method Transmission type TN liquid crystal display Drive method TFT thin film transistor active matrix driving Pixels 336 960 1440 234 General Power source voltage 14 4 V DC 10 8 to 15 6 V allowable Ground Negative Current consumption 4 0 A 1 W Auto Antenna Rated Current 500 mA less Dimen...

Page 65: ... head screw M5 8 4 Sems hexagonal bolt M5 8 5 Electro tap Machine screw M4 3 4 6 Bag for accessories No 2 Hook plate 2 Cord clamp 7 Bag for accessories NO 3 Rca cap 12 8 Universal mounting bracket 9 Remote control unit 0 Battery for remote control unit Outer Escutcheon DCP Case 3 GENERAL CAUTIONS 1 Do not open the case There are no user serviceable parts inside If you drop anything into the unit d...

Page 66: ...ration of the shift lever or obstruct your view before selecting the installation location Figure 2 3 Install the unit within 30 of the horizontal plane Figure 3 4 If you have to do any modification on the car body such as drilling holes consult your car dealer beforehand 5 Use the included screws for installation Using other screws can cause damage Figure 4 6 The source unit has mounting screw ho...

Page 67: ...er escutcheon so that all the hooks are locked Note 1 Some car models require special mounting kits for proper installation Consult your Clarion dealer for details 2 Fasten the front stopper securely to prevent the main unit from coming loose Main unit Figure 6 Console opening dimensions Hole 7 3 16 182 mm 2 1 16 53 mm Screwdriver Stoppers Hole Instrument panel Universal mounting bracket Stoppers ...

Page 68: ...es Figure 7 2 Secure the mounting brackets to the chassis as shown in Figure 8 Holes are pre tapped for TOYOTA and NISSAN vehicles modification such as drilling new holes of the mounting brackets may be required for other models 3 Wire as shown in Section 8 4 Secure the unit in the dashboard and then reassemble the dashboard and the center panel 2 Screw 2 Spring 4 Hexagonal screw M5 8 Main Unit Fi...

Page 69: ... to turn the power off before wiring 2 Be particularly careful where you route the wires Keep them well away from the engine and exhaust pipe etc Heat may damage the wires 3 If the fuse should blow check to see if the wiring is correct If a fuse is blown replace it with a new one of the same amperage rating as the original 15A FUSE 4 To replace the fuse remove the old fuse of the power supply lead...

Page 70: ...ble of the car battery In the optional devices the RCA Pin and the Connector cable are separately sold items Note Red White Red White Right left Front audio output terminal Right left Rear audio output terminal Right left Non fader output terminal Gray Black Purple Red White Yellow Yellow White Red Video output terminal Video Audio left Audio right Visual input terminal Wireless Head phone VTR etc...

Page 71: ...ake again Yellow Black Purple Purple Black Grass green Gray Gray Black White White Black Green Green Black Blue White Orange White Red Brown Blue 12V main power Ground Rear right Rear right Parking brake lead Front right Front right Front left Front left Rear left Rear left Amplifier turn on lead Illumination 12V accessory Phone mute 1 Auto antenna 1 Connecting the PHONE MUTE terminal The lead inc...

Page 72: ...ified lead of the cellular phone is connected to the phone mute lead of the source unit the audio mute is available when the cellular phone is used Satellite Radio Receiver When a Satellite Radio Receiver is to be connected use the CeNET connector For detailed information refer to the instruction manual of the Satellite Radio Receiver TV Tuner When the TV tuner is to be connected connect the CeNET...

Page 73: ... optical fiber cable included the DVH940 RCA cable sold separately RCA cable sold separately RCA cable sold separately Digital optical fiber cable DCA 005 008 sold separately Set the SLAVE STAND ALONE switch to the SLAVE position Set the CeNET STAND ALONE switch to the CeNET position Gray Gray RCA video cable included the VCZ625 Ferrite clamp Included the DVD changer RCA cable included the DVH940 ...

Page 74: ...76 VRX765VD 280 8358 00 English INSTALLATION AND WIRE CONNECTION MANUAL Eng book 76 ページ 2005年12月27日 火曜日 午後11時36分 ...

Page 75: ...DE DVD RADIO CON CONTROL CeNET Owner s manual Installation manual Mode d emploi et manuel d installation Manual de instrucciones y de instalación All Rights Reserved Copyright 2006 Clarion Co Ltd Printed in Japan Imprimé au Japon Impreso en Japón 2006 1 Y YI QC 6823B 280 8358 00 Clarion Co Ltd VRX765VD 001 cover E 1 ...

Reviews: