


8
English
Français
Deutsch
Italiano
Nederlands
Español
Italiano
Nederlands
Español
English
Français
Deutsch
English
Français
Deutsch
Nederlands
Italiano
Español
English
Français
Deutsch
Italiano
Nederlands
Español
6.
6.
INSTALLING THE NAVIGATION UNIT
INSTALLATION DE L’UNITÉ DE NAVIGATION
EINBAU DER NAVIGATIONSEINHEIT
INSTALLAZIONE DELL’UNITÀ DI NAVIGAZIONE
INSTALLEREN VAN HET NAVIGATIETOESTEL
INSTALACIÓN DE LA UNIDAD DE NAVEGACIÓN
Installation location
Lieu d’installation
Installationsort
Posto d’installazione
Installatieplek
Lugar de instalación
Figure 6
Figure 6
Abbildung 6
Figura 6
Afb. 6
Figura 6
English
Français
Deutsch
Italiano
Nederlands
Español
1
1
1
1
1
1
Navigation unit
Unité de navigation
Navigationseinheit
Unità di navigazione
Navigatietoestel
Unidad de navegación
English
Français
Deutsch
Italiano
Nederlands
Español
Figure 7
Figure 7
Abbildung 7
Figura 7
Afb. 7
Figura 7
English
Français
Deutsch
Italiano
Nederlands
Español
Figure 8
Figure 8
Abbildung 8
Figura 8
Afb. 8
Figura 8
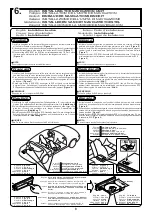
Caution label
Etiquette de précaution
Warnzeichen
Etichetta per l’avviso
Waarschuwingslabel
Etiqueta de precaución
English
Français
Deutsch
Italiano
Nederlands
Español
23
23
23
23
23
23
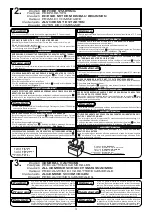
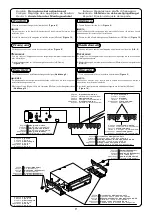
Push the DVD tray ejecting button. When the DVD
tray comes out, pull it out by hand.
Appuyez sur le bouton d’éjection du chargeur de DVD-
ROM. Lorsque le chargeur s’ouvre, tirez-le à la main.
Drücken Sie auf den DVD-Ausgabeknopf. Wenn das
DVD-Fach herauskommt, ziehen Sie es mit der Hand
heraus.
Premere il pulsante di espulsione del piatto DVD.
Quando il piatto fuoriesce, tirarlo con la mano.
Druk op de uitwerpknop van de DVD-lade. Wanneer
de DVD-lade naar buiten komt, trekt u deze verder
met de hand uit.
Pulse el botón de expulsión de la bandeja del DVD.
Cuando la bandeja salga, tire de ella con la mano.
English
Français
Deutsch
Italiano
Nederlands
Español
English
Français
Deutsch
Italiano
Nederlands
Español
Lens
Lentille
Linse
Lente
Lens
Lente
English
Français
Deutsch
Italiano
Nederlands
Español
Turntable
Chargeur de DVD-ROM
Drehscheibe
Piatto girevole
Draaischijf
Bandeja
(130mm)
NOTE
Do not apply strong forces on the turntable from above.
REMARQUE
N’appuyez pas sur le chargeur de DVD-ROM.
HINWEIS
Üben Sie keinen starken Druck von oben auf die Drehscheibe aus.
NOTA
Non esercitare troppa forza dall’alto sul piatto girevole.
OPMERKING
Druk niet te hard op de DVD-lade en draaischijf.
NOTA
No ejerza ninguna presión fuerte sobre el plato giratorio.
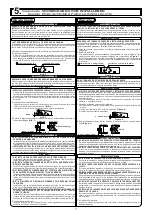
Install the navigation unit on the floor of the vehicle, such as on the front or back corner
of the floor in the back, or under the seat. (
Figure 6
)
If the navigation unit is installed under the seat and the navigation unit is exposed when
the seat is moved forward, put a warning label on the case of the unit. (
Figure 7
)
When inserting a DVD-ROM, the DVD tray is ejected approximately 130 mm. Confirm
that there are no obstacles to the DVD tray when deciding where to install it.
(
Figure 8
)
1.
2.
3.
Installez l’unité de navigation sur le sol de votre véhicule, comme par exemple sur le
coin avant ou arrière du sol du compartiment arrière, ou sous le siège. (
Figure 6
)
Dans le cas où l’unité de navigation est installé sous le siège, si l’unité de navigation est
visible quand on avance le siège, appliquez l’autocollant de mise en garde sur le boiter
de l’appareil. (
Figure 7
)
Quand vous insérez le DVD-ROM, le chargeur du DVD est éjecté sur une distance
d’environ 130mm. Veillez à ce qu’il n’y ait pas d’obstacle pour l’éjection du chargeur du
DVD quand vous décidez de l’endroit où vous allez installer l’appareil. (
Figure 8
)
1.
2.
3.
Installieren Sie die Navigationseinheit am Fahrzeugboden, z. B. in der vorderen oder
hinteren Ecke am Boden des Rücksitzbereiches oder unter dem Sitz. (
Abbildung 6
)
Falls die Navigationseinheit unter dem Sitz installiert werden und offen liegen sollte,
wenn der Sitz nach vorn geschoben wird, bringen Sie den Warnaufkleber am
Gerätegehäuse an. (
Abbildung 7
)
Beim Einlegen der DVD-ROM wird die DVD-Schublade etwa 130 mm weit ausgefahren.
Achten Sie darauf, dass die DVD-Schublade nicht behindert wird, wenn Sie einen
Installationsort wählen. (
Abbildung 8
)
1.
2.
3.
Installare l'unità di navigazione sul pavimento del veicolo, ad esempio nell'angolo
anteriore o posteriore del pavimento del vano posteriore o sotto il sedile. (
Figura 6
)
Qualora si installi l'unità di navigazione sotto il sedile e risulti quindi esposto quando si
sposta il sedile in avanti, applicare l'etichetta d'avvertenza sull'involucro dell'unità.
(
Figura 7
)
Dopo aver inserito il DVD-ROM, il cassetto del DVD fuoriuscirà di circa 130 mm. Prima
di selezionare il punto d'installazione, accertarsi di non ostruire il cassetto del DVD .
(
Figura 8
)
1.
2.
3.
Installeer het navigatietoestel op de vloer van de auto, bijv. de voorste of achterste hoek
achterin, of onder een stoel. (
Afb. 6
)
Wanneer het navigatietoestel onder een stoel wordt geïnstalleerd en men het toestel
tijdens het naar voren schuiven van de stoel kan zien, moet het waarschuwingslabel op
het toestel worden bevestigd. (
Afb. 7
)
Tijdens het plaatsen van een DVD-Rom schuift de DVD lade ca. 130mm uit. Zorg er
daarom, tijdens het bepalen van de installatieplek, voor dat het openen van de DVD-
lade niet door spullen e.d. wordt belemmerd. (
Afb. 8
)
1.
2.
3.
Instale la unidad de navegación en el suelo del vehículo: por ejemplo, en la esquina
frontal o en la esquina posterior del suelo del compartimento trasero o bajo el asiento.
(
Figura 6
)
En caso de que la unidad de navegación se instale debajo del asiento y quede expuesta
cuando el asiento se desplaza hacia delante, pegue una etiqueta de precaución en la
caja de la unidad. (
Figura 7
)
Cuando inserte el DVD-ROM y abra la bandeja de DVD, ésta se desplaza unos 130 mm.
Antes de decidir el lugar de instalación, cerciórese de que no hay ningún obstáculo para
la bandeja de DVD. (
Figura 8
)
1.
2.
3.