DRX9675z
29
28
DRX9675z
9. TROUBLESHOOTING
Power does not
turn on.
(No sound is
produced.)
Nothing happens
when buttons are
pressed.
Display is not
accurate.
Compact disc
cannot be loaded.
Sound skips or is
noisy.
Sound is bad
directly after
power is turned
on.
Poor sound
quality
Problem
Fuse is blown.
Incorrect wiring.
The microprocessor has
malfunctioned due to noise,
etc.
DCP or source unit
connectors are dirty.
Another compact disc is
already loaded.
There is a disc other than a
CD or foreign matter already
in place.
Compact disc is dirty.
Compact disc is heavily
scratched or warped.
Water droplets may form on
the internal lens when the
car is parked in a humid
place.
The equalizer levels are too
high.
Replace with a fuse of the same amperage. If the
fuse blows again, consult your store of purchase.
Consult your store of purchase.
Press the reset button for about 2 seconds with a thin
rod.
Wipe the dirt off with a soft cloth moistened with
cleaning alcohol.
Eject the compact disc before loading the new one.
Press and hold OPEN button
6
for 2 seconds or
longer. The foreign matter is forcibly ejected.
Clean the compact disc with a soft cloth.
Replace with a compact disc with no scratches.
Let dry for about 1 hour with the power on.
If the equalizer levels are too high, the sound may
distort. Lower the equalizer levels.
Cause
Measure
DSP
Reset button
Editing/storing a P.EQ menu (User
memory)
1. Select a P.EQ menu which you want to edit
on the basis of.
2. Press ENT button
$
.
3. Press VOLUME buttons
2
up (
w
) or down
(
z
) to select the item to be adjusted.
There are selections of correction channel,
correction band, the center frequency, the Q-
curve and gain adjustment available for the
items to be adjusted.
• The P.EQ adjustment contents are as follows:
Channel selection
Select the channel to be compensated (front
or rear).
Selection of center frequency
Select the center frequency that you want to
compensate from the range of 20Hz to 20kHz.
(1/3 octave step, 31 points)
Selection of Q-curve
Set the sharpness of the Q-curve to one of the
parameters: 1, 3, 5, 7 and 20.
Gain adjustment
Adjust the gain (output level) in the range of -
12dB to +12dB. (1dB step, 25 points)
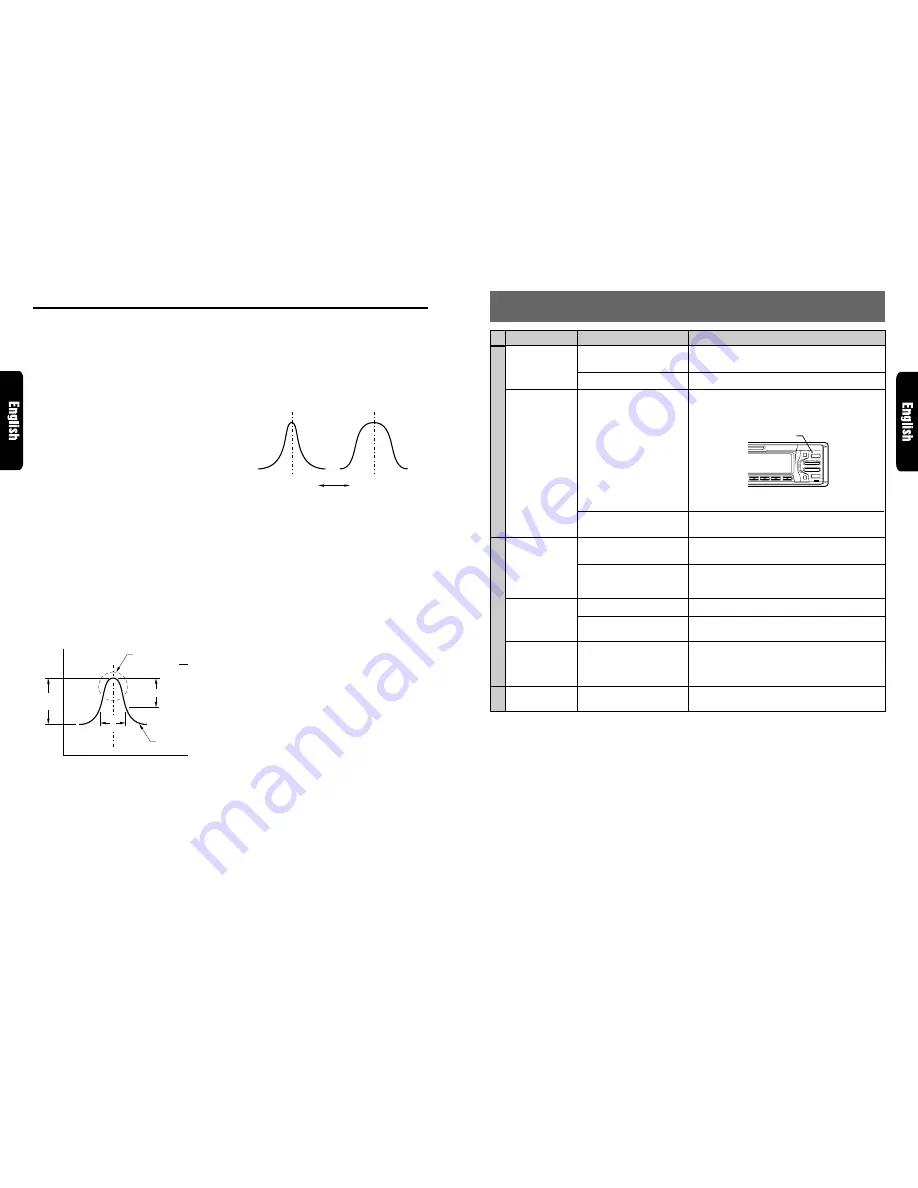
About the compensation of frequency char-
acteristics
See Figure 1 concerning the relationship of the
center frequency, Q-curve (Q) and gain.
Level
(dB)
Frequency curve
Gain
(G)
3dB
Center frequency (F)
Figure 1
Frequency (Hz)
Q curve (Q)
Q=
F
f
f
AC PROCESSOR Operations
About the Q-curve (Q)
For the Q-curve (Q), setting larger values makes
the curve sharper, setting smaller values makes
the curve flatter. (Figure 2)
Selecting the Q-curve (Q) opposite to the fre-
quency curve to be compensated makes the fre-
quency characteristics flat.
Q curve; 20
Q curve; 1
Figure 2
Q curve (Q)
High
Low
4. Press the right side of SEARCH button
4
to
move the cursor.
5. Press VOLUME buttons
2
up (
w
) or down
(
z
) to make the adjustment.
6. Repeat steps 3 to 5 to complete the
adjustment and press ENT button
$
.
7. Press and hold one of Direct buttons
"
for 2
seconds or longer to store the edited contents.
∗
You can give a title to the user memory. For
the inputting method of titles, refer to the
section “Entering titles” in “Operations
common to each mode”.
8. Press MODE button
&
three times or press
and hold ENT button
$
for 1 second or longer
to return to the previous mode.
General
CD
Summary of Contents for DRX9675z
Page 17: ...32 DRX9675z Memo ...


