background image

8

English

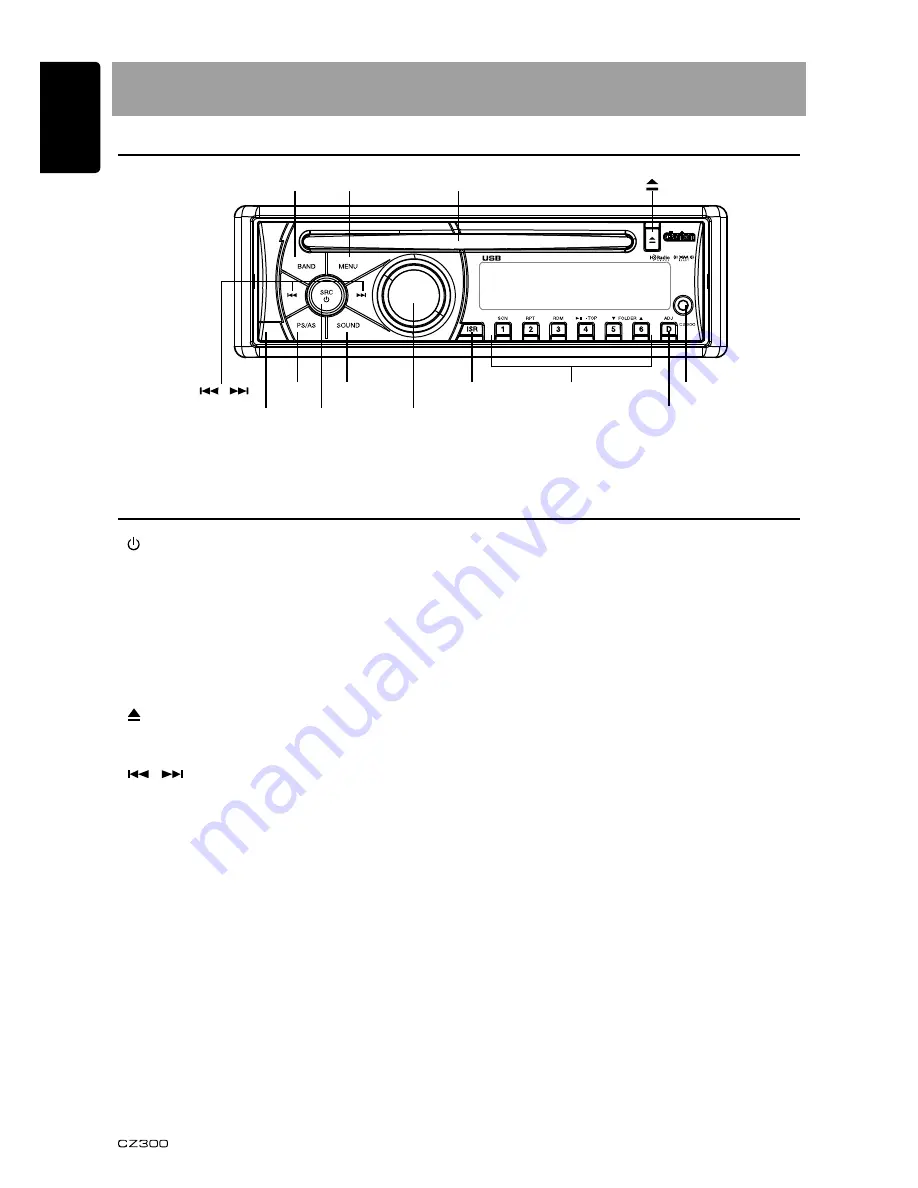
[   / SRC] button

•  Power/Toggle the audio source

[BAND] button

•   Select tuner band

[MENU] button

• System 

menu

[   ] button

•  Eject the disc in the unit.

 , 

 ] button

• Previous 

(Next)/Search

[OPEN] button

•  Unlock the front panel.

[PS / AS] button

•  Preset scan/Auto memory store

[SOUND] button

•  Sound effect setting

[VOLUME] knob

 •  Adjust volume level/Conrm

[ISR] button

 •  Recall ISR station stored in memory and 

store current station in ISR memory (long 
press)

 •  iTunes Tagging (when connected with HD 

Radio module)

[1–6] button

 •  [1] button: Scan play/Preset station 1.
 •  [2] button: Repeat play/Preset station 2. 
 •  [3] button: Random play/Preset station 3. 
•  [4] button:  Play/Pause/Top play (long 

press)/Preset station 4.

 •  [5] button:  Previous folder/Preset station 

5. 10 tracks down (long press)

 •  [6] button:  Next folder/Preset station 6. 

10 tracks up (long press)

[ADJ] button

•  Display switch/System menu

3. CONTROLS

Operational Panel

Names of Buttons

[BAND]

[POWER/SRC]

[OPEN]

[PS/AS] [SOUND]

[ISR]

[VOLUME]

[ADJ]

[1~6]

[     ,     ]

[MENU]

[     ]

Disc slot

AUX jack

Summary of Contents for CZ300

Page 1: ...Owner s manual Installation manual Mode d emploi et manuel d installation Manual de instrucciones y de instalación CD USB MP3 WMA RECEIVER LECTEUR CD USB MP3 WMA RECEPTOR CD USB MP3 WMA ...

Page 2: ...avantage aenregistrer votre produits Nous vous invitons avisiter notre site Web www clarion com pour enregistrer votre produit Clarion Nous avons facilite la tache d enregistrement de produit simple et facile grace anotre site Le formulaire d enregistrement est court et facile acompleter Lorsque vous etes enregistrer nous pouvons vous tenir ihforme des informations important de produits Enregistre...

Page 3: ... 11 Radio Operations 12 Satellite Radio Mode 13 HD Radio Operations 14 iTunes Tagging 15 CD MP3 WMA Operations 16 USB Operations 18 iPod iPhone Operations 18 AUX Operations 19 Audio Setup 20 System Setup 20 6 TROUBLE SHOOTING 21 7 ERROR DISPLAY 22 8 SPECIFICATIONS 23 9 INSTALLATION WIRE CONNECTION GUIDE 24 Thank you for purchasing this Clarion product Please fully read this owner s manual before o...

Page 4: ... BEAT EQ with 3 Band Parametric Equalizer MP3 WMA compatible with ID3 TAG display Expanding Systems Note Items outside of the frames are commercially available 4 channel ampli er iPod iPhone USB memory Portable player Connect by AUX IN Jack Expanding audio features HD Radio receiver THD300 to be connected XM tuner to be connected ...

Page 5: ...tion against harmful interference in a residential installation This equipment generates uses and can radiate radio frequency energy and if not installed and used in accordance with the instructions may cause harmful interference to radio communications However there is no guarantee that interference will not occur in a particular installation If this equipment does cause harmful interference to r...

Page 6: ... device or its compliance with safety and regulatory standards iPod and iTunes are trademarks of Apple Inc registered in the U S and other countries iPhone is a trademark of Apple Inc 2009 SIRIUS XM Radio Inc SIRIUS XM and all related marks and logos are trademarks of SIRIUS XM Radio Inc and its subsidiaries All other marks channel names and logos are the property of their respective owners HD Rad...

Page 7: ...ing it be carefully not to drop it or subject it to strong shocks Once the OPEN button is pressed and DCP is unlocked car vibrations can cause the DCP to fall The connector connecting the source unit and the DCP is an extremely important part Be careful not to damage it by pressing on it with ngernails screwdrivers or other hard objects Note If the DCP is dirty wipe off the dirt with a soft dry cl...

Page 8: ...d store current station in ISR memory long press iTunes Tagging when connected with HD Radio module 1 6 button 1 button Scan play Preset station 1 2 button Repeat play Preset station 2 3 button Random play Preset station 3 4 button Play Pause Top play long press Preset station 4 5 button Previous folder Preset station 5 10 tracks down long press 6 button Next folder Preset station 6 10 tracks up l...

Page 9: ...OT recharge disassemble heat or expose the battery to re 6 Insert the battery in proper direction according to the and poles 7 Store the battery in a place where children cannot reach to avoid the risk of accident POWER SRC button Toggle the audio source Power on Power off long press button Preset station up down Previous next track Search long press SCN PS AS button Scan play Preset scan Auto mem...

Page 10: ...Do not use commercially available disc protection sheets or discs equipped with stabilizers etc These may damage the disc or cause breakdown of the internal mechanism Storage Do not expose discs to direct sunlight or any heat source Do not expose discs to excess humidity or dust Do not expose discs to direct heat from heaters 4 CAUTIONS ON HANDLING Cleaning To remove ngermarks and dust use a soft ...

Page 11: ... status after power on 3 Press and hold the button on the front panel to turn off the power under work mode Mute Press the MUTE button on the remote control to mute the volume from the unit Note Pressing the MUTE button again or adjusting volume will release muting Volume adjustment Turn the VOLUME knob on the front panel or press the button on the remote control The adjustable range of volume is ...

Page 12: ...n store by AS function Each bands can store six stations CZ300 can store 24 stations in total Manual store While tuned into a desired radio station press and hold number button 1 6 to store it in the memory Radio Operations Recall the stored stations Press one numeric button among 1 to 6 on the panel to select the corresponding stored station Local seeking When LOCAL seeking is on only those radio...

Page 13: ...0 seconds each Storing a station 1 Select a band if needed then select a station 2 Press and hold a preset button numbers 1 6 on the front panel 3 The preset number and station is displayed and highlighted Recalling a station 1 Select a band if needed 2 Press a front panel preset button numbers 1 6 to select the corresponding stored station Channel search To access Channel Search mode press the ME...

Page 14: ...ect SUB CH by rotating the VOLUME knob and press it Multi channel is available when a digital signal is detected the DIGITAL icon will light If the digital signal becomes unavailable the unit will revert to Analog reception Preset stations Up to six stations on each band can be stored as presets which can then be instantly recalled by pressing the associated preset button To store a station turn t...

Page 15: ... Messages Tag Message Reason STORE 64 If the Tags data is ready and the ISR button is pressed SENDING Tags data is sending to iPod MEMO FULL Tag storage is full DEFFICIENT Tag data is not available IPOD FULL iPod memory is full NOT SUPPORT An iPod without Tagging function is connected and the ISR button is pressed Note Tags saved to your iPod can be managed using the iTunes software available at w...

Page 16: ...ote If you play a le with DRM Digital Rights Management for WMA remaining ON no audio is output The WMA indicator blinks To disable DRM Digital Rights Management When using Windows Media Player 9 10 11 click on Tool Options Copy Music tab then under Rip settings uncheck the Copy Protect Music box Then recreate the les When you disable DRM you do so at your own responsibility Precautions when creat...

Page 17: ...and hold the 5 button to move back 10 tracks Fast forward Fast reverse Fast forward Press and hold the button Fast reverse Press and hold the button For MP3 WMA discs it takes some time until the start of searching and between tracks In addition the playing time may have a margin of error Folder select This function allows you to select a folder containing MP3 WMA les and start playing from the rs...

Page 18: ...S SONGS COMPOSERS press and rotate the knob to select a desired option then press the knob to con rm Repeat play This function allows you to play the current track repeatedly or play all tracks in your iPod iPhone repeatedly 1 Press the RPT button once or more until TRACK RPT appears on the LCD to perform repeat play 2 Press the RPT button repeatedly until iPod iPhone Operations ALL RPT appears on...

Page 19: ...ack connector plugged into audio in socket on the front panel AUX input sensitivity setting 1 Press the ADJ button 2 Turn the VOL SEL knob to select AUX MID 3 If the output level of connected external audio player is High rotate VOL SEL knob and choose AUX LOW And if the output level is Low choose AUX HIGH AUX Operations ...

Page 20: ... SCROLL is ON the LCD will display ID3 TAG information cyclely e g TRACK FOLDER FILE ALBUM TITLE ARTIST TRACK When SCROLL is OFF the LCD will display one of the ID3 TAG information the default is TRACK but user can adjust it to other ID3 TAG information by pressing the DISP button System Setup DIMMER ON OFF Rotate the knob to choose dimmer on or off ON The LCD is dimmed when the interior light is ...

Page 21: ...nd open the operation panel Press the Reset button with a thin rod Note When the Reset button is pressed turn off the ACC power When the Reset button is pressed frequencies of radio stations titles etc stored in memory are cleared Remote control does not work Battery depleted Change the battery Battery installed incorrectly Install the battery correctly No low audio output Improper audio output co...

Page 22: ...utton is pressed frequencies of radio stations titles etc stored in memory are cleared USB devices Problem Cause Measure USB device cannot be inserted The USB device has been inserted with wrong direction Reversing the connection direction of the USB device try it again The USB connector is broken Replace with a new USB device USB device is not recognized The USB device is damaged Disconnect the U...

Page 23: ...edance 4 4 to 8 allowable Input Audio input sensitivity High 320 mV at 1 V output Mid 650 mV at 1 V output Low 1 3 V at 1 V output input impedance 10 k or greater Aux in level 2 V 8 SPECIFICATIONS General Power supply voltage 14 4 VDC 10 8 to 15 6 V allowable negative ground Pre Amp output voltage 2 0 V CD play mode 1 kHz 0 dB 10 k load Fuse 15 A Dimensions of the main unit W H D 7 2 5 2 7 25 7 12...

Page 24: ...ealer or an authorized Clarion service center 2 Use a soft dry cloth to clean the case Never use a rough cloth thinner benzine or alcohol For tough dirt apply a little cold or warm water to a soft cloth and wipe off the dirt gently CONTENTS 1 Before Starting 24 2 Package Contents 24 3 General Cautions 24 4 Cautions on Installation 26 5 Installing the Source Unit 26 6 Removing the Source Unit 27 7 ...

Page 25: ...e instrument panel use a screwdriver to bend each stopper of the universal mounting bracket inward then secure the stopper 2 Insert the source unit into the mounting bracket until it locks 3 Carefully adjust all mounting tabs on the mounting bracket and con rm that the mounting tabs are securely attached Notes 1 Some car models require special mounting kits for proper installation Consult your Cla...

Page 26: ... components such as the laser head 5 Install the unit horizontally Installing the unit more than 30 degree vertically may result in degraded performance 6 To prevent electric spark connect the positive pole rst and then the negative pole 7 DO NOT block the cooling fan exit to ensure suf cient heating dissipation of this unit or it may result in damage to this unit Unit installation Method A 1 Inse...

Page 27: ...ng installation Attach the trim ring around the front panel Disassemble trim ring 1 Push the trim ring to right and pull out the right part 2 Push the trim ring to left and pull out the left part Disassemble the unit 1 Switch off the power 2 Remove the panel 3 Remove the trim ring 4 Insert the removal keys straight back until they lock then pull the unit out 5 Disconnect all the wires 6 Removing t...

Page 28: ... Black Red Black White Gray Red Left Right Front audio output terminal 4 channel ampli er Rear audio output Left Subwoofer output 1 Rear audio output Right Subwoofer output 2 Black ANTENNA Refer to the next page HD BUS SAT R Red Black Black HD RADIO XM RADIO CCUXM1 CNP2000UC THD300 ...

Page 29: ...sulate each wire Gray Gray Black White White Black Purple Purple Black Green Green Black 16 pin connector extension lead attached to the source unit Brown wire Phone mute lead Connect to cellular phone mute lead Yellow wire Memory back up lead Connect directly to battery Red wire Power lead Accessory 12 V Blue White wire Ampli er turn on lead Connect to remote turn on lead of ampli er Black wire G...

Page 30: ...Clarion Co Ltd All Rights Reserved Copyright 2010 Clarion Co Ltd Printed in China Imprimé en Chine Impreso en China PN 127075002438 ...

Page 31: ...de Service et Garantie 2239 Winston Park Drive Oakville Ontario L6H 5R1 905 829 4600 www c1arion com clarion GARANTIE LIMITEE DE 1 AN CLARION Pour Ie Canada et les Etats Unis seulement Ce produit Clarion vendu par marchand autorise Clarion est garanti contre tous defauts de materiel et de mise en CEuvre pour une duree de un 1 an acompter de la date de vente initiale quand I achat ET I installation...

Page 32: ...arranty Service Center 2239 Winston Park Drive Oakville Ontario L6H 5R1 905 829 4600 www c1arion com 281 0639 00 2007 9 CLARION 1 YEAR LIMITED WARRANTY For USA and Canada only This Clarion product purchased from an authorized Clarion dealer are warranted against all defects in materials and workmanship for a period of one 1 year from the date of original purchase when purchased from AND installed ...

Reviews: