


2 / 4
Doc ID - 904 • REV 06
Connecting devices to the CLIQ.express
After placing your CLIQ.express, make the connections to your
other devices. Figures 2 and 3 identify the LEDs and ports on
the front and rear of the CLIQ.express. Refer to the
documentation that came with each of your other devices for
detailed information about connecting those devices to the
CLIQ.express.
To connect the CLIQ.express:
1. Connect your serial devices (optional) to the RS-232 port
using an RJ12 to RS-232 adapter cable, or an RJ12 to
DB-9 null modem cable (included). See Figure 3, item 1.
For RJ12 pinouts, see Figure 6.
Note:
The Console port is a service port used by Clare
Controls and not used with normal applications.
2. Connect a device, such as the optional CS-BR-1 Streams
Audio Bridge to a USB port on the CLIQ.express, See
Figure 3, item 3.
3. Use an Ethernet cable (not included) to connect your
CobraNet switch to the port labeled “CobraNet.” See
Figure 3, item 4.
Note:
The CobraNet port is preset with the static IP
address 172.30.100.1. All CobraNet devices used on the
same subnet must use an address from 172.30.100.2 to
172.30.100.254.
4. Use an Ethernet cable (not included) to connect to your
data network switch to the port labeled “Ethernet.” See
Figure 3, item 5.
Notes
The Network port is preset to DHCP. If you are using
the Streaming Media server in your project, a fixed IP
address is not required and should be configured as
“localhost.”
If you are using a device, such as an RTI remote that
requires the controller to have a fixed IP, you must set
the fixed IP using a MAC/DHCP reservation on the local
router.
5. Attach the 908.4 MHz antenna or optional antenna
extender to the antenna port. See “Attaching the antenna”
below.
Figure 2: CLIQ.express front
(1) LED – It illuminates purple when booting and blue when running
normally.
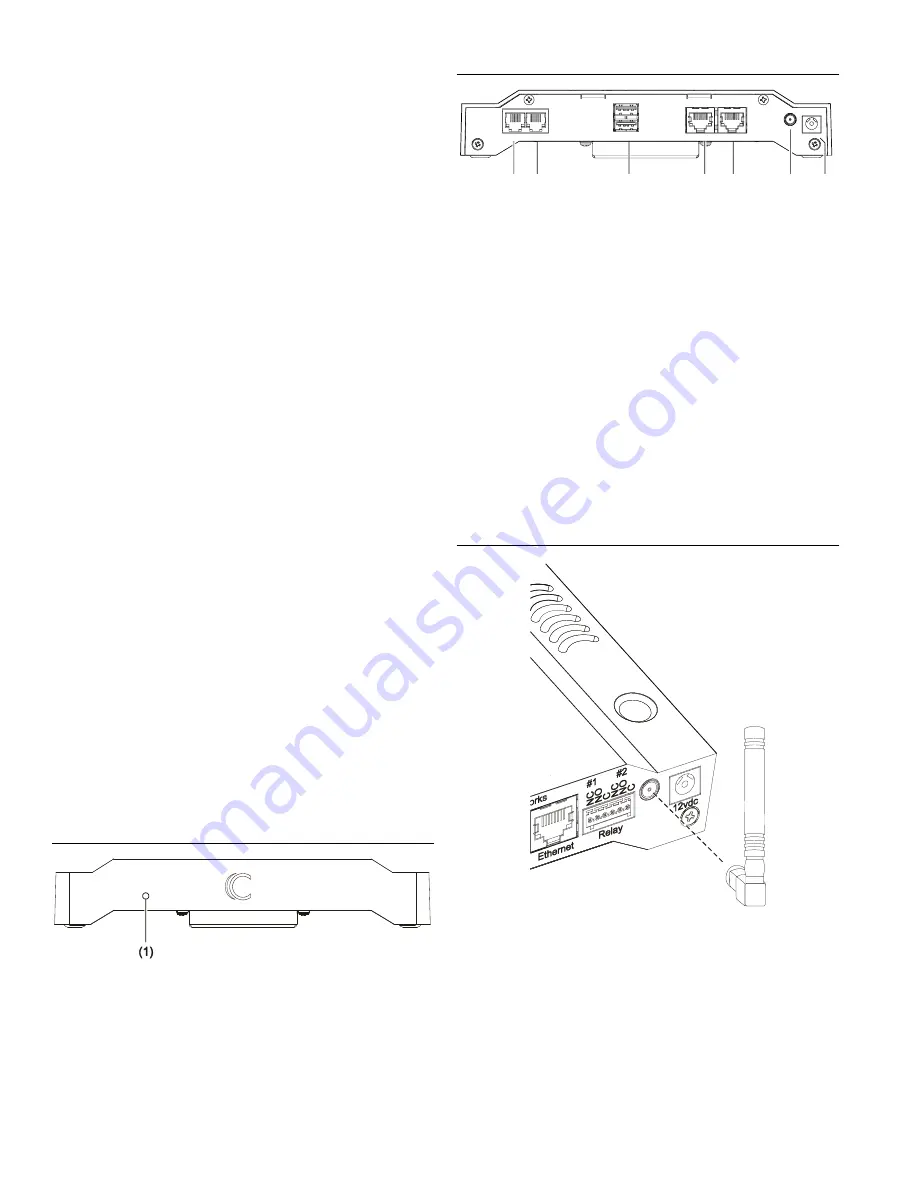
Figure 3: CLIQ.express rear connections
(1) RS232 (1 port)
(2) Console (factory use, only)
(3) USB ports
(4) CobraNet
(5) Ethernet
(6) Antenna
(7) Power – 12 VDC
Attaching the antenna
The 908.4 MHz antenna can be mounted to the CLIQ.express
controller, or further away using an extender cable (included)
to enhance radio performance. When mounting the
CLIQ.express inside a structured enclosure, always mount the
antenna outside the enclosure using the extender cable.
To attach the antenna directly to the CLIQ.express:
1. Remove the antenna from its packaging.
2. Screw antenna to the antenna port on the rear of the
CLIQ.express until the antenna is snug. Do not over-
tighten the antenna. See Figure 4.
Figure 4: Attaching the antenna to the CLIQ.express
To attach the antenna using the extender cable:
1. Using a 17/64 in. drill bit, drill a hole in the sidewall of the
ClareHome Structured Enclosure Extender, near the
CLIQ.express.
2. On the extender cable, remove the locknut and washer
from the SMA Male connector. See Figure 5.
RS232
USB
CobraNet Ethernet
12vdc
Networks
#1
#2
(1)
(3)
(4) (5)
(6)
(7)
Console
(2)


