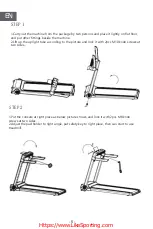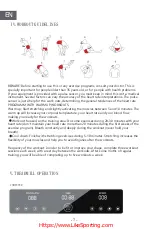
background image

- 9 -

EN

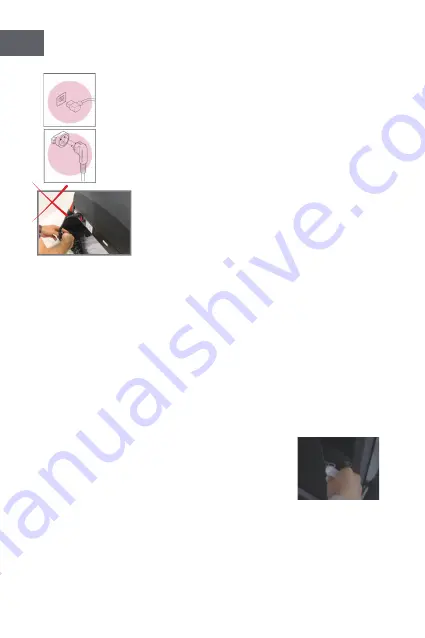
 This product must be earthed. If the power cord is damaged,it 

must be replaced with a manufacturer recommended power cord.

STORAGE: Keep your equipment in a enclosed place, away from dust or humidity. Don’t 

store it neither in a garage or in a indoor backyard, or near the water. Humidity, dust and 

water could damage it and have an effect on its functioning

After running for a period of time, the treadmill must be configured with special 

cymene silicone oil for lubrication.

ELECTRIC CABLE: Make sure that the cable and plug are in perfect conditions. Electric 

cables must be away from hot surfaces

SCREWS AND CONNECTING CABLES: Supervise and tighten the screws on a regular 

basis, because due to the vibration the screws and nuts tend to loosen.  

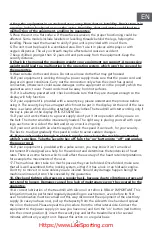
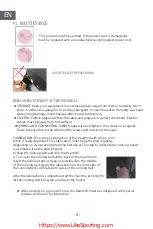
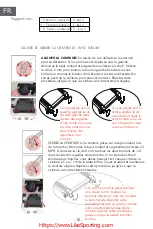
LUBRICATION: It’s a correct lubrication of the treadmill with silicon oil or 

teflon is really important. This lubrication must be performed regularly

depending on its use even before the first use.a) The step to lubricate the running board 

is as follows: (see the above figure) 

b) Stop the running belt and fold the treadmill.

c) Turn over the running belt at the back of the main frame. 

Insert the lubricant pot as deep as possible into the middle 

of the running belt. Apply the lubricant onto the inner side of

the running belt. Lubricate both sides of the running belt.

After the lubrication is completed, start the machine at 1km/h to 

let the running belt bring silicon all over the board. 

VI

. MAINTENANCE

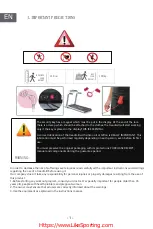
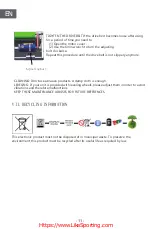
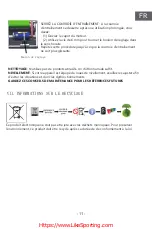
DO NOT TANGLE THE POWER CORD

REGULAR MAINTENANCE OF THE TREADMILL

Https://www.LikeSporting.com

Summary of Contents for CS-WP5

Page 1: ...Product Instruction Model CS WP5 Please read the instruction carefully before using Https www LikeSporting com...

Page 2: ...IMPORTANT PRECAUTIONS 1 2 MAIN TECHNICAL FEATURES 3 3 ASSEMBLY 4 4 WORKOUT GUIDELINES 7 5 TREADMILL OPERATION 7 6 MAINTENANCE 9 7 RECYCLING INFORM 11 8 9 COMMON ERRORS 12 WARRANTY 12 Https www LikeSp...

Page 3: ...ginal packaging with its protections PURCHASE RECEIPT manual and components during the guarantee period In order to decrease the risk of suffering severe injuries read carefully all the important inst...

Page 4: ...n while you are on the belt The motor would be innecesarily loaded The right way is placing yourself with open legs each one on a side of the belt and sit up once it is ongoing 14 If your unit works w...

Page 5: ...g STOP IMMEDIATELY 27 You must preserve the original packaging with its protections manual and components during the guarantee period 28 The accessories can be different to the other models 29 This el...

Page 6: ...0HP Name Main frame No Fittings M8 Knob 5mmWrench 6mm Wrench Multi Wrench User s Manual M10 Knob Silicone oil Safety Key Main 1set Qty Qty No Qty Fittings Frequency Running area Function Speed Range...

Page 7: ...up the upright tube according to the picture and lock it with 2pcs M10 knob screws at two sides 1 Put the console at right place as below picture shows and lock it with 2pcs M8 knob screws at two side...

Page 8: ...two sides 1 Fold up the treadmill turn around the supporting frame locker to horizontal place the supporting frame will extend automatically 2 When need to use treadmill collect the supporting frame...

Page 9: ...re your heart rate and your blood flow making you ready for the workouts Workout focused on the training area Do some exercises during 20 30 minutes with your heart rate don t maintain your heart rate...

Page 10: ...NUAL BLUETOOTH SPEAKER APP G APP GFIT BLUETOOTH SPEAKER This monitor has an integrated bluetooth speaker To use it with your mobile device select it within the Bluetooth settings Https www LikeSportin...

Page 11: ...gular basis because due to the vibration the screws and nuts tend to loosen LUBRICATION It s a correct lubrication of the treadmill with silicon oil or teflon is really important This lubrication must...

Page 12: ...the belt is properly tight to walk you must be able to pull up each side of the belt 5 or 7 cm off the platform Be careful and maintain the belt aligned Repeat this procedure until the belt is properl...

Page 13: ...t use abrasive products A damp cloth is enough LEVELING If your unit is provided with leveling wheels please adjust them in order to avoid vibrations and therefore malfunctions KEEP THESE MAINTENANCE...

Page 14: ...ng with its protections PURCHASE RECEIPT manual and components during the guarantee period VIII COMMON ERRORS ERROR CODE REASON HOW TO SOLVE E01 A signal wire not well connected Re connect signal wire...

Page 15: ...T RISTIQUES TECHNIQUES PRINCIPALES 3 3 ASSEMBLAGE 4 4 LIGNES DIRECTRICES POUR L ENTRA NEMENT 7 5 FONCTIONNEMENT DU TAPIS ROULANT 7 6 ENTRETIEN 9 7 INFORMATIONS SUR LE RECYCLAGE 11 8 9 ERREURS COURANTE...

Page 16: ...AVEC SES PROTECTIONS RE U D ACHAT MANUEL ET COMPOSANTS PENDANT LA PERIODE DE GARANTIE Afin de r duire le risque de blessures graves lisez attentivement toutes les instructions et avertissements impor...

Page 17: ...tes sur la ceinture Le moteur serait inutilement charg La bonne fa on est de vous placer les jambes ouvertes chacune sur un c t de la ceinture et de vous asseoir une fois qu elle est en cours 14 Si v...

Page 18: ...dissements pendant l entra nement ARR TEZ IMM DIATEMENT 27 Vous devez conserver l emballage d origine avec ses protections manuel et composants pendant la p riode de garantie 28 Les accessoires peuven...

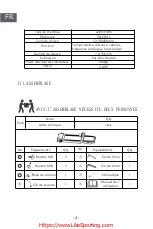
Page 19: ...al No Equipements Bouton M8 Cl de 5mm Cl de 6 mm Cl multiple Manuel de l utilisateur Bouton M10 Huile de silicone Cl de s curit Parti 1set Qty Qty No Qty Equipements Fr quence Zone de course Fonction...

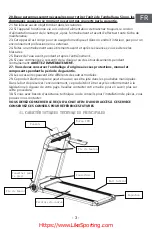
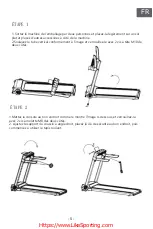
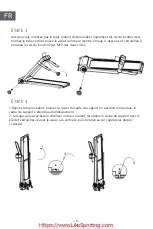
Page 20: ...tical conform ment l image et verrouillez le avec 2 vis t te M10 de deux c t s 1 Mettez la console au bon endroit comme le montre l image ci dessous et verrouillez la avec 2 vis molette M8 des deux c...

Page 21: ...bouton 2pcs M10 des deux c t s 1 Repliez le tapis roulant tournez le casier du cadre de support en position horizontale le cadre de support s tendra automatiquement 2 Lorsque vous avez besoin d utilis...

Page 22: ...diaque et votre flux sanguin vous pr parant pour les entra nements Entrainement ax sur le domaine d entrainement Faites quelques exercices pendant 20 30 minutes avec votre fr quence cardiaque ne maint...

Page 23: ...UT PARLEUR BLUETOOTH APP G HAUT PARLEUR BLUETOOTH Ce moniteur a un haut parleur Bluetooth int gr Pour l utiliser avec votre appareil mobile s lectionnez le dans les param tres Bluetooth Https www Like...

Page 24: ...en raison des vibrations les vis et les crous ont tendance se desserrer LUBRIFICATION C est une lubrification correcte du tapis roulant avec de l huile de silicone ou le t flon est vraiment important...

Page 25: ...des aiguilles d une montre Si vous d viez vers la droite ajustez la vis du c t droit dans le sens horaire ou la vis du c t gauche dans le sens antihoraire si la courroie mobile glisse utilisez une cl...

Page 26: ...OYAGE N utilisez pas de produits abrasifs Un chiffon humide suffit NIVELLEMENT Si votre appareil est quip de roues de nivellement veuillez les ajuster afin d viter les vibrations et donc les dysfoncti...

Page 27: ...c ses protections RE U D ACHAT manuel et composants pendant la p riode de garantie VIIl ERREURS COURANTES CODE ERRO RAISON COMMENT R SOLVER E01 A fil de signal mal connect B fil de signal cass Changer...

Page 28: ...ICHTSMASSNAHMEN 1 2 TECHNISCHE HAUPTMERKMALE 3 3 VERSAMMLUNG 4 4 RICHTLINIEN F R DAS TRAINING 7 5 LAUFBANDBETRIEB 7 6 INSTANDHALTUNG 9 7 VERWERTUNG INFORMIEREN 11 8 H UFIGE FEHLER 12 9 GARANTIE 12 Htt...

Page 29: ...N SCHUTZVORRICHTUNGEN DEM KAUFREIHEITSERSATZ DEM HANDBUCH UND DEN KOMPONENTEN W HREND DER GARANTIEZEIT AUFBEWAHREN Um das Risiko schwere Verletzungen zu verringern lesen Sie vor der Benutzung eines La...

Page 30: ...iert Nehmen Sie es nicht in Betrieb w hrend Sie am G rtel sitzen Der Motor w rde unn tig belastet Der richtige Weg ist sich mit offenen Beinen auf eine Seite des Bandes zu stellen und sich aufzusetzen...

Page 31: ...en 25 Trinken Sie Wasser vor w hrend und nach dem Training 26 Wenn Sie w hrend des Trainings Schmerzen oder Schwindelgef hle bekommen H REN SIE SOFORT AUF 27 Sie m ssen die Originalverpackung mit ihre...

Page 32: ...Knopf 5mm Schl ssel 6 mm Schl ssel Mehrfachschl ssel Benutzer Handbuch M10 Knopf Silikon l Sicherheitsschl ssel Hauptteil 1Satz Qty Qty Nein Qty Beschl ge H ufigkeit Laufende Fl che Funktion Geschwin...

Page 33: ...rriegeln Sie es mit 2 St ck M10 Knopfschrauben an zwei Seiten 1 Setzen Sie die Konsole an die richtige Stelle wie im Bild unten gezeigt und verriegeln Sie mit 2 St ck M8 Knopf Schrauben an zwei Seiten...

Page 34: ...en wieder an zwei Seiten 1 klappen Sie das Laufband zusammen drehen Sie den Tragrahmenschrank in die Horizontale und der Tragrahmen f hrt automatisch aus 2 Wenn Sie das Laufband benutzen m ssen nehmen...

Page 35: ...quenz und Ihre Durchblutung erh hen so dass Sie f r das Training bereit sind Das Training konzentrierte sich auf den Trainingsbereich Machen Sie einige bungen w hrend 20 30 Minuten mit Ihrer Herzfrequ...

Page 36: ...R HANDBUCH BLUETOOTH LAUTSPRECHER APP G Dieser Monitor verf gt ber einen integrierten Bluetooth Lautsprecher Um es mit Ihrem Mobilger t zu verwenden w hlen Sie es in den Bluetooth Einstellungen aus Ht...

Page 37: ...t da die Schrauben und Muttern aufgrund der Vibrationen dazu neigen SCHMIERUNG Dies ist die ordnungsgem e Schmierung des Laufbandes mit l von Silikon oder Teflon ist wirklich wichtig Diese Schmierung...

Page 38: ...f der rechten Seite gegen den Uhrzeigersinn zu verstellen Bei Abweichung nach rechts ist die Schraube auf der rechten Seite im Uhrzeigersinn oder die Schraube auf der linken Seite gegen den Uhrzeigers...

Page 39: ...n Sie keine Scheuermittel Ein feuchtes Tuch gen gt Nivellierung Wenn Ihr Ger t mit Nivellierr dern ausgestattet ist stellen Sie diese bitte ein um Vibrationen und damit Funktionsst rungen zu vermeiden...

Page 40: ...gen dem KAUFREIHEITSERSATZ dem Handbuch und den Komponenten w hrend der Garantiezeit aufbewahren VIIl H UFIGE FEHLER ERRO CODE BEGR NDUNG WIE L SUNGEN E01 A Signaldraht nicht gut angeschlossen B Signa...

Page 41: ...PRECAUCIONES IMPORTANTES 1 PRINCIPALES CARACTER STICAS T CNICAS 3 MONTAJE 4 PAUTAS DE ENTRENAMIENTO 7 OPERACI N DE CINTA 7 MANTENIMIENTO 9 INFORMACI N DE RECICLAJE 11 ERRORES COMUNES 12 9 GARANT A 12...

Page 42: ...CIONES RECIBO DE COMPRA MANUAL Y COMPONENTES DURANTE EL PER ODO DE GARANT A Para disminuir el riesgo de sufrir lesiones graves lea detenidamente todas las instrucciones y advertencias importantes sobr...

Page 43: ...tes de usarlo La llave de seguridad tiene un im n que debe colocarse en la pantalla Al final del cord n hay una abrazadera que se debe unir a la ropa La cinta comenzar a funcionar solo si la llave se...

Page 44: ...cualquier tarea de mantenimiento 23 Esta unidad est dise ada para un uso dom stico y en un lugar interior no para entornos comerciales o exteriores 24 Haz un entrenamiento con estiramientos antes y d...

Page 45: ...nillo 5mm llave inglesa 6mm llave inglesa Multi llave Manual de usuario M10 tornillo Aceite de silicona Clave de seguridad Principal 1 set Cantidad Cantidad No Cantidad Guarniciones Frecuencia rea de...

Page 46: ...o con la imagen y bloqu elo con 2 tornillos M10 en ambos lados 1 Coloque la consola en el lugar correcto como se muestra en la imagen de abajo y bloqu ela con 2 tornillos M8 en ambos lados 2 Ajuste el...

Page 47: ...s de la perilla M10 de 2 piezas en ambos lados 1 Pliegue la cinta de correr gire el casillero del marco de soporte a un lugar horizontal el marco de soporte se extender autom ticamente 2 Cuando necesi...

Page 48: ...u flujo sangu neo prepar ndolo para los entrenamientos Entrenamiento centrado en el rea de entrenamiento Haga algunos ejercicios durante 20 30 minutos con su frecuencia card aca no mantenga su frecuen...

Page 49: ...VOZ BLUETOOTH MANUAL BLUETOOTH APP G Este monitor dispone de un altavoz bluetooth integrado Para utilizarlo con su dispositivo m vil selecci nelo dentro de los ajustes de Bluetooth Https www LikeSport...

Page 50: ...apriete los tornillos regularmente porque debido a la vibraci n los tornillos y las tuercas tienden a aflojarse LUBRICACI N Es una lubricaci n correcta de la cinta de correr con aceite de silicio o te...

Page 51: ...o el tornillo del lado derecho en sentido antihorario Si se desv a hacia la derecha ajuste el tornillo del lado derecho en sentido horario o el tornillo del lado izquierdo en sentido antihorario Si l...

Page 52: ...PIEZA No use productos abrasivos Un pa o h medo es suficiente ARRASAMIENTO Si su unidad cuenta con ruedas niveladoras aj stelas para evitar vibraciones y por lo tanto fallos de funcionamiento MANTENGA...

Page 53: ...componentes durante el per odo de garant a VIII ERRORES COMUNES ERROR DE C DIGO RAZ N C MO RESOLVER E01 A el cable de se al no est bien conectado B cable de se al roto Cambiar nuevo cable de se al Re...

Page 54: ...IONI IMPORTANTI 1 CARATTERISTICHE TECNICHE PRINCIPALI 3 ASSEMBLEAY 4 LINEE GUIDA PER L ALLENAMENTO 7 FUNZIONAMENTO DEL TAPIS ROULANT 7 MANUTENZIONE 9 RICICLAGGIO INFORMARE 11 ERRORI COMUNI 12 9 GARANZ...

Page 55: ...ZIONI LA RICETTA DI ACQUISTO IL MANUALE E I COMPONENTI DURANTE IL PERIODO DI GARANZIA Per ridurre il rischio di gravi lesioni leggere attentamente tutte le istruzioni e le avvertenze importanti relati...

Page 56: ...comprendere il prodotto prima di utilizzarlo La chiave di sicurezza dotata di un magnete che deve essere inserito nel display Alla fine del laccio c un morsetto che deve essere attaccato ai vestiti I...

Page 57: ...iasi operazione di manutenzione 23 Questa unit progettata per uno scopo domestico e in un luogo interno non per un ambiente commerciale o esterno 24 Do un allenamento con allungamenti prima e dopo le...

Page 58: ...di Manopola M8 Chiave da 5 mm hiave da 6 mm Chiave multipla Manuale d uso Manopola M10 Olio di silicone Chiave di sicurezza Parte 1 set D accordo Qnty No Qnty Raccordi Frequenza Area di corsa Funzione...

Page 59: ...secondo l immagine e bloccarlo con 2pz viti a testa cilindrica M10 su due lati 1 Mettere la console al posto giusto come mostra l immagine sottostante e bloccarla con 2pz viti con pomello M8 su due la...

Page 60: ...u due lati 1 Fold up il tapis roulant girare intorno all armadietto del telaio di supporto in posizione orizzontale il telaio di supporto si estender automaticamente 2 Quando necessario utilizzare tap...

Page 61: ...a frequenza cardiaca e il flusso sanguigno rendendovi pronti per gli allenamenti Allenamento focalizzato sull area di allenamento Eseguire alcuni esercizi per 20 30 minuti con la frequenza cardiaca no...

Page 62: ...LANTE BLUETOOTH MANUALE BLUETOOTH SPEAKER APP G Questo monitor ha un altoparlante bluetooth integrato Per usarlo con il tuo dispositivo mobile selezionalo nelle impostazioni Bluetooth Https www LikeSp...

Page 63: ...ente perch a causa delle vibrazioni le viti e i dadi tendono ad allentarsi LUBRIFICAZIONE una corretta lubrificazione del tapis roulant con olio siliconico o il teflon davvero importante Questa lubrif...

Page 64: ...ra regolare la vite sul lato sinistro in senso orario o la vite sul lato destro in senso antiorario Se si devia a destra regolare la vite sul lato destro in senso orario o la vite sul lato sinistro in...

Page 65: ...PULIZIA Non usare prodotti abrasivi Un panno umido sufficiente LIVELLAMENTO Se l unit dotata di ruote di livellamento si prega di regolarle in modo da evitare vibrazioni e quindi malfunzionamenti CONS...

Page 66: ...RICETTA DI ACQUISTO il manuale e i componenti durante il periodo di garanzia VIII ERRORI COMUNI CODICE ERRO MOTIVAZIONE COME RISOLVERE E01 A filo di segnale non ben collegato B filo di segnale rotto C...

Page 67: ...8 Inhoud VOORZORGSMAATREGELEN 1 TECHNISCHE EIGENSCHAPPEN 3 ASSEMBLAGE 4 TRAINING AANWIJZINGEN 7 LOOPBAND BEDIENING 7 ONDERHOUD 9 RECYCLING INFORMATIE 11 PROBLEEMOPLOSSING 12 9 GARANTIE 12 Https www Li...

Page 68: ...TERIAAL AANKOOPBONNEN HANDLEIDING EN COMPONENTEN TIJDENS DE GARANTIEPERIODE WAAR SCHUWING Lees om het risico op ernstig letsel te verminderen zorgvuldig alle belangrijke instructies en waarschuwingen...

Page 69: ...gebruikt De beveiligingssleutel heeft een magneet die in het display moet worden geplaatst Aan het uiteinde van het koord zit een klem die aan de kleding moet worden bevestigd De loopband zal pas gaa...

Page 70: ...de die op dat moment is veroorzaakt niet gedekt door de garantie 21 Laat geen enkel voorwerp in de groeven vallen 22 Als het apparaat via een netsnoer werkt trek altijd de stekker uit het stopcontact...

Page 71: ...raat Nr Nr Onderdeel M8 Knop 5mm sleutel 6mm sleutel Multi sleutel Handleiding M10 Knop Siliconen olie Veilig heidssleutel Main 1 set Aantal Aantal Aantal Onderdeel Frequentie Loopoppervlak Functies S...

Page 72: ...ns de afbeelding en vergrendel deze met 2 stuks M10 knopschroeven aan twee kanten 1 Zet de console op de juiste plaats zoals hieronder afgebeeld en vergrendel hem met 2 stuks M8 knopschroeven aan twee...

Page 73: ...roeven aan twee kanten 1 Vouw de loopband in draai de steunframe locker horizontaal het steunframe zal automatisch uitschuiven 2 Wanneer u de loopband moet gebruiken doe dan het ondersteunende frame t...

Page 74: ...stemperatuur je hartslag en je bloedstroom waardoor je klaar bent voor de trainingen TRAINING GERICHT OP HET TRAININGSGEBIED Doe enkele oefeningen gedurende 20 30 minuten met uw hartslag houd uw harts...

Page 75: ...LUIDSPREKER KNOPPEN BLUETOOTH LUIDSPREKER Deze monitor heeft een ingebouwde bluetooth speaker Om het met uw mobiele apparaat te gebruiken selecteert u het in de Bluetooth instellingen Https www LikeS...

Page 76: ...n draai de schroeven regelmatig aan omdat door de trilling de schroeven en moeren de neiging hebben los te draaien SMEREN Een correcte smering van de loopband met siliconenolie of teflon is erg belang...

Page 77: ...erkant rechtsom of de schroef aan de rechterkant linksom af Als de band naar rechts afwijkt stel dan de schroef aan de rechterkant met de klok mee of de schroef aan de linkerkant tegen de klok in Als...

Page 78: ...iddelen Een vochtige doek is voldoende NIVELLEREN Als uw apparaat is voorzien van nivellerende wielen pas deze dan aan om trillingen en dus storingen te voorkomen BEWAAR DIT ONDERHOUDSADVIES VOOR TOEK...

Page 79: ...ING EN COMPONENTEN TIJDENS DE GARANTIEPERIODE VIII PROBLEEMOPLOSSING FOUTMELDING OORZAAK OPLOSSING E01 A signaaldraad niet goed aangesloten B signaaldraad gebroken Vervang met nieuw signaaldraad Sluit...

Reviews: