background image

Page 70

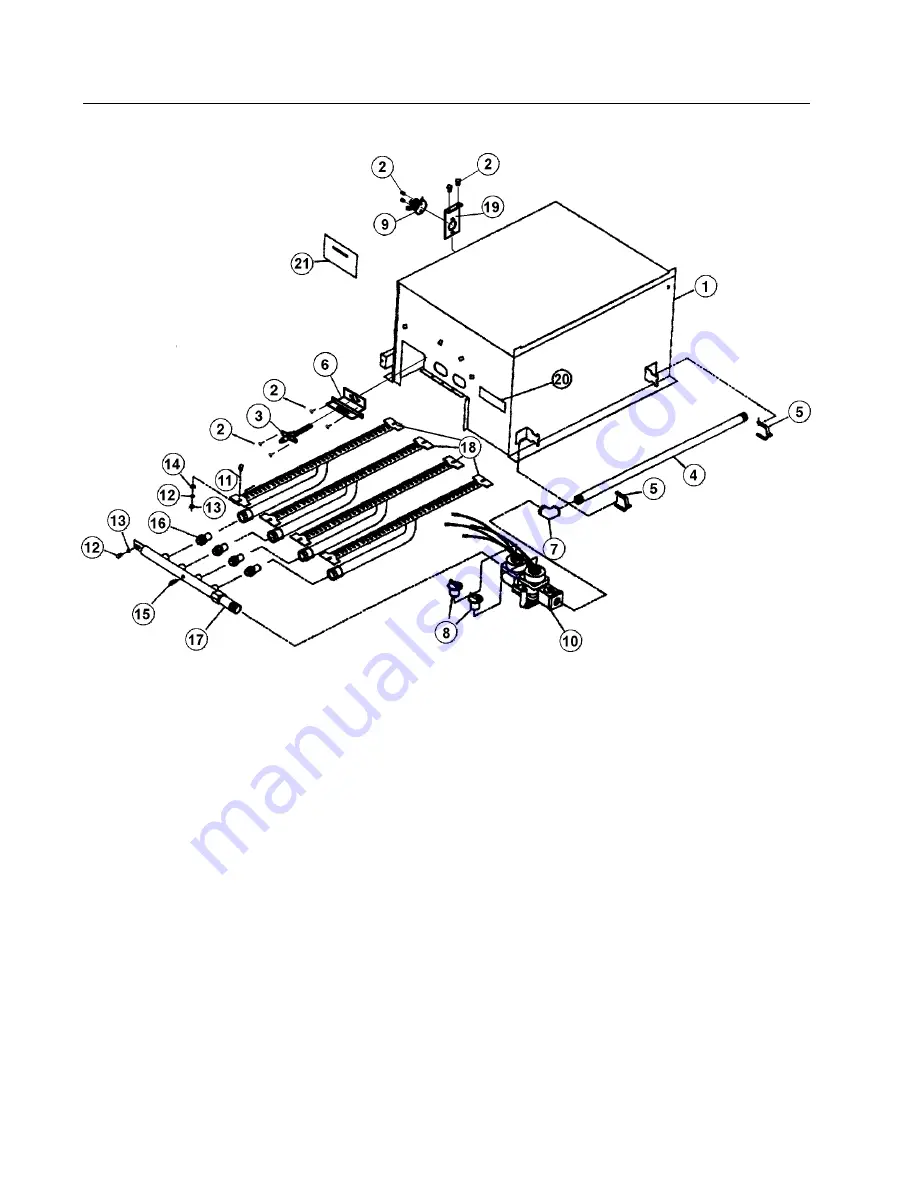
Parts—Standard Gas Bonnet

1

TU8683

Bonnet

2

TU7733

#8 - 18 x 1/2" Self Drill Screw

(Pkg. of 6)

3

GA-00764-0

Electrode Spark Igniter

4

TU13212

1/2" Pipe Nipple 24"

5

TU2226

Manifold Mounting Bracket

6

TU13826

Electrode Spark Mounting

Bracket

7

OP291

1/2" Elbow (Street)

8

C1365

Connector T & B

9

TU13678

Thermostat, Man. Reset 300°

10 TU13523

1/2" Combination Gas Valve

(Natural Gas)

TU13513

1/2" Combination Gas Valve

(LP Gas)

11

CB36

1/2" - 20 x 1/2" Hex  Head Screw

12

TU2846

1/4" Split Lockwasher

13

TU4934

1/4" - 20 Hex Nut

14

TU2847

1/4" Flat Washer

15

TU2224

1/8" Pipe Plug

16

TU3539

Gas Burner Orifice

(Specify Size)

17

TU8288

Manifold Assembly

18

TU7840

Burner

19

TU13695

Bonnet Thermostat Bracket

20

TU8645

Installation Instructions

21

---------

Spark Ignition Instructions

GAS BONNET ASSEMBLY - TU13675 (Natural Gas) DSI
GAS BONNET ASSEMBLY - TU13716 (LP Gas) DSI

Summary of Contents for L36URD30E

Page 1: ...L36URD30G L36URS30S L36URS30E L36USD30G L36URS30G L36URD30S L36URD30E THIS MANUAL MUST BE GIVEN TO THE EQUIPMENT OWNER CISSELLMANUFACTURINGCOMPANY HEADQUARTERS PHONE 502 587 1292 831SOUTHFIRSTST SALESFAX 502 585 3625 P O BOX32270 SERVICE PARTSFAX 502 681 1275 LOUISVILLE KY 40232 2270 Member of ...

Page 2: ...upants Immediately call your gas supplier from a neighbor s phone Follow the gas supplier s instructions If you cannot reach your gas supplier call the fire department Installation and service must be performed by a qualified installer service agency or the gas supplier WARNING In the event the user smells gas odor instructions on what to do must be posted in a prominent location This information ...

Page 3: ...ps wrinkles from setting in and reduces the possibility of spontaneous combustion WARNING Be Safe shut main electrical power and gas supply off externally before attempting service WARNING Never use drycleaning solvents gasoline kerosene or other flammable liquids in the dryer FIRE AND EXPLOSION WILL OCCUR NEVER PUT FABRICS TREATED WITH THESE LIQUIDS INTO THE DRYER NEVER USE THESE LIQUIDS NEAR THE...

Page 4: ...ment ou vous vous trouvez Evacuez la piece le batiment ou la zone Appelez immediatement votre fournisseur de gaz depuis un voisin Suivez les instructions du fournisseur Si vous ne pouvez rejoindre le fournisseur de gaz appelez le service des incendies __ l installation et l entretien doivent etre assures par un installateur ou un service d entretien qualifie ou par le fournisseur de gaz POUR VOTRE...

Page 5: ...ll to diagnose troubles to adjust remove or replace defective equipment or a part nor does it include any responsibility for transportation expense which is involved therein The warranty of Cissell is contingent upon installation and use of its equipment under normal operating conditions The warranty is void on equipment or parts that have been subjected to misuse accident or negligent damage oper...

Page 6: ...s 35 TimerModelsControlPanels 36 Service Savers 37 Troubleshooting 38 41 SparkIgnitionSystem 42 43 GeneralMaintenance 44 45 BurnerAirInletShuttersAdjustment 46 47 ReplacingBearings Instructions 48 BasketAlignment 49 50 ShimmingtheBasketandSpiderAssembly 51 AirSwitchAdjustment 52 GearReducerInformation 53 Duct Work and Air Switch Assembly 54 DryerswithReversingControlTimer 55 56 Front Panel and Doo...

Page 7: ...tado Hot DoNotTouch Heiß NichtBeruhren Hautetemperature Nepas toucher Caliente notocar start demarrage Start arranquedeunmovimiento emission of heat in general êmission de chaleur en general Warmeabgabeallgemein emisióndecalor cooling refroidissement Kühlen enfriamiento dangerousvoltage tensiondangereuse Gefährlicheelektrische Spannung tension peligrosa ...

Page 8: ...nginzweiRichtungen movimientorotativoenlosdos sentidos End of Cycle caution attention Achtung atencion precaucion directionofrotation sens de mouvement continu de rotation DrehbewegunginPfeilrichtung movimientogiratorioorotatorio en el sentido de la flecha Symbol Description ...

Page 9: ...w free access to the rear of dryer for future servicing of belts pulleys and motors Installation clearance from all combustable material is 0 ceiling clearance 0 rear clearance and 0 side clearance Before operating dryer open basket door and remove blocking between front panel and basket Read the instruction tags owner s manual warnings etc IMPORTANT Openingtheclothesloadingdoordeactivatesthedoors...

Page 10: ... prevent an over accumulation IMPORTANT Provide adequate clearance for air openings into the combustion chamber Permanent press durable press and other modern day fabrics require the care that your laundry dryers now provide At the end of the drying cycle a timed Cool Down control automatically takes over and continues the rotation of the fan and basket without heat until the garment load reaches ...

Page 11: ...Page 11 50 lb Dryer Dimensions Standard Gas Steam and Electric Heated Illustration ...

Page 12: ...Page 12 50 lb Dryer Dimensions Gas Energy Saver Model Illustration ...

Page 13: ...um Air Displacement 800 cfm 1359 m h Recommended Operating Range 630 730 cfm 1070 1240 m3 h Basket Speed Reversing 42 rpm 3 2 reversals per minute Non reversing 42 rpm Export Cube 90 2 ft 2 6 m For total amps check electrical rating plate on dryer 1 Can be designed for any voltage 2 50 Hz or 60 Hz 3 1 or 3 Phase Electrical wiring to dryer must comply with local electrical code requirements GENERAL...

Page 14: ...ng Dimensions 83 2108 mm Long 45 1143 mm Wide 55 1397 mm High Input ratings as shown are for elevations up to 2 000 ft 610 m For higher elevations ratings should be reduced 4 for each 1 000 ft 305 m above sea level Heater Input 30 kW h 25 812 kcal h Drying Time Approx 12 lb 5 4 kg Dry weight Indian Head 80 moisture retention 12 min Net Weight Approx 565 lb 256 kg Model with single motor 625 lb 283...

Page 15: ...ight Approx 640 lb 290 kg Model with single motor 690 lb 313 kg Model with double motor Domestic Shipping Weight 705 lb 320 kg Approx Model with single motor 755 lb 342 kg Model with double motor Export Shipping Weight 1180 lb 535 kg Approx Model with single motor 1230 lb 558 kg Model with double motor For high altitude installation remove the 5 127mm I D exhaust ring Input ratings as shown are fo...

Page 16: ...ian Head 80 moisture retention 30 minutes low pressure 22 minutes high pressure Steam Consumption Low pressure 2 9 BHP 24 496 kcal h High pressure 3 8 BHP 32 098 kcal h Net Weight Approx 595 lb 270 kg Single motor 655 lb 297 kg Double motor Export Shipping Weight 630 lb 286 kg 1 Carton Single motor 690 lb 313 kg Double motor Export Shipping Weight 638 lb 289 kg 1 Box Single motor 698 lb 317 kg Dou...

Page 17: ...302 220 380 60 3 1 2 373 1 8 9 F MTR302 200 346 50 3 1 2 373 2 0 1 0 F MTR300 115 200 240 60 1 1 2 373 6 2 3 1 F MTR300 110 200 230 50 1 1 2 373 7 4 3 7 F MTR184 240 415 50 3 1 3 25 1 6 9 F MTR302 200 240 480 60 3 1 2 373 1 8 9 F MTR101 575 60 3 1 75 1 7 F MTR302 220 380 50 3 1 2 373 2 0 1 0 F MOTOR NUMBER LIST FOR 50 LB SINGLE MOTOR MODELS Motor No Voltage Hz Phase HP KWATTS Amps Basket Fan MTR30...

Page 18: ...an to connect the power leads to the wire connectors within the service connection box on the rear of the dryer Do not change wiring without consulting the factory as you may void the factory warranty DO NOT CONNECTTHEDRYERTOANYVOLTAGEORCURRENT OTHER THAN THAT SPECIFIED ON THE DRYERRATING PLATE Wiringdiagramislocatedonrearwallofdryer All panels must be in position before operation of dryer ELECTRI...

Page 19: ... utilities company for proper gas pressure and gas supply line 5 Natural gas only check the gas pressure inlet supply to dryer 11 inches water column maximum Manifold pressure 3 5 inches water column 8 8 mbar pressure 6 L P gas only check the gas pressure inlet supply to dryer 13 inches water column 32 4 mbar maximum Manifold pressure 11 inches water column 27 4 mbar pressure CAUTION Lowgaspressur...

Page 20: ... any pressure testing of that system at test pressures in excess of 1 2 psi 3 5 kPa The dryer must be isolated from the gas supply piping system by closing it s individual manual shutoff valve during any pressure testing of the gas supply piping system at test pressures equal to or less than 1 2 psi 3 5 kPa Gas shutoff valve is not supplied with dryer ...

Page 21: ...nces should be connected upstream from the loop WARNING LIQUIFIED PETROLEUM GASES ONLY A gas pressure regulator for liquified petroleum gases is not furnished on gas heated clothes dryers This regulator is normally furnished by the installer In accordance with American Gas Association AGA standards a gas pressure regulator when installed indoors must be equipped with a vent limiter or a vent line ...

Page 22: ...300000 330000 350000 380000 400000 430000 450000 480000 504000 550000 605000 650000 705000 750000 806000 850000 907000 960000 1000000 3 4 3 4 3 4 3 4 3 4 3 4 1 1 1 1 1 4 1 1 4 1 1 2 1 1 2 1 1 2 2 2 2 2 2 2 2 2 2 2 1 2 2 1 2 2 1 2 2 1 2 2 1 2 2 1 2 2 1 2 2 1 2 3 3 3 3 3 3 4 3 4 3 4 1 1 1 1 1 1 1 4 1 1 4 1 1 2 1 1 2 2 2 2 2 2 2 2 1 2 2 1 2 2 1 2 2 1 2 2 1 2 2 1 2 2 1 2 2 1 2 3 3 3 3 3 3 3 1 2 3 1 2 ...

Page 23: ...nt is in operation 5 Before connecting trap and check valve to dryer open globe valve in steam supply line and allow steam to flow through dryer to flush out any dirt and scale from dryer This will assure proper operation of trap when connected 6 After flushing system install bucket trap with built in strainer and check valve For successful operation of dryer install trap 18 457 mm below coil and ...

Page 24: ...Page 24 Steam Piping Installation Illustration ...

Page 25: ...30 L36UR30 L36UR36 L36AR36 L44FD42 MODELS L44CD42 L50CD42 No of dryers Duct diameter in inches in cm No of dryers Duct diameter in inches in cm No of dryers Duct diameter in inches in cm 1 2 3 4 5 6 7 8 9 10 11 12 13 14 15 16 17 18 19 20 21 22 23 24 6 9 11 12 14 15 16 17 18 19 20 21 22 23 23 24 25 26 26 27 28 28 29 30 15 23 27 30 35 38 41 43 46 48 51 53 56 58 58 61 63 66 66 68 71 71 73 76 1 2 3 4 ...

Page 26: ...3 kcal h for each cubic foot per minute cfm used 4 Zero inches clearance to combustible material allowed on sides and at points within 4 inches 100 mm of front on top 5 Heat loss into laundry room from dryer fronts only is about 60 Btu h per square foot 15 kcal h per 0 1m 6 Flange mounted belt driven tube axial fan Fan must run when one or more dryers are running See suggested Automatic Electrical...

Page 27: ... 75 E S 75 34 536 911 6 153 103 665 C 75 ST 75 34 1000 1700 12 305 192 1239 HD80 80 36 3 1465 2490 10 254 282 1819 C 110 110 50 2200 3740 12 305 422 2723 C 110 E S 110 50 850 1445 8 203 163 1052 C 125 125 56 7 2000 3400 12 305 384 2477 C 150 150 68 2250 3825 12 305 432 2787 HD175 175 79 4 2780 4726 12 305 534 3445 HD190 190 86 2 3000 5100 12 305 576 3716 HD20 20 9 1 450 765 6 153 87 561 HD30 30 13...

Page 28: ...sure from the top or side walls See Dryer Make Up Air Requirements Chart 2 Enclosure plenum with service door This separates the dryer air from the room comfort air If dryers use room air instead of outside air additional heat loss can be another 25 Btu h 6 3 kcal h for each cubic foot per minute cfm 03m min used 3 Zero inches mm clearance to combustible material allowed on sides and at points wit...

Page 29: ...t 0 6 m of straight duct on dryer before installing an elbow on energy saver models only 5 Do not install wire mesh or other restrictions in the exhaust duct 6 Use clean outs in the exhaust duct and clean periodically when needed 7 Never exceed 0 3 water column 8 mbar static pressure in the exhaust duct 8 Inside surface of the duct must be smooth 9 Recommend pop rivets for duct assembly FOR BEST D...

Page 30: ...warnings or precautions 7 Never tumble fiberglass materials in the dryer unless the labels say they are machine dryable Glass fibers break and can remain in the dryer and could cause skin irritation if they become mixed into other fabrics 8 Reference Lighting and shut down instructions and wiring diagrams are located on the rear wall of the dryer cabinet 9 The dryer must not be installed or stored...

Page 31: ...erature heavy fabrics and hard to dry cottons and linens MEDIUM 150 F 66 C exhaust temperature permanent press synthetic blends LOW 135 F 58 C exhaust temperature delicate sheer fabrics 4 Press the Start button to start the drying and cooling cycles OPERATING INSTRUCTIONS COIN METER MODELS WHAT IS HAPPENING AFTER STEP 4 1 Digital display will count down time remaining in cycle computerized coin me...

Page 32: ...ryerisdesignedforacapacitymaximumload Overloading itwillresultinlongerdryingtimeanddampspotsonsomeofthe load Maximumoperatingefficiencydependsonproperairflow The lint screen must be kept clean daily to insure proper circulation of air throughout the dryer Thiscommercialdryerhaskeysforthelintdoorandaccessdoor to burners and controls This is for the safety of the user IMPORTANT ...

Page 33: ...Page 33 Setting Time On Computerized Coin Meter Illustration INSTRUCTIONS FOR SETTING TIME ON COMPUTERIZED COIN METER DIP Switch Banks are located here ...

Page 34: ...ed with two banks of four DIP switches each 2 Each DIP switch bank consists of 4 small switches each with a specifiedamountoftime minutes asshown 3 To set the time on the DIP bank simply set the appropriate switch to the ON up position to total the desired amount of time NOTE OFF down position equals 0 minute EXAMPLE 25 for12minutes MINUTES 0 0 4 8 12 min ...

Page 35: ...esired time The cooling light will come on after the drying finishes Step 4 Select the temperature desired High Heat 185 F 85 C exhaust temperature heavy fabrics and hard to dry Normal 185 F 85 C exhaust temperature cottons and linens PermanentPress 150 F 66 C exhaust temperature syntheticblends Low Heat 135 F 58 C exhaust temperature delicate sheer fabrics Step 5 Turn on off toggle switch to on a...

Page 36: ...Page 36 Double Timer Models Illustration Double Timer Panel ...

Page 37: ... time rather than drying time 2 Are the gas valves in the dryer and in the main gas line turnedon 3 Check for low or intermittant gas pressure 4 Check spark ignition module diagnostic light CLOTHES ARE NOT SATISFACTORILY DRY 1 Timed cycle Did you allow enough heating time before the cool down part of the cycle 2 Is the lint screen blocked 3 Is the exhaust duct to the outside clean and not blocked ...

Page 38: ...s Check installation sheet in service manual for recom mended make up air openings Clean lint accumulation on and around motors Close door Adjust switch by removing cover and bend actuator lever to clear switch button 3 8 10 mm with cover in place Replace switch Replace contactor Replace timer Replace V belt Adjust belt tension Tighten set screw Remove load No power Incorrect power Time off Loose ...

Page 39: ...objects lint accumulation or other causes that may prevent damper from operating Check duct work for lint build up Check installation sheet to insure that duct work and make up air open ings are adequately sized Check exhaust outlet If a screen has been improperly installed on the outlet it may be clogged with lint or frozen over in winter Never install a screen on the exhaust outlet Vacuum within...

Page 40: ...o 6 times the exhaust area of the dryer Remove lint Must be full open or replace Adjust gas pressure per rating plate Check service manual for recommended sizes Remove obstructions or lint build up from duct work NEVER use smaller size exhaust duct ALWAYS use larger size Dryer runs but no heat continued Main burners burning improperly Low or high gas flame Dryer too hot Air switch out of adjustmen...

Page 41: ... and blow down strainer or remove and clean thoroughly if heavily clogged Check piping per steam installation instructions Check trap for size and capacity If dirty and slug gish clean thoroughly or replace Check return line for high back pressure or another trap charging against the trap functioning improperly Check timer to see if operating Dryer does not stop at end of time period 6 Dryer runs ...

Page 42: ...f the module has multiple retries and no flame is detected the gas valve is de energized and the module goes into an interpurge delay After this delay the module will attempt another trial for the ignition period This will continue until the number of retries has been used up At the time the module will go into safety lockout 4 Recovery from safety lockout requires one of the following a A manual ...

Page 43: ...Page 43 DIRECTSPARK IGNITIONOPERATION FLOW CHART ...

Page 44: ... periodically Adjust tension by movement of idler bracket Lubricate idler pulley once every two months using six grams of high temperature grease Do not over grease 5 Electric motor Keep motor clean and dry Motors are packed with sufficient grease for 10 years normal service After that bearings and housing should be cleaned and repacked one third full with Chevron grease No SR1 2 See label on moto...

Page 45: ...ions outlined on separate page of this manual 12 Main Basket Bearings Lubricate once every six months using six grams of high temperature grease Do not over grease 13 Steam Heating Units Keep steam coils clean Check periodically and clean as often as required Remove lint and dirt accumulation from coil fins to avoid decreasing their efficiency 14 CleanOutPanel EnergySaverGasModelsOnly Remove this ...

Page 46: ...e Air Shutter Adjustment Propermethod Close air shutters to yellow tip then open air shutters to blue flame tip Orange tips are impurities in the air such as lint dust etc BURNER AIR INLET SHUTTER ADJUSTMENT AIR SHUTTER ADJUSTMENT Burner Air Inlet Type of Gas ShutterAdjustment Natural gas Wide open Liquidpetroleum 1 2 Open Manufacturedgas 1 8 Open ...

Page 47: ...er This flame pattern indicates the burner air inlet shutters are correctly adjusted but air through the dryer is insufficient This condition indicates excessive lint in the lint compartment lack of make up air in the room restricted exhaust duct or a vacuum in the room caused by anexhaustfan WRONG NEED TO PROVIDE CORRECT AIR FLOW THROUGH THE DRYER WRONG NEED TO ADJUST SHUTTER NEED TO ADJUST SHUTT...

Page 48: ...e flange basket bearing and take it off the dryer Step 5 Inspect the bearings for damage and replace as necessary in reverse order of removing them Before tightening securely align basket per instructions on separate instruction sheet Step 6 Lubrication guide Bearings never need lubrication They have been permanently lubricated by the supplier with a high temperature grease REPLACING BEARINGS AND ...

Page 49: ... two B pins for equal clearance Step 3 With the pins in position tighten the two 5 bolts until flush against back of dryer Retighten gear reducer mounting bolts in the numerical order indicated in figure 3 Tighten lock nuts 6 to secure bolts 5 in position Then remove pins Step 4 Check the space between basket and door opening at A pin and B pin positions figure 2 If the gap is not approximately th...

Page 50: ...and two B diameter pins inside the drying compartment between the rim of the basket opening and the rim of the door opening in the positions shown in figures 1 and 2 Check the two B pins for equal clearance NOTE Push the basket toward the rear Step 4 With the pins in position tighten the set screws on the bearing races Step 5 Tighten the side bolts 1 2 3 4 in numerical order Tighten the bolts 7 on...

Page 51: ...is position and the nearest rib to this position D Remove the basket do not loosen the alignment bolts E With the basket on the floor spider up place one or two shims between the spider leg and the back of the basket at the marked rib position see drawing F Re insert spider and basket assembly and re check cylinder G If at this point basket is still out of round procedure must be repeated starting...

Page 52: ...re2 under air blade in position shown hold switch mounting bracket firmly and adjust switch actuator D with needle nose pliers at E by twisting actuator right or left whichever is needed so that switch closes when end of air blade engages bar C 4 Maximum opening of air switch must be no greater than 3 4 figure 3 Bend tab F in or out to maintain this dimension 5 Re install air switch assembly on re...

Page 53: ...e new oil must be used After this change the oil every six months or 2500 hours of operation CAUTION USEAGMA8EPTYPEOIL CISSELLPART TU3465 ONLY The gear reducer is equipped with two oil plugs located on the right side as viewed from the back of the dryer To change oil remove the lower oil plug and drain the used oil Re install the lower oil plug and remove the upper oil plug Add new oil until the o...

Page 54: ... 2 TU8055 Duct Long 3 TU8052 Duct Tee 5 TU7375 Extended Elbow 6 TU8177 Duct Short 7 TU9161 Installation Label 1 F888 E Ring 2 TU2463 Actuator Arm 3 TU3476 Air Switch Decal 4 TU1771 6 Tinnerman Nut 5 TU8155 Air Switch 6 TU1770 Insulator 7 TU8171 Air Switch Bracket 8 TU7733 8 18 x 1 2 Self Drilling Screw 9 TU3219 6 x 1 Round Head S M S ...

Page 55: ...UTION Dryer power supply must be shut off before adjusting timer The dwell time is the time from when the motor turns off to when it turns on again in the opposite direction Turning the dwell adjustment knob counter clockwise increases the dwell time and turning it clockwise decreases the dwell time Recommended dwell time for the basket to stop completely is 5 to 7 seconds Minimum basket stopping ...

Page 56: ...ck end of motor See arrow on motor support Basket rotates counter clockwise as viewed from back end of motor See arrow on motor support Basket rotates counter clockwise as viewed from front of tumbler To change rotation of both fan and basket reverse power leads L1 and L2 To change rotation of fan only reverse motor leads F1 and F2 To change rotation of basket only reverse motor leads B1 and B2 ...

Page 57: ...eiss TU13213 Lens Repl Weiss 14 TU6766 Thermometer Mtg Plate 15 TU4840 10 32 Hex Crown Nut 16 TU4839 10 32 x 3 8 Machine Screw 17 TU2236 Hinge Posts 18 TU2836 5 16 18 x 1 2 Hex Head Cap Screw 19 TU2878 10 x 5 8 Sheet Metal Screw 20 TU5158 Door Catch Latch Asm w rivets 21 M271 8 Internal Tooth Lockwasher 1 TU10784 Front Panel for Coin Vault Specify Color 1a TU10785 Front Panel for Time and Temp Spe...

Page 58: ...Page 58 50 lb Laundry Dryer Front Exploded View Illustration ...

Page 59: ...20 TU7473 Handle 21 TU2710 TrimHolder 22 TU2385 Trim 23 TUB1867 Lock and Key Coin Meter Models K457 Latch Assembly Timer Models 24 TU7733 8 x 1 2 Self Drill Screw 25 TU10290 Lint Trap Housing Assembly ONLY 26 TU10362 Self CleaningLintScreenONLY TU5225 Lint Screen Frame ONLY 27 TU5876 Sweep Sheet Gaskets 28 TU3206 Lock Plate Coin Meter Models 29 TU2878 10 x 5 8 S M S 30 TU2877 10 Speed Nut 31 TU320...

Page 60: ...Page 60 50 lb Laundry Dryer Single Motor Model Rear View Illustration ...

Page 61: ... and Bottom Gasket 2Required 25 TU2476 FeltSeal 27 TU5874 Fan Wheel with Set Screws 60 Hz Gas Models TU8740 Fan Wheel with Set Screws 50 Hz Gas Models and 50 60 Hz Steam Electric 28 TU5439 Hex Head Screw 5 16 18 x 3 4 29 VSB130 Cut Washer 5 16 30 TU2814 SplitLockwasher 5 16 31 C249 Hex Nut 5 16 32 TU7733 SelfDrillingScrew 33 PT196 Cable Strap 35 TU3247 RetainingRing 36 TU4787 Hex Nut 3 8 37 VSB134...

Page 62: ...Page 62 50 lb Laundry Dryer Double Motor Model Rear View Illustration ...

Page 63: ...0 1 2 GreenfieldCable 30 Long 22 See Page 16 Fan Motor Specify Motor Number and Voltage 23 TU2376 Motor Mount 50 60 Hz 24 TU2474 Top and Bottom Gasket 2Required 25 TU2473 SideGasket 2Required 26 TU2476 FeltSeal 27 TU4684 Key 28 TU5874 Fan Wheel with Set Screws 60 Hz Gas Models TU8740 Fan Wheel with Set Screws 50 Hz Gas Models and 50 60 Hz Steam Electric 29 TU8206 AirSwitchAssembly See separate pag...

Page 64: ...pkg 6 3 TU2831 1 2 Lockwasher pkg 6 4 TU2883 1 2 Flat Washer pkg 6 5 TU10850 Flange Bearing 6 TU2195 1 2 13 x 1 3 4 Cap Screw pkg 6 7 TU10676 Pillow Block Bearing 8 OP251 1 2 I T Lockwasher pkg 6 9 RC347 1 2 13 x 1 1 4 Cap Screw pkg 6 10 TU13372 1 2 Hex Nut Nylok 11 TU10644 3 8 16 x 1 2 Nylok Set Screw pkg 6 ...

Page 65: ...1 1 2 x 7 1 8 1 7 TM110 Large Bearing Cup Cone 2 8 TM112 Large End Cap 1 9 TM115 1 4 Pipe Plug 1 11 TM102 Worm Gear 1 12 TM120 Oil Seal 2 13 TU2623 Cap Screw 3 8 16 x 1 1 4 14 TU2839 Cap Screw 1 4 20 x 7 8 8 15 TM121 Vent Plug 1 4 NPT 1 16 RC349 1 4 Internal Tooth Lockwasher 8 17 TM118 Small Closed End Cap 1 TU3465 Transmission oil Not Shown 1 Quantity ...

Page 66: ... Switch 12 TU1771 Twin Nut Pkg 12 13 TU13856 Control Panel Plate Asm 14 M271 8 Int Tooth Lockwasher 15 TU9524 6 x 5 16 Screw 16 TU2555 Timer Knob 17 TU3479 10 32 x 7 16 Truss Head Screw 18 P104 1 4 Cut Washer 19 TU2842 10 32 Hex Nut 20 TU7983 Upper Front Trim 21 TU13814 Control Panel Nameplate N Rev TU13816 Control Panel Nameplate Rev 22 TU8629 Terminal Board 23 TUT316 Pilot Light 24V 24 FB187 10 ...

Page 67: ... Head Scr 28 M271 8 Int Tooth Lockwasher 1 TU11659 Access Door Weldment 2 TU3479 10 32 x 7 16 Truss Head Screw 3 P104 1 4 Cut Washer 4 TU2842 10 32 Hex Nut 5 TU4822 Lock JWC2 6 TU2844 Key JWC2 7 TU8013 Cissell Nameplate 8 TU3400 Nut 9 TU13843 Control Panel Nameplate 10 TUT191A Push Button Switch Plate 11 TU4958 8 32 x 3 8 Machine Screw 12 Coin Meter Specify Voltage Coin Denomination Single or Doub...

Page 68: ...0 x 3 4 Hex Head Screw 4 TU7733 8 18 x 1 2 Self Drill Screw Pkg 6 5 TU13480 Transformer 200 240V 24V w Reset 6 TU13516 Contactor 24V 7 TU13526 Contactor Assembly 24V Reversing 8 TU2793 8 18 x 3 4 Self Drill Screw Pkg 6 9 TU14118 Box Cover Plate 10 F540 6 x 5 8 Phillips Head Screw 11 TU12874 Timer Solid State Reversing ...

Page 69: ...1 1 TU3240H Safety High Limit Thermostat 2 TU3240H 185 F Thermostat 3 TU5150H 150 F Thermostat 4 TU7244H 135 F Thermostat 5 TU5143 Mounting Bracket 6 TU3624 6 32 x 1 4 Round Head Screw 6 each 7 TU3400 6 32 Hex Nut 8 TU7733 8 x 1 2 Self Drill Screw 9 TU6067 8 Speed Clip 2 each ...

Page 70: ...eset 300 10 TU13523 1 2 Combination Gas Valve Natural Gas TU13513 1 2 Combination Gas Valve LP Gas 11 CB36 1 2 20 x 1 2 Hex Head Screw 12 TU2846 1 4 Split Lockwasher 13 TU4934 1 4 20 Hex Nut 14 TU2847 1 4 Flat Washer 15 TU2224 1 8 Pipe Plug 16 TU3539 Gas Burner Orifice Specify Size 17 TU8288 Manifold Assembly 18 TU7840 Burner 19 TU13695 Bonnet Thermostat Bracket 20 TU8645 Installation Instructions...

Page 71: ...g of 6 14 CB36 1 4 20 x 1 2 Hex Head Screw 15 TU2846 1 4 SplitLockwasher 16 TU2847 1 4 Flat Washer 17 TU4934 1 4 20 Hex Nut 18 TU2224 1 8 PipePlug 19 TU3539 Gas Burner Orifice SpecifySize 20 TU7840 Burner 21 TU8288 ManifoldAssembly 22 TU3416 8 x 1 1 4 Sheet Metal Screw 23 TU10946 Plug 24 M271 Lockwasher 25 P104 1 4 Cut Washer Brass 27 TU10292 WingNut 28 TU2877 10TinnermanNut 29 TU2878 10 x 5 8 She...

Page 72: ...fold 5 TU2414 3 4 16 x 3 8 Straight Connector 6 TU2405 Steam Coil 9 required 7 3 4 W x 1 5 8 H x 26 L 7 CB36 1 4 20 x 1 2 Hex Head Screw Pkg of 6 8 TU7733 8 x 1 2 S M S Pkg of 6 9 TU2598 Air Filter 16 x 25 x 1 10 TU2735 1 x 3 4 Reducer 11 TU4608 3 4 x 2 Pipe Nipple 12 TU13517 Solenoid Valve 24V 50 60 Hz 13 CFB2100 Greenfield Cable 1 2 Specify 21 Long 14 TU4790 1 2 Straight Conn 2 required 15 TU106...

Page 73: ...e Block E Heater Fuse F Bonnet with Elements G Heater Element H Moter Fuse Holder I Motor Fuse 1 TU3103 Bonnet Weldment 2 TU3102 Hold Down Plate 3 TU9205 Control Box Weldment 4 TU9207 Terminal Box Cover 5 TU12454 Top Cover 7 TU3104 Air Inlet Cover 8 TU3767 Contact Strap 4 required 9 TU3768 Contact Strap 1 required 10 TU3253 Insulators 11 TU7244H Thermostat 135o F 12 TU7738 Grounding Lug 13 TU9254 ...

Page 74: ...inalBlock TU9143 TU9143 TU9143 TU9142 TU9143 TU9143 TU9142 TU9143 D HeaterFuse Block TU11096 TU11096 TU11096 TU9141 TU11096 TU11096 E HeaterFuses TU7074 60AMPS 3required TU7074 60AMPS 3required TU7074 60AMPS 3required TU7072 40AMPS 3required TU7074 60AMPS 3required TU7074 60AMPS 3required F Bonnetwith Elements TU7589 30KW 208V 3PH TU7590 30KW 240V 3PH TU10395 30KW 240Vor415V 3PH TU7590 30KW 480V 3...

Page 75: ...ge 89 AMPS 87 AMPS 87 AMPS 86 AMPS 78 AMPS 76 AMPS 76 AMPS 75 AMPS 76 44 AMPS 75 43 AMPS 38 AMPS 38 AMPS 33 9AMPS Minimum Size Supply Wire Based On 60 C 140 F Insulated CopperConductor 2AWG 2AWG 2AWG 2AWG 3AWG 3AWG 3AWG 3AWG 3 6 AWG 3 6 AWG 8AWG 8AWG 8AWG Circuit Minimum Conduit Trade Size 60 60 60 60 60 60 60 60 50 50 35 35 35 Circuit Minimum Conduit Trade Size 1 1 4 1 1 4 1 1 4 1 1 4 1 1 4 1 1 4...

Page 76: ...Page 76 ...

Reviews: