background image


3-6

Cisco Physical Access 1125 Appliance User Guide

OL-20929-01

Chapter 3      Rack Mounting the Cisco PAM 1125 Appliance

Rack Mounting the Cisco PAM 1125 Appliance

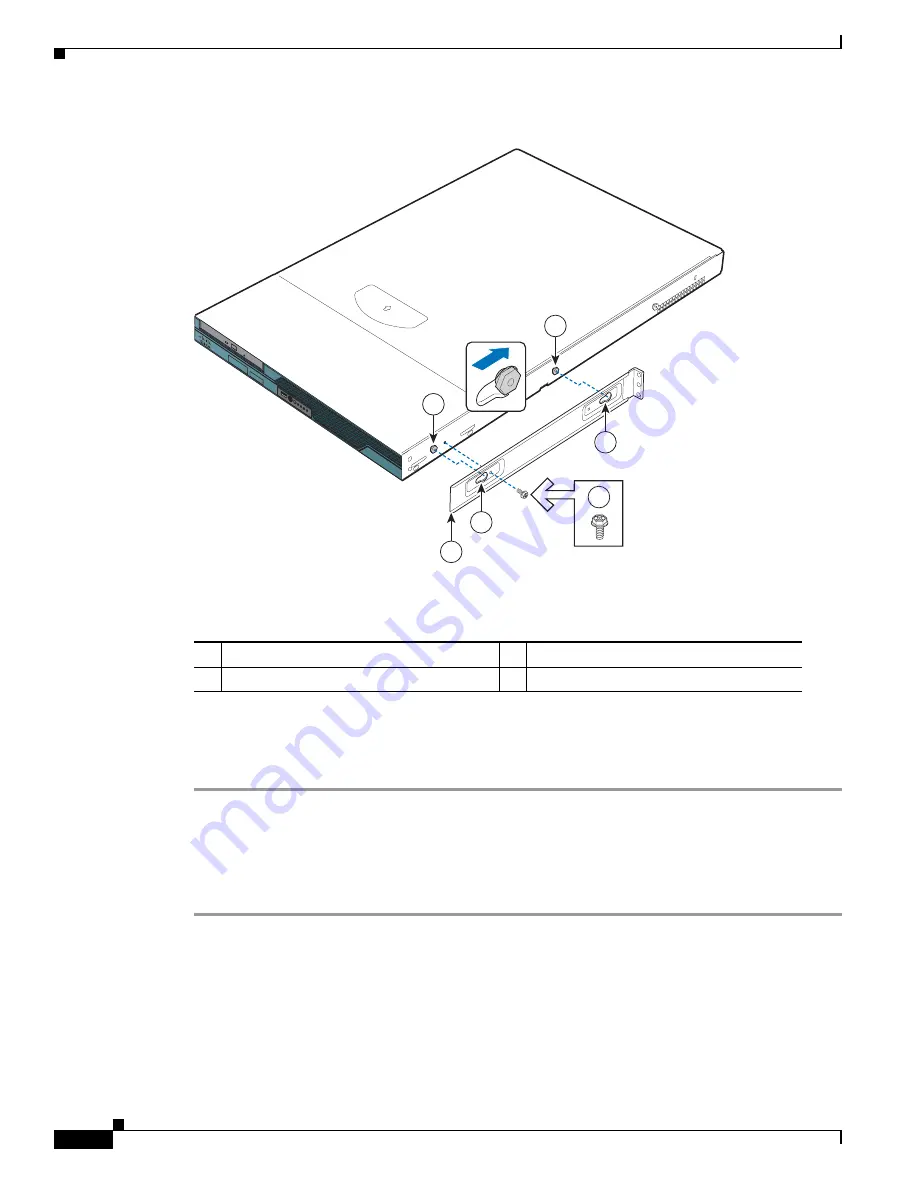
Figure 3-4

Installing a Chassis Bracket in the Mid-mount Position

1

8

7

8

59

Ci

s

co Ph

y

s

ical

 Acce

ss

 Mana

g

er

1

3

3

2

2

4

The following items are shown in 

Figure 3-4

:

1

Chassis bracket, in mid-mount position

3

Chassis tabs

2

Bracket holes

4

Hex head screw

Attaching L Brackets to Center Posts

To attach the L brackets to the center posts, perform the following procedure:

Step 1

Position an L bracket (see item 1 in 

Figure 3-5 on page 3-7

) on the front side of the center post (see item 

3 in 

Figure 3-5 on page 3-7

).

Step 2

Attach the L bracket to the center post using rack screws (see item 2 in 

Figure 3-5 on page 3-7

). Do not 

fully tighten at this time.

Step 3

In the same manner, attach an L bracket to the other center post.

Summary of Contents for Physical Access 1125 Appliance

Page 1: ...sco Systems Inc 170 West Tasman Drive San Jose CA 95134 1706 USA http www cisco com Tel 408 526 4000 800 553 NETS 6387 Fax 408 527 0883 Cisco Physical Access 1125 Appliance User Guide Release 1 2 0 Text Part Number OL 20929 01 ...

Page 2: ...diumVision Cisco TelePresence Cisco Unified Computing System Cisco WebEx DCE Flip Channels Flip for Good Flip Mino Flipshare Design Flip Ultra Flip Video Flip Video Design Instant Broadband and Welcome to the Human Network are trademarks Changing the Way We Work Live Play and Learn Cisco Capital Cisco Capital Design Cisco Financed Stylized Cisco Store and Flip Gift Card are service marks and Acces...

Page 3: ... 1 3 C H A P T E R 2 Preparing to Rack Mount the 1125 Appliance 2 1 Contents 2 1 Review All Safety Information and Guidelines 2 1 Preparing Your Site for Installation 2 1 Environmental 2 2 Choosing a Site for Installation 2 2 Grounding the System 2 2 Creating a Safe Environment 2 2 AC Power 2 3 Cabling 2 3 Precautions for Rack Mounting 2 3 Required Tools and Equipment 2 4 C H A P T E R 3 Rack Moun...

Page 4: ...g the Chassis in the Rack 3 12 Mounting the 1125 Appliance in a Four Post Rack 3 14 Setting the Multi Pin Adapters for Rack Type 3 15 Installing the Slide Rails into a Rack with Square Holes 3 16 Installing the Slide Rails into a Rack with Round Holes 3 18 Installing the 1125 Appliance into the Slide Rails 3 19 Connecting to the AC Power Source 3 20 Connecting Cables 3 20 Next Steps 3 20 A P P E N...

Page 5: ...cluded with the appliance see the Cisco Physical Access Manager User Guide This preface includes the following additional information Obtaining Documentation and Submitting a Service Request page iii Safety Warnings page iv Safety Guidelines page vi Obtaining Documentation and Submitting a Service Request For information on obtaining documentation submitting a service request and gathering additio...

Page 6: ...efore servicing the unit Statement 106 Warning This is a Class A Information Product when used in residential environment it may cause radio frequency interference under such circumstances the user may be requested to take appropriate countermeasures Statement 257 Warning Do not attempt to make such connections yourself Contact the appropriate electric inspection authority or electrician as approp...

Page 7: ...g is available Statement 1024 Warning This unit might have more than one power supply connection All connections must be removed to de energize the unit Statement 1028 Warning Blank faceplates and cover panels serve three important functions they prevent exposure to hazardous voltages and currents inside the chassis they contain electromagnetic interference EMI that might disrupt other equipment a...

Page 8: ...omponents inside these compartments should be serviced only by an authorized service technician If any of the following conditions occur unplug the product from the electrical outlet and replace the part or contact your authorized service provider The power cable or plug is damaged An object has fallen into the product The product has been exposed to water The product has been dropped or damaged T...

Page 9: ...ord Do not modify power cables or plugs Consult a licensed electrician or your power company for site modifications Always follow your local or national wiring rules Protecting Against Electrostatic Discharge Static electricity can harm delicate components inside the device To prevent static damage discharge static electricity from your body before you touch any of your system s electronic compone...

Page 10: ...User Guide OL 20929 01 Preface Connect the device to a properly grounded outlet Do not overload the power outlet when installing multiple devices in the rack Do not place any object weighing more than 110 lb 50 kg on top of rack mounted devices ...

Page 11: ...and controls Note The Cisco 1125 appliance is installed with Cisco PAM 1 0 0 and 1 1 0 This User Guide provides a reference for existing installations For new installations of Cisco PAM Release 1 2 0 or higher see the Cisco Physical Security Multi Services Platform User Guide Front View and Overview page 1 1 Identifying Chassis Components page 1 2 Front View and Overview Figure 1 1 shows the appli...

Page 12: ...5 port LAN Two 10 100 1000 Gigabit Ethernet RJ45 ports Hard Drives Capable of supporting up to two drives 1 0 in 2 5 cm in height Peripherals One slimline DVD ROM drive Power Supply One 350 watt power supply module Serial Ports Three USB 2 0 ports 1 front 2 rear DB9 Serial port Keyboard and Mouse Stacked PS 2 ports for keyboard and mouse Identifying Chassis Components This section helps you identi...

Page 13: ... Connectors on the Cisco PAM Rear Panel 1 2 4 10 7 8 11 9 6 5 3 231107 The following table describes the rear panel connectors called out in Figure 1 3 1 AC Power Connector 6 ETH 0 10 100 1000 Mb 2 Mouse 7 ETH 1 10 100 1000 Mb 3 Keyboard 8 USB 0 1 4 Serial Port 9 PCI Add in Card Slot 5 Video ETH LED Indicators The rear of the Cisco PAM appliance system includes LEDs that indicate the activity and ...

Page 14: ...n speed associated with each LED state Table 1 2 ETH LED Descriptions LED LED State Description Left Off No network connection Solid Amber Network connection in place Blinking Amber Transmit receive activity Right Off 10 Mbps connection if left LED is on or blinking Solid Amber 100 Mbps connection Solid Green 1000 Mbps connection ...

Page 15: ...ing page 2 3 Required Tools and Equipment page 2 4 Note Read the Regulatory Compliance and Safety Information for Cisco Physical Access Manager document that came with your device before you begin the installation Review All Safety Information and Guidelines Review all safety warnings and guidelines in the following sections Safety Warnings page iv Safety Guidelines page vi Preparing Your Site for...

Page 16: ...t be adequate to cool equipment to acceptable operating temperatures without adequate circulation Ensure that the room in which you operate has adequate air circulation Choosing a Site for Installation Warning This unit is intended for installation in restricted access areas A restricted access area is where access can only be gained by service personnel through the use of a special tool lock and ...

Page 17: ...d to ensure your safety Observe the following precautions for rack stability and safety Also refer to the rack installation documentation accompanying the rack for specific warning and caution statements and procedures Note Component refers to any server storage system or appliance and to various peripherals or supporting hardware Do not move large racks by yourself Due to the height and weight of...

Page 18: ...eparing to Rack Mount the 1125 Appliance Required Tools and Equipment Required Tools and Equipment You need the following tools and equipment to install the Cisco PAM Number 2 Phillips head screwdriver Tape measure and level Antistatic mat or antistatic foam ESD grounding strap ...

Page 19: ... included with the appliance see the Cisco Physical Access Manager User Guide Overview Table 3 1 provides a high level overview of the installation process Table 3 1 Quick Reference Task References Use the rack mount kit to install the Cisco PAM in a rack Rack Mounting the Cisco PAM 1125 Appliance page 3 2 Connect the Cisco PAM to an AC power source Connecting to the AC Power Source page 3 20 Conn...

Page 20: ...s can damage the rack Installation Precautions Before you begin the installation review the warnings and cautions in this section Warning APPLIANCE POWER ON OFF The push button on off power switch on the front panel of the appliance does not turn off the AC power To remove AC power from the appliance you must unplug the AC power cord from either the power supply or wall outlet Warning HAZARDOUS CO...

Page 21: ...ions in temperature can cause a variety of problems in your appliance Caution Ventilation The equipment rack must provide sufficient airflow to the front of the appliance to maintain proper cooling Contents of the Rail Installation Kit Figure 3 1 Installation Kit Brackets 231543 1 2 Table 3 2 lists the rail installation kit contents The brackets in the rail installation kit are shown in Figure 3 1...

Page 22: ...ing the 1125 Appliance on a Two Post Rack This section contains the following topics Attaching Brackets to the Chassis page 3 4 Attaching L Brackets to Center Posts page 3 6 Installing the Chassis in the Rack page 3 7 Attaching Brackets to the Chassis Before you begin check the 10 32 x inch screws that are included in the Fastener Pack to see if they are the correct size for your rack If not obtai...

Page 23: ...along one side of the chassis in the mid mount position Step 3 Align the holes item 2 in Figure 3 4 on page 3 6 in the bracket with the tabs item 3 in Figure 3 4 on page 3 6 on the chassis and place the bracket against the chassis Step 4 Slide the bracket as far as it will go toward the front of the chassis Step 5 Fasten the bracket to the chassis using the hex head screws item 4 in Figure 3 4 on ...

Page 24: ...ket in mid mount position 3 Chassis tabs 2 Bracket holes 4 Hex head screw Attaching L Brackets to Center Posts To attach the L brackets to the center posts perform the following procedure Step 1 Position an L bracket see item 1 in Figure 3 5 on page 3 7 on the front side of the center post see item 3 in Figure 3 5 on page 3 7 Step 2 Attach the L bracket to the center post using rack screws see ite...

Page 25: ... a two person job If needed use an appropriate lifting device A fully loaded Cisco PAM appliance weighs approximately 13 9 kg 30 6 lbs To mount the chassis on the rack perform the following procedure Step 1 Locate one person at the front of the rack and one at the rear Step 2 Position the chassis so that the L brackets see item 1 in Figure 3 6 on page 3 8 are inserted into the chassis mounting bra...

Page 26: ...nserted into Chassis Mounting Brackets Front View Manager 187860 Cisco Physical Access Manager 2 1 3 Step 4 Slide the chassis toward the front of the rack until the front of the chassis mounting brackets contact the rear of the center posts Step 5 Using the rack screws attach the front of the mounting brackets to the front of the center posts see Figure 3 7 Step 6 Tighten all screws ...

Page 27: ... only configuration However this option is not recommended for use in most rack systems If you wish to use a front mount only configuration it is strongly recommended that you verify with your rack vendor that your specific rack is designed to support the excessive weight and stresses that this mounting configuration imposes on the rack If the rack is not designed for this type of load you may exp...

Page 28: ...place the screws to keep the bezel attached to the appliance Figure 3 8 Removing a Handle from the Chassis 211432 Step 2 Place a mounting bracket see item 1 in Figure 3 9 on page 3 11 along one side of the chassis in the front mount position Step 3 Align the holes see item 2 in Figure 3 9 on page 3 11 in the bracket with the tabs see item 3 in Figure 3 9 on page 3 11 on the chassis and place the b...

Page 29: ...he following items are shown in Figure 3 9 1 Chassis bracket in front mount position 3 Chassis tabs 2 Bracket holes 4 Hex head screw Attaching the L Brackets to the Rack Posts Step 1 Position an L bracket see item 1 in Figure 3 10 on the rear side of the one of the posts item 3 Step 2 Attach the L bracket to the center post using the rack screws see item 2 in Figure 3 10 Do not fully tighten the s...

Page 30: ... attaching it to the rack is a two person job If needed use an appropriate lifting device A fully loaded Cisco PAM appliance weighs approximately 14 kg 31 lbs Step 1 Locate one person at the front of the rack and one at the rear Step 2 Position the chassis so that the L brackets see item 1 in Figure 3 11 on page 3 13 are inserted into the chassis mounting brackets see item 2 in Figure 3 11 on page...

Page 31: ...ounting Brackets 187863 Cisco Physical Access Manager Application Deployment Engine 2 1 3 Cisco Physical Access Manager Step 4 Slide the chassis toward the rear of the rack until the front of the chassis brackets contact the front of the center posts Step 5 Using the rack screws attach the front of the mounting brackets to the front of the center posts see Figure 3 12 on page 3 14 Step 6 Tighten a...

Page 32: ...ng the rail or in the event of an earthquake you should affix the rack to the floor The four post slide rail kit consist of individual left and right slide rails Figure 3 13 shows the some of the features of the four post slide rail This section contains the following topics Setting the Multi Pin Adapters for Rack Type page 3 15 Installing the Slide Rails into a Rack with Square Holes page 3 16 In...

Page 33: ...tch the rack mounting hole type if necessary Remove the Multi Pin Adapter by rotating the Swivel Lock up pressing the mounting pins together and then pulling the adapter from the Multi Pin Bracket Step 2 Install the Multi Pin Adapter by pressing the pins together while inserting the adapter into the bracket Multi Pin Adapter must be fully locked in the bracket Make certain both mounting pins on th...

Page 34: ... damage the slide rail and your mounting may not be secure To install the slide rails into the rack perform the following procedure Step 1 At all four rack uprights determine the vertical position in the rack where the slide rails are to be installed The top most mounting hole for a particular Rack Unit RU mounting position is typically identified by a mark or hole see Figure 3 15 on page 3 16 Fig...

Page 35: ... 3 16 Figure 3 16 Inserting the Adapter Pins into the Mounting Holes 231492 1 1 2 2 The following table describes some of the correct and incorrect ways to insert the adapter pins into the rack as illustrated in Figure 3 17 1 Correct The Multi Pin Adapter pins are fully engaged in rack holes Also the rack hole into which the top pin was inserted aligns with one of the round RU holes 2 Not correct ...

Page 36: ...e Slide Rails into a Rack with Round Holes Caution If you mount the slide rail in holes that are not vertically aligned from front to back you can damage the slide rail and your mounting may not be secure Note When you install the rail hardware into a rack with round holes you must position the rails so that they are inside the rack with the brackets facing outward This placement decreases the amo...

Page 37: ...binding recheck the mounting positions Step 6 Repeat Steps 2 through 5 for the right slide rail ensuring that it is parallel and level with the left slide rail Installing the 1125 Appliance into the Slide Rails To install the Cisco PAM appliance into the slide rails perform the following procedure Step 1 Extend both slide rails into the fully extended locked position Step 2 Align the mounting stud...

Page 38: ...ce with the provided power cable Connecting Cables Use unshielded twisted pair UTP copper wire Ethernet cable with standard RJ 45 compatible plugs to connect the Cisco PAM to the network To connect the cables Step 1 Plug the Ethernet network connection into port ETH 1 See Figure 1 3 on page 1 3 for the location of the Ethernet ports Step 2 If a redundant standby appliance is installed connect the ...

Page 39: ...Operating 2 0 g 11 msec 1 2 sine Packaged Operational after an 24 inch free fall Acoustic noise 7 Bels in sound power for a typical office ambient temperature 18 24 C 65 75 F Your selection of peripherals may change the noise level Electrostatic discharge ESD Tested to 15 kilovolts kV no component damage Maximum power consumption 350W maximum output power supply rating 540W maximum input power sup...

Page 40: ...29 01 Appendix A Hardware Specifications Optical drive 1 DVD ROM front accessible 8X DVD read 24X CD read Serial ports 1 USB 2 0 ports 3 1 at front and 2 at back of chassis Keyboard port 1 PS 2 Mouse port 1 PS 2 Table A 1 Environmental Specifications continued ...

Page 41: ...rt message No Go to Step 2 Step 2 Visually inspect the chassis Is the system wet or damaged Yes Liquid spills splashes and excessive humidity can cause damage to the system If an external device such as an external drive gets wet contact your service representative for instructions If the chassis was dropped or damaged while being moved you should check the system to see if it functions properly I...

Page 42: ...on page 1 3 for the location of back panel connections on the system To check all the connections and switches follow these steps Step 1 Power down the system including any attached peripherals such as external drives Disconnect all the power cables from their electrical outlets Step 2 If the system is connected to a power strip or power distribution unit turn the power strip off and then on again...

Reviews: