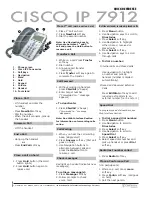

| CISCO IP PHONE 7912 SERIES |
Instructional & Information Technology Services
|
Change Web Locale
(language)
This determines the language of
the CallManager. To change the
default language setting:
1. From the main menu, click
[
Change the Locale for your
device profile(s) and these web
pages
]
2. Select a language from the
drop-down menu
3. Click [UPDATE]
Change Ring Setting
1. On the main menu, click
[CHANGE THE RING SETTINGS
FOR YOUR PHONE]
2. From the drop-down menus,
select how you would like each
line on your phone to ring
When Phone is Idle
and
When Phone s In Use
3. Click [UPDATE]
My Address Book
Store and retrieve telephone
numbers. To use this service, it
must first be activated online (one
time only).
♦
Activate service (online):
1. From the main menu, click
Configure your Cisco IP
Phone Services
2. Click
My Address Book
under
“Available Services”
3. Click
Continue
4. Enter
9
for the “Outside Access
Code”
5. Enter user name (your phone
number
+ 1
)
Example:
Phone extension is
3432
User ID is 848
34321
6. Enter PIN: 12345
7. Click Update
♦
Add entries (online):
1. From the main menu, click
Configure your Cisco
Personal Address Book
2. Click
Add a New Entry
3. Enter information and click
Insert
♦
Dial a number:
1. Press the
Menu
button
2. Use Navigation to scroll to
Services
3. Scroll to
My Address Book
4. Press
Select
soft key
5. Enter partial (or whole)
Last
,
First
, or
Nickname
using
the dial pad
6. Press
Submit
soft key (
Note
:
you may skip step 4 and
simply scroll through your
entries)
7. Select a name
8. Press
Dial
soft key
Fast Dial
Store up to 99 numbers for fast
dialling. To use this service, it
must first be activated online (one
time only).
♦
Activate service (online):
1. From the main menu, click
Configure your Cisco IP
Phone Services
2. Click
Fast Dial
under
“Available Services”
3. Click
Continue
4. Enter
9
for the “Outside Access
Code”
5. Enter user name (your phone
number
+ 1
)
Example:
Phone extension is
3432
User ID is 848
3432
1
6. Enter PIN: 12345
7. Click
Update
♦
Add entries (online):
1. From the main menu, click
Configure your Cisco
Personal Address Book
2. Click
Fast Dials
3. Under “Description”, click
(Unassigned)
4. Click a name already in your
Address Book
5. Select a number from “Choose
a Directory Number from your
Personal Address Book”
drop-down menu
6. Click
Insert
Or
♦
To add a number not in
your personal Address
Book:
1. From the main menu, click
Configure your Cisco
Personal Address Book
2. Click
Fast Dials
3. Under “Description”, click
(Unassigned)
4. Select “Enter a directory
number” and enter a phone
number (it is not necessary to
include 9)
5. Click
Insert
♦
Dial a number:
1. Press the
Menu
button
2. Use Navigation to scroll to
Services
3. Scroll to
Fast Dials
4. Press
Select
soft key
5. Enter partial (or whole)
Last
,
First
, or
Nickname
using the
dial pad
6. Press
Submit
soft key (
Note
:
you may skip step 4 and
simply scroll through your
entries)
7. Select a name
8. Press
Dial
soft key
For more information visit the
VoIP website at:
http://voip.concordia.ca
QUICK REFERENCE
P.3


