background image

   Cisco Firepower 2100 Series Hardware Installation Guide

58

Maintenance and Upgrades

Install the Optional Cable Management Brackets

Summary of Contents for Firepower 2110

Page 1: ...are Installation Guide First Published 2017 05 25 Last Modified 2017 06 20 Americas Headquarters Cisco Systems Inc 170 West Tasman Drive San Jose CA 95134 1706 USA http www cisco com Tel 408 526 4000 800 553 NETS 6387 Fax 408 527 0883 ...

Page 2: ... IMPLIED INCLUDING WITHOUT LIMITATION THOSE OF MERCHANTABILITY FITNESS FOR A PARTICULAR PURPOSE AND NONINFRINGEMENT OR ARISING FROM A COURSE OF DEALING USAGE OR TRADE PRACTICE IN NO EVENT SHALL CISCO OR ITS SUPPLIERS BE LIABLE FOR ANY INDIRECT SPECIAL CONSEQUENTIAL OR INCIDENTAL DAMAGES INCLUDING WITHOUT LIMITATION LOST PROFITS OR LOSS OR DAMAGE TO DATA ARISING OUT OF THE USE OR INABILITY TO USE T...

Page 3: ...ers 20 Hardware Specifications 23 C H A P T E R 2 Installation Preparation 27 Installation Notes and Warnings 27 Safety Recommendations 30 Maintain Safety with Electricity 30 Prevent Electrostatic Discharge Damage 31 Site Environment 31 Site Considerations 31 Power Supply Considerations 31 Equipment Rack Configuration Considerations 32 C H A P T E R 3 Mount and Connect 33 Rack Mount the Chassis 33...

Page 4: ...k Module 43 Remove and Replace the SSD 45 Remove and Replace the Power Supply Module 46 Connect the DC Power Supply Module 48 Secure the Power Cord on the Power Supply Module 51 Remove and Replace the Fan Tray 54 Install the Optional Cable Management Brackets 55 Cisco Firepower 2100 Series Hardware Installation Guide iv Contents ...

Page 5: ...ront Panel LEDs page 9 Rear Panel page 14 Network Modules page 15 Power Supply Modules page 17 Fans page 20 SSDs page 20 Supported SFP SFP Transceivers page 20 Hardware Specifications page 23 Cisco Firepower 2100 Series Features The Cisco Firepower 2100 series security appliance is a standalone modular security services platform The series includes the Firepower 2110 2120 2130 and 2140 Figure 1 Fi...

Page 6: ... processor 64 GB 32 GB 16 GB Intel x86 memory Single 16 core at 1 8G Single 12 core at 1 2G Single 8 core at 1 2G Single 6 core at 1 2G Cavium Network Processor Unit NPU 16G 8G Cavium NPU RAM 8G nominal Flash 24 16 Maximum number of interfaces 1 Gigabit Ethernet 10M 100M 1G Base T Management port RJ 45 serial port Console port Type A 2 0 500mA USB port 12 fixed RJ 45 1G 100M 10M ports Named Ethern...

Page 7: ...can install the MSP in the SSD slot 2 Malware Storage Pack MSP Deployment Options You can deploy the Firepower 2100 in the following ways As a firewall At the enterprise Internet edge deployed in a high availability configuration At branch offices in either an HA pair or standalone As a device that provides additional application control URL filtering or IPS threat centric capabilities Behind an e...

Page 8: ...ckage Contents Blue console cable PC terminal adapter 2 Firepower 2110 or 2120 chassis 1 SFP transceiver Optional in package if ordered 4 One power cord country specific 3 One ground lug kit 6 AWG lug two 10 32 x 38 screws 6 2 rack mount brackets and screws Six 8 32 0 281 Four 12 24 0 75 Four 10 32 0 75 Four M6 19mm 5 Useful Links Cisco Firepower 2100 Series 8 Two cable management brackets Optiona...

Page 9: ...Optional in package if ordered 4 One or two power cords country specific 3 Six 8 32 x 25 slide rail locking bracket screws 6 Slide rail kit Left and right slide rails two M3X6mm wafer head screws 5 One ground lug kit 6 AWG lug two 10 32 x 38 screws 8 Two slide rail locking brackets 7 Useful Links Cisco Firepower 2100 Series 10 Cable management bracket kit Two cable management brackets and four 8 3...

Page 10: ...lowing figure shows the front panel of the Firepower 2110 and 2120 security appliances See Front Panel LEDs on page 9 for a description of the LEDs Figure 5 Firepower 2110 and 2120 Front Panel Gigabit Ethernet management port Management 0 also referred to as Management 1 1 and Diagnostic 1 1 2 Power LED 1 Cisco Firepower 2100 Series Hardware Installation Guide 6 Overview Serial Number Location ...

Page 11: ...EDs on page 9 for a description of the LEDs Figure 6 Firepower 2130 and 2140 Front Panel Locator beacon 2 Power LED 1 Twelve RJ 45 1G 100M 10M auto duplex auto MDI X Base T ports Ethernet 1 1 through 1 12 labeled top to bottom left to right 4 Gigabit Ethernet management port Management 0 also referred to as Management 1 1 and Diagnostic 1 1 3 SSD 2 6 SSD 1 5 Type A USB 2 0 port 8 System LEDs 7 Pul...

Page 12: ...s disk1 The Type A USB port supports the following OIR USB drive formatted with FAT32 Boot kickstart image from ROMMON for discovery recovery purposes Copy files to and from workspace and volatile within local mgmt The most relevant files are Core files Ethanalyzer packet captures Tech support files Security module log files Platform bundle image upload using download image usbA The Type A USB por...

Page 13: ...tandby power is off Blinking green The system has detected a power switch toggle event and initiated the shutdown sequence If the power switch is in the OFF position the system powers off after shutdown is completed Do not remove the AC or DC power source while this LED is blinking so that the system has time to perform a graceful shutdown Solid amber The system is powering up before the BIOS boot...

Page 14: ...no activity Blinking green SSD is active 5 SSD1 Alert Status Unlit SSD has normal activity Solid amber SSD failure 8 FAN Unlit The environmental subsystem is not active yet Solid green The fans are running normally It may take up to one minute for the LED status to turn green after power is on Solid amber One fan has failed The system can continue to operate normally but fan service is required Bl...

Page 15: ...nabled network activity is detected 12 Ethernet Speed Blinking green The number of blinks determines link speed 1 blink 10Mbit 2 100Mbit 3 1Gbit 11 The following figure describes the Firepower 2130 and 2140 front panel LEDs Figure 8 Firepower 2130 and 2140 Front Panel LEDs Cisco Firepower 2100 Series Hardware Installation Guide 11 Overview Front Panel LEDs ...

Page 16: ...This takes one to five seconds at most Solid green The system is fully powered up 1 ACT Active Unlit The system in standby mode Green The system is active The status is updated every 10 seconds Amber Not in use at this time 4 SYS Health Unlit The system has not booted up yet Blinking green The system is booting up or in bootloader stage Solid green The system has fully booted Solid amber The syste...

Page 17: ... the LED status to turn green after power is on Solid amber One fan has failed The system can continue to operate normally but fan service is required Blinking amber Two or more fans have failed or the fan tray has been removed from the system Immediate attention is required 9 Ethernet Link Solid green The link partner is detected no activity Blinking green Network activity is detected 12 SSD2 Ale...

Page 18: ... the accessory kit Note 4 Fixed fans 3 The following figure shows the rear panel of the Firepower 2130 and 2140 Figure 10 Firepower 2130 and 2140 Rear Panel Power supply module 1 FAIL LED 2 Power on off switch 1 Power supply module 1 4 Power supply module 2 FAIL LED 3 Fan tray 6 Power supply module 1 OK LED 5 Power supply module 2 OK LED 8 Power supply module 2 7 Cisco Firepower 2100 Series Hardwa...

Page 19: ...uption can occur Caution For More Information See Remove and Replace the Power Supply Module on page 46 for the procedure for removing and replacing the power supply module in the Firepower 2130 and 2140 See Remove and Replace the Fan Tray on page 54 for the procedure for removing and replacing the fan tray in the Firepower 2130 and 2140 See Ground the Chassis on page 38 for the procedure for usin...

Page 20: ...vity LEDs Unlit No connection or port is not in use Solid amber No link or network failure Solid green Link up Blinking green Network activity 10 Ethernet 2 8 9 For More Information See Supported SFP SFP Transceivers on page 20 for a list of supported SFPS See Remove and Replace the Network Module on page 43 for the procedure for removing and replacing network modules Cisco Firepower 2100 Series H...

Page 21: ...y module is hot swappable Note The system power requirements are lower than the power supply module capabilities See the following table Note Make sure that one power supply module is always active Attention AC Power Supply The dual power supplies can supply up to 800W power across the input voltage range The load is shared when both power supply modules are plugged in and running at the same time...

Page 22: ...ugged in and running at the same time Table 3 DC Power Supply Module Hardware Specifications 2140 2130 48 to 60V DC Input voltage 15A at 48V DC The power supply module is rated at 15A but the system power is limited to 6 1A See Hardware Specifications on page 23 for more system specifications Note Maximum current 350W Maximum output power 1 1 redundancy Redundancy 92 Efficiency at 50 load Cisco Fi...

Page 23: ...switch is off Solid green The power supply module is enabled and running Amber LED Fail Status Unlit No fault detected Blinking amber Fault warning power supply may still work but could fail due to high temperature failing fan or over current Solid amber Fault detected power supply not working properly Includes over voltage over current over temperature and fan failure For More Information See Rem...

Page 24: ...rade to the MSP The MSP MUST be installed in the second slot The MSP stores threat detection results for use in future analysis It supports the Advanced Malware Protection AMP software feature It is used as both storage and as the Malware application repository RAID is not supported You cannot swap SSDs between different Firepower platforms For example you cannot use a 4100 series SSD in a 2100 se...

Page 25: ... microscopes within a distance of 100 mm may pose an eye hazard Warning Statement 1057 Hazardous Radiation Exposure Use of controls or adjustments or performance of procedures other than those specified may result in hazardous radiation exposure Warning The SFP SFP transceiver is a bidirectional device with a transmitter and receiver in the same physical package It is a hot swappable optical inter...

Page 26: ...d we do not recommend using them because they have not been tested and validated by Cisco Cisco TAC may refuse support for any interoperability problems that result from using an untested third party SFP transceiver Caution The following table lists the supported transceivers Table 4 Supported SFPs Ports Supported PID Optics Type SFP 1G Ports 13 through 16 Ports 1 though 8 of the 8X10G network mod...

Page 27: ... CU3M SFP H10GB CU5M H10GB CU 1M 1 5M 2M 2 5M 3M 5M SFP H10GB ACU7M SFP H10GB ACU10M H10GB ACU 7M 10M SFP 10G AOC1M SFP 10G AOC2M SFP 10G AOC3M SFP 10G AOC5M SFP 10G AOC7M SFP 10G AOC10M 10G AOC 1M 2M 3M 5M 7M 10M Hardware Specifications The following table contains hardware specifications for the Firepower 2100 series security appliance 2140 2130 2120 2110 Specification Physical 1 RU Fits standar...

Page 28: ... GB DDR4 DRAM Power 100 240VAC 2 9A at 100VAC 50 to 60 Hz The power supply module is rated at 6 3A but the system power is limited to 2 9A Note 100 240VAC 1 9A at 100VAC 50 to 60 Hz The power supply module is rated at 4A but the system power is limited to 1 9A Note System power AC or DC AC Power supply module Yes No Redundant power Environmental Operating 32 to 104 F 0 to 40 C Nonoperating 40 to 1...

Page 29: ... dBA typical 76 7 dBA maximum 47 3 dBA typical 73 4 dBA maximum Sound pressure 66 typical 84 5 maximum 60 2 typical 85 1 maximum Sound power Front to back Air flow Cisco Firepower 2100 Series Hardware Installation Guide 25 Overview Hardware Specifications ...

Page 30: ...Cisco Firepower 2100 Series Hardware Installation Guide 26 Overview Hardware Specifications ...

Page 31: ... to read the Regulatory Compliance and Safety Information document before installing the security appliance Take note of the following warnings Statement 1071 Warning Definition IMPORTANT SAFETY INSTRUCTIONS This warning symbol means danger You are in a situation that could cause bodily injury Before you work on any equipment be aware of the hazards involved with electrical circuitry and be famili...

Page 32: ...straps to avoid ESD damage to the card Do not directly touch the backplane with your hand or any metal tool or you could shock yourself Warning Statement 1004 Installation Instructions Read the installation instructions before connecting the system to the power source Warning Statement 1007 TN and IT Power Systems This equipment has been designed for connection to TN and IT power systems Warning S...

Page 33: ...rough the chassis Do not operate the system unless all cards faceplates front covers and rear covers are in place Warning Statement 1030 Equipment Installation Only trained and qualified personnel should be allowed to install replace or service this equipment Warning Statement 1040 Product Disposal Ultimate disposal of this product should be handled according to all national laws and regulations W...

Page 34: ...alling the security appliance Follow these guidelines when working on equipment powered by electricity Before beginning procedures that require access to the interior of the chassis locate the emergency power off switch for the room in which you are working Then if an electrical accident occurs you can act quickly to turn off the power Do not work alone if potentially hazardous conditions exist an...

Page 35: ...ent these considerations may help you isolate the cause of failures and prevent future problems Site Considerations Considering the following helps you plan an acceptable operating environment for the chassis and avoid environmentally caused equipment failures Electrical equipment generates heat Ambient air temperature might not be adequate to cool equipment to acceptable operating temperatures wi...

Page 36: ... frame does not block the intake or exhaust ports Be sure enclosed racks have adequate ventilation Make sure that the rack is not overly congested as each chassis generates heat An enclosed rack should have louvered sides and a fan to provide cooling air In an enclosed rack with a ventilation fan in the top heat generated by equipment near the bottom of the rack can be drawn upward and into the in...

Page 37: ...ing guidelines are provided to ensure your safety Warning This unit should be mounted at the bottom of the rack if it is the only unit in the rack When mounting this unit in a partially filled rack load the rack from the bottom to the top with the heaviest component at the bottom of the rack If the rack is provided with stabilizing devices install the stabilizers before mounting or servicing the u...

Page 38: ... you install 3 screws on the chassis to secure the slide rail For the 2130 2140 you install use the pegs on the chassis to secure the slide rail Before You Begin You need the following to install the Firepower 2100 in a rack 4 post EIA 310 D rack 1 Phillips Head screwdriver Firepower 2100 kit that contains the following One slide rail set Two brackets with captive screws Six 8 32 0 25 screws Two M...

Page 39: ...sing the six 8 32 x 375 countersink Phillip head screws three per side provided in the kit Figure 14 Attaching the Rack Mount Bracket to the Side of the Chassis Rack mount bracket 2 Chassis 1 8 32 x 0 25 countersink Phillip head screws 3 per side 3 Step 2 Attach the inner rails to the sides of the chassis a Remove the inner rails from the slide rail assemblies b Align an inner rail with each side ...

Page 40: ...ine up with the three pegs on the side of the chassis Figure 16 Lining up the Inner Rail with the Pegs on the 2130 2140 Chassis Inner rail 2 Mounting peg on the chassis for the keyed slot 1 M3X6mm screw 1 per side 3 c Set the keyed slots over the screws pegs and then slide the rail toward the front to lock it in place on the screw pegs The rear key slot has a metal clip that locks over the screw p...

Page 41: ...ost and the mounting pegs enter the rack post holes from the outside front The rack post must be between the mounting pegs and the open securing plate Note b Push the mounting pegs into the rack post holes from the outside front c Press the securing plate release button marked PUSH The spring loaded securing plate closes to lock the pegs in place d Adjust the slide rail length and then push the re...

Page 42: ...lease clip 1 Step 6 Use the captive screws on the front of the mounting brackets to fully secure the chassis to the rack What to Do Next Continue with Ground the Chassis on page 38 and Connect Cables Turn on Power and Verify Connectivity on page 39 Ground the Chassis Statement 1024 Ground Conductor This equipment must be grounded Never defeat the ground conductor or operate the equipment in the ab...

Page 43: ...ping tool to secure the grounding cable in the grounding lug Step 4 Remove the adhesive label from the grounding pad on the chassis Step 5 Place the grounding lug against the grounding pad so that there is solid metal to metal contact and insert the two M4 screws with washers through the holes in the grounding lug and into the grounding pad Step 6 Make sure that the lug and cable do not interfere ...

Page 44: ...connect Device A readily accessible two poled disconnect device must be incorporated in the fixed wiring Warning Statement 1025 Use Copper Conductors Only Use copper conductors only Warning After rack mounting the Firepower 2100 series security appliance follow these steps to connect cables turn on power and verify connectivity Step 1 Connect the console port Using a serial console cable connect a...

Page 45: ...ll the SFP SFP transceivers Install SFP SFP transceivers in the Ethernet network interfaces in the fixed ports or in the network modules you have installed taking care not to touch the contacts in the rear Flip the SFP over to connect in the upper ports The SFP connects in the normal way in the lower ports The sockets on the upper row face up and the sockets on the lower row face down Do not force...

Page 46: ... the rear panel Step 7 Check the PWR LED on the front panel Solid green indicates that the appliance is powered on Step 8 Check the SYS LED on the front panel Solid green indicates that the system has passed power on diagnostics When you toggle the power switch from ON to OFF it takes several seconds for the system to power off During this time the PWR LED on the front panel blinks green Do not re...

Page 47: ...ray page 54 Install the Optional Cable Management Brackets page 55 Remove and Replace the Network Module Take note of the following warnings Statement 1030 Equipment Installation Only trained and qualified personnel should be allowed to install replace or service this equipment Warning Statement 1073 No User Serviceable Parts No user serviceable parts inside Do not open Warning You can remove and ...

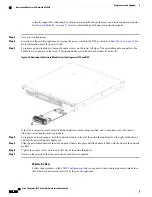
Page 48: ...empty install a blank faceplate to ensure proper airflow and to keep dust out of the chassis otherwise install another network module Step 4 To replace a network module hold the network module in front of the network module slot on the right of the chassis and pull the network module handle out Step 5 Slide the network module into the slot and push it firmly into place until the handle is flush wi...

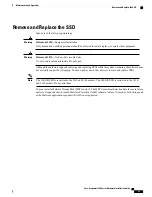
Page 49: ...ot currently support hot swapping You must power down the chassis to remove and replace SSDs The 100 GB SSD is restricted to the 2110 and 2120 models The 200 GB SSD is restricted to the 2130 and 2140 models Do not mix them Note You can install a Malware Storage Pack MSP in slot 2 The MSP stores threat detection data for use in future analysis It supports the Advanced Malware Protection AMP softwar...

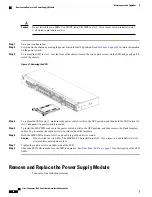
Page 50: ...tly until it is seated Step 5 To install the MSP SSD make sure the power switch is still in the OFF position and then remove the blank faceplate in Slot 2 by loosening the captive screws on either side of the faceplate Step 6 Hold the MSP SSD in front of slot 2 and push it in gently until it is seated Do not switch the two SSDs The MSP MUST be installed in slot 2 If you remove it and install it in...

Page 51: ...spose of used batteries according to the manufacturer s instructions Warning Statement 1022 Disconnect Device A readily accessible two poled disconnect device must be incorporated in the fixed wiring Warning Statement 1025 Use Copper Conductors Only Use copper conductors only Warning Statement 1030 Equipment Installation Only trained and qualified personnel should be allowed to install replace or ...

Page 52: ...all a blank faceplate to ensure proper airflow and to keep dust out of the chassis otherwise install another power supply module Step 5 To replace a power supply module hold the power supply module with both hands and slide it into the power supply module bay Step 6 Push in the power supply module gently until you hear the latch engage and it is seated Step 7 Plug in the power supply cable Step 8 ...

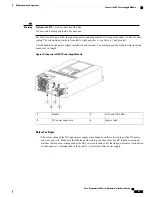
Page 53: ...3 Firepower 2100 DC Power Supply Module FAIL and OK LEDs 2 Handle 1 Ejector latch 4 DC power connector 3 Before You Begin The color coding of the DC input power supply leads depends on the color coding of the DC power source at your site Make sure that the lead color coding you choose for the DC input power supply matches the lead color coding used at the DC power source and verify that the power ...

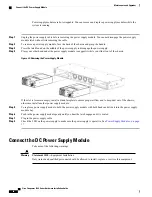
Page 54: ... 10 mm 0 02 inch 0 5 mm We recommend you use 14 AWG insulated wire Do not strip more than the recommended length of wire because doing so could leave the wire exposed from the terminal block Note Figure 24 Stripped DC Input Source Wire Step 4 Insert the exposed wire into the terminal block Ensure that you cannot see any wire lead outside the plastic cover Only wires with insulation should extend f...

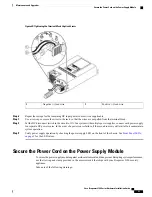
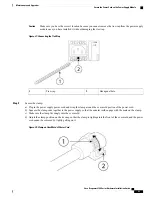
Page 55: ...ource failure if the second source is still available it can maintain system operation Step 9 Verify power supply operation by checking the power supply LED on the front of the chassis See Front Panel LEDs on page 9 for the LED values Secure the Power Cord on the Power Supply Module To secure the power supply module against accidental removal and thus prevent disrupting system performance use the ...

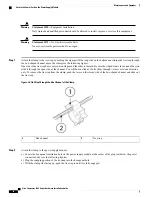
Page 56: ...of the channel You will hear a click as the tie slides through it moves in one direction only To remove the tie wrap from the clamp push the lever on the closed side of the box shaped channel and slide out the tie wrap Figure 26 Tie Wrap Through the Box Channel of the Clamp Tie wrap 2 Box channel 1 Step 2 Attach the clamp to the power supply module a Locate the hexagonal ventilation hole on the po...

Page 57: ... portion of the power cord b Squeeze the clamp ends together to the power supply so that the annular teeth engage with the mate on the clamp c Make sure the clamp fits snugly into the over mold d Adjust the clamp position on the tie wrap so that the clamp is tight against the front of the over mold and the power cord cannot be removed by lightly pulling on it Figure 28 Clamp on Over Mold of Power ...

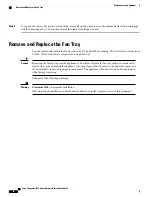
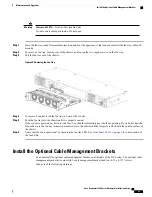
Page 58: ...y exposes the appliance to no airflow Replace the fan tray within 30 seconds after removal to avoid overheating the appliance If you wait longer than 30 seconds the appliance may power off automatically to prevent damage to components The appliance will not power up and boot properly if the fan tray is missing Caution Take note of the following warnings Statement 1030 Equipment Installation Only t...

Page 59: ...ed on listen for the fans You should immediately hear the fans operating If you do not hear the fans make sure the fan tray is inserted completely into the chassis and the faceplate is flush with the outside surface of the chassis Step 6 Verify that the fan is operational by checking the fan tray LED See Front Panel LEDs on page 9 for a description of the fan LEDs Install the Optional Cable Manage...

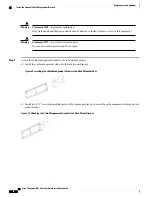
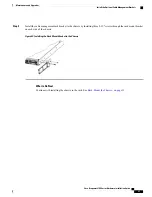
Page 60: ...k mount bracket a Install the cable management studs into the rack mount bracket Figure 30 Installing the Cable Management Studs into the Rack Mount Bracket b Install two 8 32 screws through the inside of the rack mount bracket to secure the cable management bracket to rack mount bracket Figure 31 Attaching the Cable Management Bracket to the Rack Mount Bracket Cisco Firepower 2100 Series Hardware...

Page 61: ...ket on each side of the chassis Figure 32 Installing the Rack Mount Bracket to the Chassis What to Do Next Continue with installing the chassis in the rack See Rack Mount the Chassis on page 33 Cisco Firepower 2100 Series Hardware Installation Guide 57 Maintenance and Upgrades Install the Optional Cable Management Brackets ...

Page 62: ...Cisco Firepower 2100 Series Hardware Installation Guide 58 Maintenance and Upgrades Install the Optional Cable Management Brackets ...

Reviews: