2-9
Catalyst 2940 Switch Hardware Installation Guide
OL-6157-01
Chapter 2 Installation
Installing the Switch
Step 7
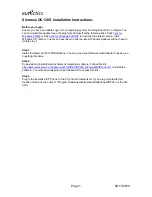
Place the switch onto the mounting screws and slide the switch forward until it locks in place, as shown
in
Figure 2-4
.
Figure 2-4
Mounting the Switch Under a Desk
Installing the Switch on a Wall
Follow the steps in this section to install the switch to a wall:
Note
The switch can be wall-mounted with the front panel facing up or down. The steps in this section show
how to mount the switch with the front panel facing down (as shown in
Figure 2-5 on page 2-10
and
Figure 2-6 on page 2-11
.) If you want to mount the switch with the front panel facing up, rotate the screw
template 180 degrees.
Step 1
Locate the screw template. The template is used to align the mounting screw holes.
Step 2
Position the screw template so that the two side-by-side slots face toward the ceiling, as shown in
Figure 2-5
. This ensures that the power cord faces toward the floor after they are connected.
For the best support of the switch and cables, make sure the switch is attached securely to a wall stud or
to a firmly attached plywood mounting backboard.
Note
Do not attach the screw template to the wall yet.
1
Desktop
3
Slides on this way
2
Screws
4
Wall
Catalyst 2940
SERIES
SYST
STA
T
DP
LX
SP
D
89856
1
4
3
2
Summary of Contents for Catalyst Series Switch 2940
Page 6: ...Contents vi Catalyst 2940 Hardware Installation Guide OL 6157 01 ...
Page 10: ...x Catalyst 2940 Switch Hardware Installation Guide OL 6157 01 Preface Conventions ...
Page 12: ...xii Catalyst 2940 Switch Hardware Installation Guide OL 6157 01 Preface Conventions ...
Page 82: ...Index IN 6 Catalyst 2940 Switch Hardware Installation Guide OL 6157 01 ...