background image

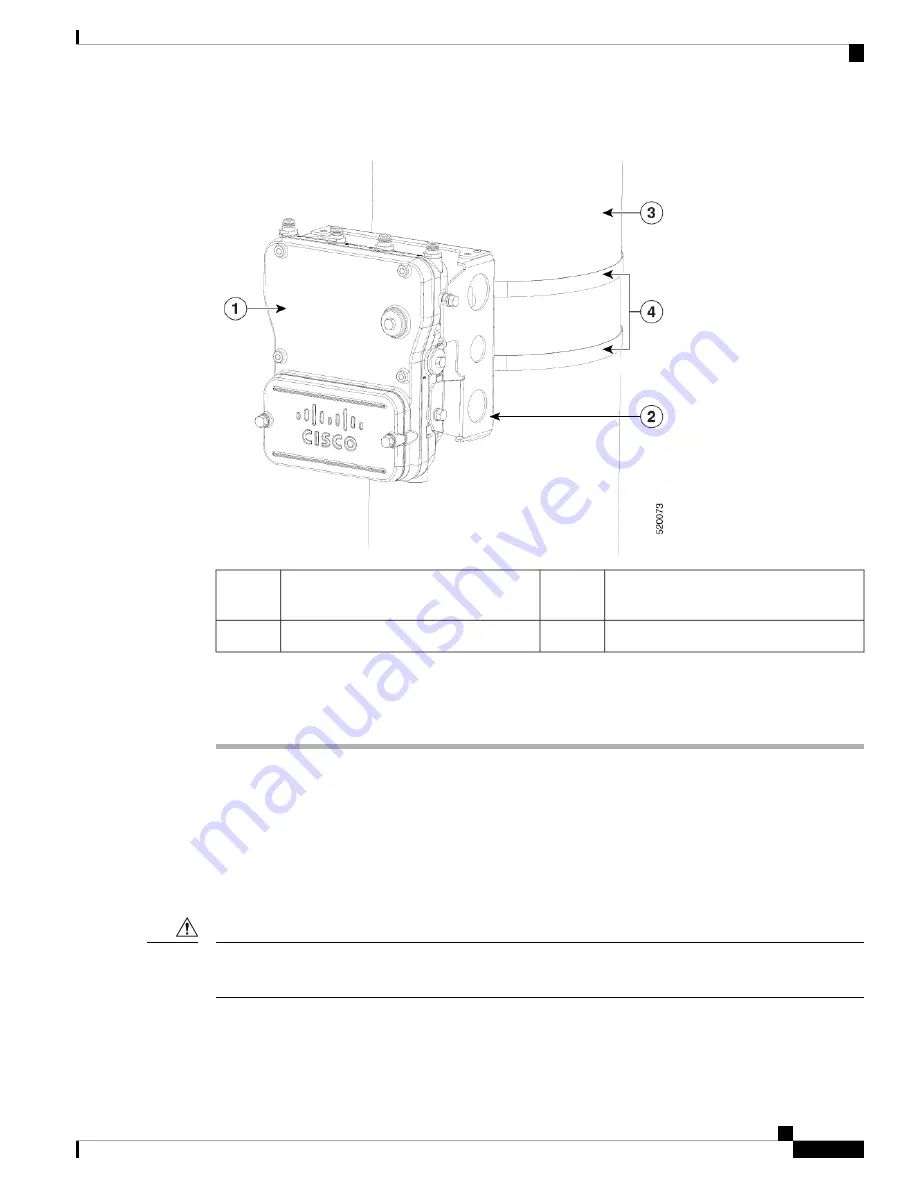
Figure 12: Assembled Access Point Hanging in Mounting Bracket

Pole (wood, metal, or fiberglass)2 to 16 in.
(5.1 to 40.6 cm) diameter

3

Access point

1

Stainless steel mounting straps

4

Mount bracket

2

Step 14

When using the Cisco Aironet Dual-Band Omnidirectional Antennas, connect them to the access point.
Hand-tighten the antennas to the access point.

Step 15

Continue with

Grounding the Access Point , on page 19

and

Powering the Access Point, on page 20

.

Working with the Access Cover

This section details opening and closing the access cover of the access point.

Opening the Access Cover

The access cover must not be opened unless the area is considered non-hazardous and the AP has been powered
off.

Caution

You need to open the access cover to access the AC or DC terminal block, the Ethernet ports, and when you
are installing the fiber-optic SFP module.

Installing the Access Point

13

Installing the Access Point

Working with the Access Cover

Summary of Contents for Catalyst IW6300 Series

Page 1: ...understand wireless access points and bridging techniques and grounding methods All installation methods for mounting an access point on any wall surface is subject to the acceptance of local jurisdiction Caution Installation Option The Cisco Catalyst IW6300 Heavy Duty Series Access Points are installed using the pole mount installation kit IOT ACCPMK which is used for pole or wall installations O...

Page 2: ...ations compliance The access point is oriented with the system LED pointing down and the access cover facing out This positioning allows the LEDs to be visible to someone on the ground below the access point and the I O interfaces are on the bottom to minimize moisture ingress in case ports are not adequately sealed Omnidirectional antennas are vertically polarized and should be mounted vertically...

Page 3: ...point when you are ready The following table lists the material that you will need to provide in addition to the pole mount kit Table 1 Material Needed to Mount Access Point to a Vertical Wall In Kit Materials Required Yes Ground lug and screws provided with access point No Crimping tool for ground lug No Four M8 or 5 16 in 31 mm screws No Four wall anchors specified for wall material No Drill bit...

Page 4: ... a 50 lb 22 7 kg static weight Caution The mounting bracket can be used as a template to mark the screw hole locations To mount the access point on a vertical wall follow these instructions Procedure Step 1 Use the mounting bracket as a template to mark four screw hole locations on your mounting surface You can optionally use the individual mounting holes or the mounting slots Figure 3 Mounting Br...

Page 5: ...unt the access point to stucco cement or drywall Note Step 3 Screw a M8 x16 bolt in the top support bolt hole on each side the access point Do not screw the bolt all the way in leave approximately a 0 25 inch 0 635 cm space Step 4 Position the two bolts on the access point onto the hands free attach points on each side of the mounting bracket Ensure that the access point cover is facing out Never ...

Page 6: ...g the Access Point on page 20 Mounting the Access Point on a Pole When installing an access point on a vertical pole you should use the optional Cisco pole mount kit The kit supports metal wood or fiberglass poles from 2 to 16 inches in diameter Assembling the Pole Clamp Bracket and the Mounting Bracket The pole mount kit contains several parts that you must assemble prior to mounting on a pole Fi...

Page 7: ...6 inches 27 94 cm to 40 64 cm 1 To assemble the pole clamp bracket follow these steps Procedure Step 1 Position the strap brackets on the pole clamp bracket for the pole diameter you are using and secure each strap bracket with two M8 x16 bolts with lock washers Tighten the bolts to 13 to 15 ft lbs 17 6 to 20 3 Nm Installing the Access Point 7 Installing the Access Point Assembling the Pole Clamp ...

Page 8: ...et support bolt and tighten just enough to prevent the bolt from falling off Step 3 Go to Pole Mounting on page 8 Pole Mounting To mount your access point on a vertical pole you need to install two metal bands around the pole to support the access point This process requires extra tools and material not provided in the pole mount kit see the following table Installing the Access Point 8 Installing...

Page 9: ...e to mount the access point You can attach the access point to any pole from 2 to 16 inch 5 1 to 40 6 cm in diameter Step 2 For poles larger than 3 5 inch 8 9 cm mount the pole clamp bracket assembly to a pole using two metal straps Following the instructions provided with the banding strap tool BAND IT AIR BAND INST TL loop each metal strap twice through the slots on the strap bracket Do not plac...

Page 10: ...are cut or disassembled Note Step 5 Tighten the metal bands using the banding strap tool BAND IT Cisco AIR BAND INST TL by following the operating instructions in the box with the tool Ensure that the metal bands are as tight as possible Step 6 Place the mounting bracket onto the pole clamp bracket support bolt Step 7 Install four M8 x16 bolts with flat and lock washers into the bolt holes Step 8 ...

Page 11: ...e 10 Assembling Access Point to Hands Free Attach Point with Top Support Bolts Hands free attach point 3 Top Support M8 x16 bolt hole 1 Second M8 x16 bolt hole 2 Step 12 Screw a M8 x16 bolt with flat and lock washers into the second bolt hole on each side of the access point Installing the Access Point 11 Installing the Access Point Pole Mounting ...

Page 12: ...olt Installation M8 x16 bolt 1 Step 13 Ensure that the front of the access point is vertical and tighten the four bolts to 13 to 15 ft lbs 17 6 to 20 3 Nm Installing the Access Point 12 Installing the Access Point Pole Mounting ...

Page 13: ... Grounding the Access Point on page 19 and Powering the Access Point on page 20 Working with the Access Cover This section details opening and closing the access cover of the access point Opening the Access Cover The access cover must not be opened unless the area is considered non hazardous and the AP has been powered off Caution You need to open the access cover to access the AC or DC terminal b...

Page 14: ...these steps Procedure Step 1 Ensure that O ring sealing surface is free of debris and that O ring is undamaged and fully contained in groove Step 2 When closing the access cover be careful not to pinch internal wires Step 3 Carefully position the cover flush with all sides of the access point then slowly hand tighten each bolt Step 4 When all bolts are hand tightened use a 13 mm closed end wrench ...

Page 15: ...ed 3 port 8 8 dBi 2 4 5 GHz AIR ANT2588P3M N Directional dual polarized 4 port 13 13 dBi 2 4 5 GHz AIR ANT2513P4M N Omnidirectional vertically polarized white 5 dBi 2 4 GHz AIR ANT2450V N Omnidirectional vertically polarized white for Hazardous Locations 5 dBi 2 4 GHz AIR ANT2450V N HZ Omnidirectional vertically polarized gray 5 dBi 2 4 GHz AIR ANT2450VG N Omnidirectional horizontally polarized gr...

Page 16: ... ANT2568VG N Omnidirectional access coverage on both radios Single band Connect the two 2 4 GHz omnidirectional antennas directly to ports A and B Mount the 5 GHz directional antenna with the included hardware and connect it to ports C and D via the adapters coaxial cables and lightning arrestors if required 2x N m N f Lightning Arrestor CGR LA NM NF and 2x N f N f adapter AIR ACC370 NF NF 2x N m ...

Page 17: ... access on 5 GHz backhaul on 2 4 GHz Dual band Connect the coax cables from Ports A and B to the two outer ports of the antenna Terminate the unused middle port of the antenna and Ports C and D of the IW 6300 with a weatherproof cap Use lightning arrestors if required 2x N m N f Lightning Arrestor CGR LA NM NF 2x N m N m cables CAB L400 5 N N CAB L400 5 N NS CAB L400 20 N N CAB L600 30 N N or AIR ...

Page 18: ... Connector by Pulse Electronics AIR ANT2450V N HZ Cisco PN 07 1133 01 2 4 GHz 8dBi Omnidirectional with fixed Type N Male Connector by Laird Corporation AIR ANT2480V N Cisco PN 07 1058 01 2 4 2 483 5 25 5 85GHz 4 7 dBi Omni by Laird Technologies AIR ANT2547V N HZ Cisco PN 07 1134 01 5 GhZ Directional Panel Antenna by Pctel Inc AIR ANT5114P2M N Cisco PN 07 1192 01 2 4 GHz Directional Panel Antenna ...

Page 19: ...d wire strip the insulation as required for the grounding lug Step 2 Use the appropriate crimping tool to crimp the bare 6 AWG copper ground wire to the supplied grounding lug The grounding lug and hardware used must comply with local and national electrical codes Note Step 3 Open the anti corrosion sealant supplied and apply a liberal amount over the metal surface called the Ground Pad where the ...

Page 20: ... Button Reset button 2 Console port 1 The reset button is under a covering M25 plug Properly tighten it at the time of installation and also every time it is removed and replaced Tighten the screw to 5 6 lb ft If you do not tighten the plug properly it will not meet IP67 criteria and may lead to water leaking into the unit Powering the Access Point The access point can be powered by one of these m...

Page 21: ...hernet cable and supports a total end to end Ethernet cable length of 100 m 328 ft from the switch to the access point Power injector AIR PWRINJ 60RGDx is not certified for installation within hazardous locations environments Caution The PoE Out power is disabled when the access point is powered by the power injector But the PoE Out data link can still be active when using power injector Note When...

Page 22: ...ed But the PoE Out data link can still be active Note Connecting an Ethernet Cable to the Access Point The following tools and materials are required Shielded outdoor rated Ethernet CAT5e or better cable The Ethernet cable from the power injector to the access point must be at least 10 ft 3 05 m long Note RJ 45 connector and installation tool Adjustable wrench Ex certified cable gland or conduit T...

Page 23: ...o route and connect the ground and AC power cabling to the IW 6300H AC x K9 access point model follow these steps A readily accessible two poled disconnect device must be incorporated in the fixed wiring Statement 1022 Warning When installing or replacing the unit the ground connection must always be made first and disconnected last Statement 1046 Warning Always install the ground wire before conn...

Page 24: ...n the terminal block set screws to secure the wires in the terminal block Step 8 Verify that no bare wire is exposed If wire is exposed remove it from the terminal block adjust the length and reinstall Step 9 Check your work Step 10 Close the access point cover See Closing the Access Cover on page 14 for details Connecting DC Power to IW 6300H DCW x K9 This product relies on the building s install...

Page 25: ...he insulation from each wire Remove only enough wire to provide a solid connection in the terminal block The hot wires should have no bare wire exposed after the connection is made Step 5 Insert the ground wire into the internal ground Step 6 Insert each hot wire into the terminal block Figure 17 IW 6300H DCW x K9 Internal Ground and Terminal Block Location Internal ground 2 Terminal block 1 Step ...

Page 26: ...fety standards Statement 1033 Warning To route and connect the power cable to the IW 6300H DC x K9 model follow these steps Procedure Step 1 Open the access point cover See Opening the Access Cover on page 13 for instructions Step 2 Ensure a 6 AWG ground wire is connected to the access point see Grounding the Access Point on page 19 Step 3 Route the power cable through the 1 2 NPT port Figure 18 C...

Page 27: ... Chapter 4 Troubleshooting and the Troubleshooting a Mesh Network Guide Removing the Access Point from Service When removing an access point from service make sure you remove power from the access point before opening the cover and disconnecting the input wiring When removing the wiring the ground connection should be the last to be disconnected Conducting Periodic Inspections The access point sho...

Page 28: ...Installing the Access Point 28 Installing the Access Point Conducting Periodic Cleaning ...

Reviews: