background image

13-11

 BWX 110 Desktop Modem User Guide

OL-16307-03

Chapter 13      Troubleshooting Using BWX Modem Diagnostics Tool

The About Window

The About Window

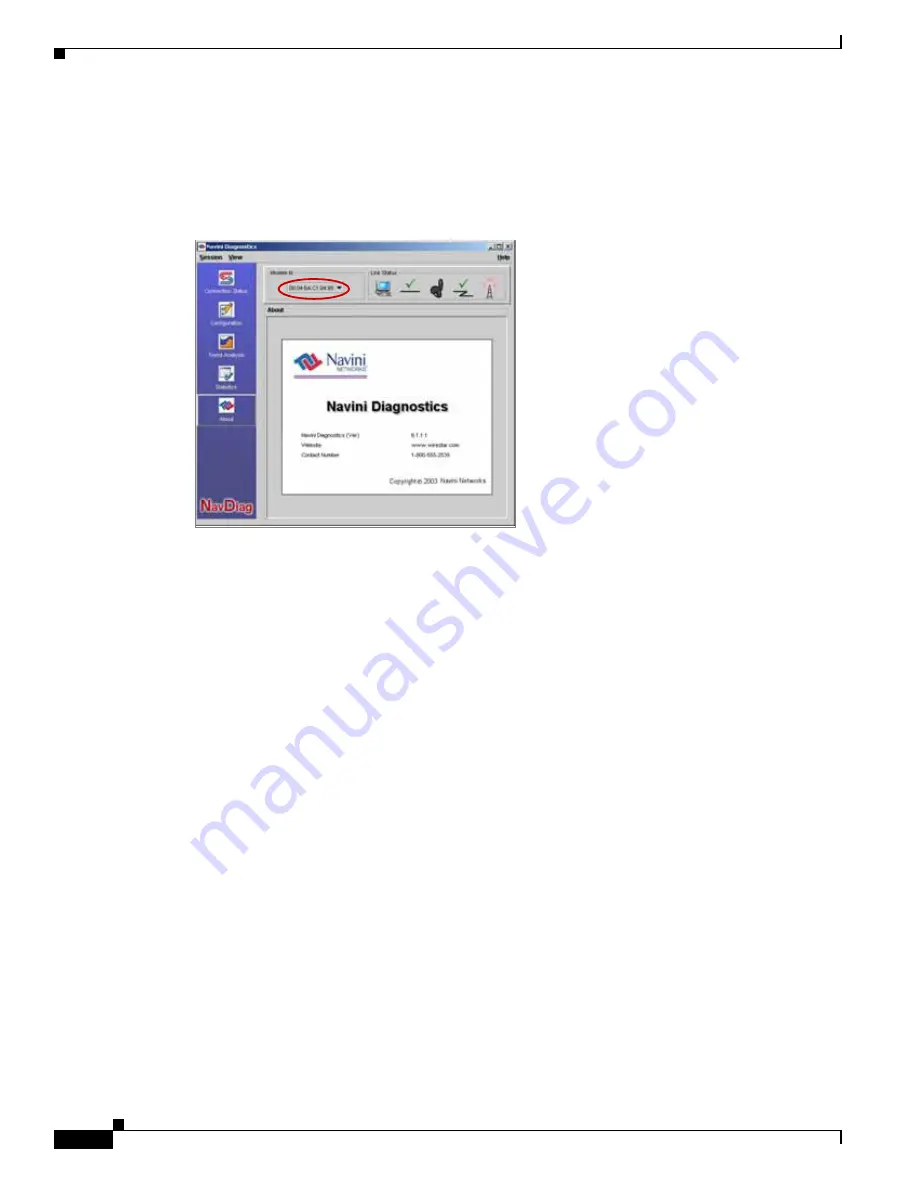
The About window provides vital information such as the version of the BWX Modem Diagnostics Tool 
software currently installed on your computer. It also provides a website address and telephone number 
where you can contact your Service Provider. To view the About window, click About.

Summary of Contents for BWX 110

Page 1: ...170 West Tasman Drive San Jose CA 95134 1706 USA http www cisco com Tel 408 526 4000 800 553 NETS 6387 Fax 408 527 0883 BWX 110 Desktop Modem User Guide For use with all BWX 110 Desktop Modem models August 1 2009 Text Part Number OL 16307 03 ...

Page 2: ...the equipment into an outlet that is on a different circuit from the television or radio That is make certain the equipment and the television or radio are on circuits controlled by different circuit breakers or fuses Modifications to this product not authorized by Cisco Systems Inc could void the FCC approval and negate your authority to operate the product The Cisco implementation of TCP header ...

Page 3: ... USER 2 2 INFORMATION REGARDING ANTENNAS 2 2 C H A P T E R 3 Introduction 3 1 C H A P T E R 4 Package Inventory 4 1 C H A P T E R 5 Modem Models 5 1 Operating Frequencies 5 1 C H A P T E R 6 Minimum Computing Requirements 6 1 C H A P T E R 7 Physical Characteristics 7 1 C H A P T E R 8 BWX 110 Desktop Modem Features 8 1 C H A P T E R 9 Installing the BWX 110 Desktop Modem 9 1 C H A P T E R 10 Acce...

Page 4: ...ngth and Quality of the Signal 13 4 The History Graphs 13 5 The Parameters 13 5 The Configuration Window 13 6 The Trend Analysis Window 13 7 The Statistics Window 13 9 The About Window 13 11 C H A P T E R 14 Manually Upgrading the BWX Diagnostics Tool 14 1 C H A P T E R 15 Uninstalling BWX Modem Diagnostics Tool Software 15 1 C H A P T E R 16 Care Maintenance 16 1 C H A P T E R 17 Upgrading the Mo...

Page 5: ...fety precautions to reduce the risk of electrical shock fire and injury to people and or property 1 Follow all warnings and instructions that come with the equipment 2 Do not use the equipment while you are in a bathtub shower pool or spa Exposure of the equipment to water could cause severe electrical shock or serious damage to the equipment 3 Do not allow any type of liquid to come in contact wi...

Page 6: ...properly or shows a distinct change in performance Battery Caution Procedures Warning To reduce risk of injury or fire follow these instructions when handling a battery 1 Risk of explosion is possible if the battery is replaced with one not supplied by Cisco 2 Do not dispose of the battery in a fire It may explode Check with the local codes for battery disposal guidelines 3 Do not open or mutilate...

Page 7: ...CC s limits may result FCC Compliance and Advisory Statement This equipment has been tested and found to comply with the limits for a class B digital device Pursuant to Part 15 of the FCC rules The operation is subject to the following two conditions 1 This device may not cause harmful interference and 2 This device must accept any interference received including interference that may cause undesi...

Page 8: ...ion Any changes or modifications not expressly approved by Cisco could void the user s authority to operate the equipment INFORMATION REGARDING ANTENNAS This device has three embedded antennas one upright antenna with approximately 2 dBi gain and two patch antennas one on each side of the device Each patch antenna has approximately 6 dBi gain This product has been tested and met all the applicable...

Page 9: ...broadband Internet access to residential and small or home office customers without requiring professional hardware installation Your BWX 110 Desktop Modem allows portability with your service A computer with this Modem can move from room to room location to location or even city to city as long as there is coverage in the area This manual will guide you through the simple process of installing th...

Page 10: ...X 110 Desktop Modem AC power adapter for Modem to power plug connection Ethernet RJ 45 cable for PC to Modem connection Installation CD that includes the BWX Modem Diagnostics tool software and the BWX 110 Desktop Modem User Guide BWX 110 Desktop Modem Quick Installation Guide If you do not find all of these items in your package notify the supplier from whom you obtained it ...

Page 11: ...ter should have an Ethernet port for connecting the Modem Modem Model Frequency Range Operating Band 2 3 GHz BWX 110 Desktop Modem 2305 2360 BWX 110 Desktop Modem E 2 305 GHz 2 360 GHz WCS 2 5 2 6 GHz BWX 110 Desktop Modem 2 5 2 6 BWX 110 Desktop Modem E 2 500 GHz 2 686 GHz EBS BRS 3 4 GHz BWX 110 Desktop Modem 3410 3525 BWX 110 Desktop Modem E 3 410 GHz 3 525 GHz WLL 3 5 GHz BWX 110 Desktop Modem...

Page 12: ... Windows Vista32bits3 or higher It is assumed the latest Windows service pack is installed on the OS Ensure the PC network port is enabled The Mac and Linux OS types are also supported 2 Windows XP must be Service Pack Level 1 or higher 3 In addition to Win2000 WinXP and Vista32bits or higher BWX Modem Diagnostics Tool also is supported on Mac OSX Mac10 4 5 or higher for Apple and Linux kernel 2 4...

Page 13: ...10 Desktop Modem 2 3 2 5 2 6 3 4 3 5 GHz Front Antenna Liquid Crystal Display On Off Button Back Power Adapter Connection Ethernet Cable Connection Front Antenna Liquid Crystal Display On Off Button Front Antenna Liquid Crystal Display On Off Button Back Power Adapter Connection Ethernet Cable Connection Back Power Adapter Connection Ethernet Cable Connection ...

Page 14: ...lug and play installation Simple to read LCD crystal display showing real time signal information In OFDMA mode meets IEEE 802 16e air interface standards Portable Works in Non Line of Sight NLOS conditions with 3 antenna switching diversity and Beamforming signals Automated over the air software upgrades ...

Page 15: ...computer and the Modem before installing the Modem Note The Modem should be positioned to minimize interference with other equipment when transmitting and should be placed 30 cm or more from any user or person If the antenna is closer than 20 cm from the user safety conditions are violated Step Action Illustration Step 1 Connect the Ethernet cable to the Ethernet port on the computer Step 2 Connec...

Page 16: ...an damage the Modem Step 4 Rotate the Modem s antenna clockwise 180 to the UP position When the antenna is in the UP position the Modem s liquid crystal display can be seen Caution Rotating the antenna up in any other direction can damage the Modem Step 5 Turn the Modem On by pushing the On Off button in 1 Step Action Illustration Power adapter connection Power adapter connection Antenna Liquid Cr...

Page 17: ...roper connection If there is still a problem contact the supplier who gave you the package Step 7 Turn your computer on and log in 1 The Wireless Modem should be positioned to minimize interference with other equipment when transmitting and should be placed 30cm or more from any persons or user If the antenna is closer than 20cm from the user the safety conditions are violated Step Action Illustra...

Page 18: ...our Internet browser settings To access the Internet Step Action Illustration Step 1 Ensure the two arrows on the activity indicator are flashing This indicates that the modem is transmitting data and is ready for use Step 2 Double click the Internet Explorer icon on your desktop or click START All Programs Internet Explorer The system responds by opening Internet Explorer with a Web page displaye...

Page 19: ...y LCD The LCD is a text based display that provides valuable information about the Modem s operation When you use the LCD display in conjunction with the BWX Modem Diagnostics Tool monitoring software you can troubleshoot signal issues network connections and power problems Below is a picture of the Modem s LCD display and the various indications you will see CONNECTED Q S CONNECTED Q S S SEARCHIN...

Page 20: ...Connected The Modem has locked on to a Basestation BS 3 Activity Indicator If both arrows are flashing There is traffic activity If blank There is no traffic activity 4 S Signal Strength Indicator SSI 0 bars N A 1 bars N A 2 bars 105 dB 3 bars 105 100 dBm 4 bars 100 95 dBm 5 bars 95 90 dBm 6 bars 90 85 dBm 7 bars 85 80 dBm 8 bars 80 dBm 5 Q Quality Signal to Noise Ratio SNR 0 bars N A 1 bars N A 2...

Page 21: ...on explains how to install this software Note To install BWX Modem Diagnostics Tool on a Windows 2000 platform you must have administrative privileges To check your account privileges open your Control Panel Double click on the Users and Passwords symbol You should see Administrator under the Users tab Note The screenshots shown in the instructions were taken from a laptop with Windows XP If you h...

Page 22: ...ile navdiag_windows exe The system automatically starts the installation of BWX Modem Diagnostics Tool and displays the Navini Diagnostics Language window Example Step 5 Select a language and click OK to continue The system responds by displaying the License Agreement window Note BWX Modem Diagnostics Tool may automatically attempt to match the language set on your PC under Regional Options The la...

Page 23: ...nstall the software Step 7 Enter the name of the folder where you wish to install the software Click Next to continue The system responds with the Choose Shortcut Folder Note The default installation folder provided by the software is shown in the illustration Step 8 Accept the default and click Next to continue The system responds with the Pre Installation Summary window Step 9 Review the content...

Page 24: ...ion window and click Install The system responds by installing the software Step 11 If The WinPcap program is already installed in your computer Then Do not perform steps 10 through 13 Otherwise Follow steps 10 through 13 to install it Step 12 Click Next to install WinPcap The system responds with the License Agreement window Step Action Illustration ...

Page 25: ... BWX Modem Diagnostics Tool Step 13 Click I Agree The system responds by installing the software and displaying the Install Complete window Note You must agree to the License agreement to continue with the Install Step 14 Click Done to close the window Step Action Illustration ...

Page 26: ... the Session menu is to close the BWX Modem Diagnostics Tool Click Session Close to close the tool The View Menu The View menu is used to view the Connection Status and Configuration of the BWX Modem Diagnostics tool Please see The Connection Status Window and The Configuration Window in this manual for more information The Help Menu The Help menu appears on the top right corner of all the BWX Mod...

Page 27: ...ve window option buttons Connection Status Configuration Trend Analysis Statistics and About Each of these windows provides unique capabilities The Connection Status Window The first button Connection Status corresponds to the default view The following sections describe the various parts of the Connection Status window The Modem ID In the Modem ID sub window the Modems ID appears as 00 04 6A _ _ ...

Page 28: ...th and Signal Quality Bars Signal Strength and Signal Quality are dynamic bar areas that indicate how well your Modem is receiving signals from the Basestation In particular the Signal Strength bar area graphically represents the strength of the synchronization signal your Modem is receiving from BS The strength of the signal is represented by a group of colored bars The higher the pile of bars go...

Page 29: ...te an excellent signal or a CINR greater than 21 Orange lines indicate a good signal or a CINR greater than or equal to 13 but less than or equal to 21 Red lines indicate a weak signal or an CINR less than 13 How to Increase the Strength and Quality of the Signal To increase the strength and quality of the signal change the location of the PC in which the Modem is inserted Try moving it closer to ...

Page 30: ...tatus of your Modem The Parameters At the bottom of the Connection Status window are four parameters These parameters are BS ID Network ID Active SW Version and Standby SW Version The BS ID indicates the BS to which the Modem is currently synchronized The Network ID indicates the network in which the Modem is allowed to operate Active SW Version and Standby SW Version indicate the version number o...

Page 31: ...f directed to do so by your Service Provider To access the Configuration window click Configuration If you must update your Modem s software contact your Service Provider to provide you with instructions At the bottom of the window is an Allow Customer Satisfaction Reporting check box This check box is used to enable local logging on your computer This log is useful for any technical support that ...

Page 32: ...eters that evolve over time With this window you can select up to three parameters to plot To view the Trend Analysis window click the Trend Analysis By selecting one or more up to 4 parameters and then clicking on the Plot Graph button the following window appears This window displays the value of the selected parameters over the last five minutes updated once every second The graphic scrolls fro...

Page 33: ...d tab associated with the Trend Analysis icon By selecting one or more up to 4 parameters and then clicking on the Plot Graph button the following window appears This window displays the value of the selected parameters over the last five minutes updated once every second The graphic scrolls from right to left WiMAX Mode Stats tab WiMAX Mode Stats tab ...

Page 34: ...ow By clicking on the Show Diagram following window appears This window displays a diagrammatic representation of the selected metrics The Statistics Window The Statistics window lets you view the current value of selected parameters These values are updated as they change over time To view the Statistics window click Statistics ...

Page 35: ...13 10 BWX 110 Desktop Modem User Guide OL 16307 03 Chapter 13 Troubleshooting Using BWX Modem Diagnostics Tool The Statistics Window ...

Page 36: ...he About Window The About Window The About window provides vital information such as the version of the BWX Modem Diagnostics Tool software currently installed on your computer It also provides a website address and telephone number where you can contact your Service Provider To view the About window click About ...

Page 37: ...is connected to the Modem To upgrade the BWX Diagnostics Tool Step Action Illustration Step 1 Open the BWX Modem Diagnostics Tool application by double clicking the Navini Diagnostics icon on your desktop The system responds by opening the BWX Modem Diagnostics Tool Step 2 Download the software update from a Web site or insert the CD that contains the software in your CD ROM drive Step 3 In the ri...

Page 38: ...he update is stored Step 5 Select the load and click Open Note The load will end with a bin extension i e lm060284 bin The 060284 in this example is the software version number of the load The system responds by displaying the path to the load in the File box Step 6 Click Start The system responds by displaying a progress indicator showing the status of the software update Step Action Illustration...

Page 39: ...onnection information Step 10 Ensure the software version in this case 060284 appears in the Active SW Version field This field is in the lower right of the Connection Status window The software version is displayed as 6 2 84 Step 11 Repeat steps 1 through 9 Step 12 Ensure the software version in this case 060284 appears in the Standby SW Version field The software version is displayed as 6 2 84 B...

Page 40: ...w Note If you are going to upgrade your PC Operating System after loading the BWX Modem Diagnostics Tool software you must first uninstall BWX Modem Diagnostics Tool prior to upgrading the OS Otherwise the BWX Modem Diagnostics Tool will not work Note The screenshots shown in these instructions were taken from a laptop with Windows XP If you have a Windows 2000 or Windows Vista operating system th...

Page 41: ...t corner click on Start Programs NavDiag Uninstall The system responds with the Uninstaller window Step 2 Click Uninstall The system responds with the Uninstall Options window Step 3 Select the default Complete Uninstall and click Next The system responds with the Uninstall Complete window Note The Uninstall Navini Diagnostics screen indicates the application is uninstalled ...

Page 42: ...l window Note If any files could not be removed proceed with step 6 otherwise the installation is complete Step 5 Manually delete the folder NavDiag under C Program Files path by right clicking the NavDiag folder and selecting Delete from the menu Step 6 Click Yes The system responds by deleting the NavDiag folder Step 7 End Step Action Illustration ...

Page 43: ... away from high temperatures Heat can cause damage to the plastic shell or the electronic circuitry Use only a mild detergent and a soft damp cloth to clean the Modem Do not use any chemicals or abrasives to clean the plastic shell If there is a problem with the Modem do not attempt to repair it yourself Report the problem to your Service Provider If you are going to upgrade your Operating System ...

Page 44: ...rade your Modem software load This method is used for systems that have a software release of 4 0 or greater The latter two methods are used only if the Modem was not powered on during the OTA upgrade process The OTA upgrade is normally transparent to the user in other words there should be no noticeable service interruption The web or CD upgrade comes with instructions and takes a minimal amount ...

Page 45: ...es to a single Modem using a hub The multi PC configuration is transparent to PC users and is analogous to a multi PC configuration on a normal Ethernet Local Area Network LAN Check with your Service Provider to see if multiple IP addressing is required for your particular configuration IP addresses can be assigned to the devices dynamically via a DHCP server as Fixed or Static IP assignments or P...

Page 46: ...cute zip C Documents and Settings navini Local Settings Temp I1197581883 Windows InstallerData Execute zip C Documents and Settings navini Local Settings Temp I1197581883 InstallerData Resource1 zip C Documents and Settings navini Local Settings Temp I1197581883 Windows InstallerData Resource1 zip C Documents and Settings navini Local Settings Temp I1197581883 InstallerData C Documents and Setting...

Page 47: ... java specification vendor Sun Microsystems Inc java specification version 1 5 java vendor Sun Microsystems Inc java vendor url http java sun com java class version 49 0 java compiler null java home C Documents and Settings navini Local Settings Temp I1197581883 Windows resource jre java io tmpdir C DOCUME 1 navini LOCALS 1 Temp os name Windows XP os arch x86 os version 5 1 path separator file sep...

Page 48: ...les NavDiag Status SUCCESSFUL Additional Notes NOTE Directory already existed Make Registry Entry Key HKEY_LOCAL_MACHINE SOFTWARE Navini Networks Value Name Value Data Status SUCCESSFUL Make Registry Entry Key HKEY_LOCAL_MACHINE SOFTWARE Navini Networks NavDiag Value Name Value Data Status SUCCESSFUL Make Registry Entry Key HKEY_LOCAL_MACHINE SOFTWARE Navini Networks NavDiag Value Name InstallDire...

Page 49: ...exe Status SUCCESSFUL Install File C Program Files NavDiag Uninstall Uninstall NavDiag lax Status SUCCESSFUL Install Directory C Program Files NavDiag Uninstall resource Status SUCCESSFUL Install File C Program Files NavDiag Uninstall resource iawin32 dll Status SUCCESSFUL Install File C Program Files NavDiag Uninstall resource remove exe Status SUCCESSFUL Make Registry Entry Key HKEY_LOCAL_MACHIN...

Page 50: ... Program Files NavDiag Navini Diagnostics exe Status SUCCESSFUL Install File C Program Files NavDiag Navini Diagnostics lax Status SUCCESSFUL Create LaunchAnywhere Navini Diagnostics exe Install All LaunchAnywhere Java Executable Components Status SUCCESSFUL Install Directory C Program Files NavDiag data Status SUCCESSFUL Additional Notes NOTE Directory already existed Install Directory C Program ...

Page 51: ...am Files NavDiag data doc Status SUCCESSFUL Install Directory C Program Files NavDiag jre Status SUCCESSFUL Additional Notes NOTE Directory already existed Install Directory C Program Files NavDiag jre bin Status SUCCESSFUL Additional Notes NOTE Directory already existed Install File C Program Files NavDiag jre bin win32com dll Status SUCCESSFUL Install Directory C Program Files NavDiag jre lib St...

Page 52: ...bleshooting Results of Correct BWX Modem Diagnostics Tool Installation Install Directory C Documents and Settings navini Desktop Status SUCCESSFUL Additional Notes NOTE Directory already existed Create Shortcut C Documents and Settings navini Desktop Navini Diagnostics lnk Status SUCCESSFUL ...

Page 53: ...Y RETURN THE ENTIRE PRODUCT FOR A FULL REFUND YOUR RIGHT TO RETURN AND REFUND EXPIRES 30 DAYS AFTER PURCHASE FROM CISCO OR AN AUTHORIZED CISCO RESELLER AND APPLIES ONLY IF YOU ARE THE ORIGINAL END USER PURCHASER The following terms of the Agreement govern Customer s access and use of the Cisco or Cisco supplied software Software except to the extent a there is a separate signed agreement between C...

Page 54: ...ii make error corrections to or otherwise modify or adapt the Software or create derivative works based upon the Software or permit third parties to do the same iii reverse engineer or decompile decrypt disassemble or otherwise reduce the Software to human readable form except to the extent otherwise expressly permitted under applicable law notwithstanding this restriction iv use or permit the Sof...

Page 55: ...easonable cost of conducting the audit Export Re Export Transfer and Use Controls The Software Documentation and technology or direct products thereof hereafter referred to as Software and Technology supplied by Cisco under the Agreement are subject to export controls under the laws and regulations of the United States U S Customer shall comply with such laws and regulations governing export re ex...

Page 56: ...o intrusion or attack Restrictions This warranty does not apply if the Software Product or any other equipment upon which the Software is authorized to be used a has been altered except by Cisco or its authorized representative b has not been installed operated repaired or maintained in accordance with instructions supplied by Cisco c has been subjected to abnormal physical or electrical stress ab...

Page 57: ...LICENSORS TO CUSTOMER FOR PERSONAL INJURY OR DEATH CAUSED BY THEIR NEGLIGENCE II CISCO S LIABILITY FOR FRAUDULENT MISREPRESENTATION OR III ANY LIABILITY OF CISCO WHICH CANNOT BE EXCLUDED UNDER APPLICABLE LAW Disclaimer of Liabilities Waiver of Consequential Damages and Other Losses IF YOU ACQUIRED THIS SOFTWARE IN THE UNITED STATES LATIN AMERICA THE CARIBBEAN OR CANADA REGARDLESS OF WHETHER ANY RE...

Page 58: ...clusive jurisdiction over any claim arising under the Agreement or Warranties If you acquired this Software in Canada unless expressly prohibited by local law the Agreement and Warranties are controlled by and construed under the laws of the Province of Ontario Canada notwithstanding any conflicts of law provisions and the courts of the Province of Ontario shall have exclusive jurisdiction over an...

Page 59: ...pressly provided herein the Agreement constitutes the entire agreement between the parties with respect to the license of the Software and Documentation and supersedes any conflicting or additional terms contained in any Purchase Order or elsewhere all of which terms are excluded The Agreement has been written in the English language and the parties agree that the English version will govern Produ...

Page 60: ...19 8 BWX 110 Desktop Modem User Guide OL 16307 03 Chapter 19 End User License Agreement ...

Reviews: