background image


2-27

Cisco Integrated Services Router Hardware Installation Guide


Chapter 2      Installing the Router

  Installing the Cisco 810 ISR

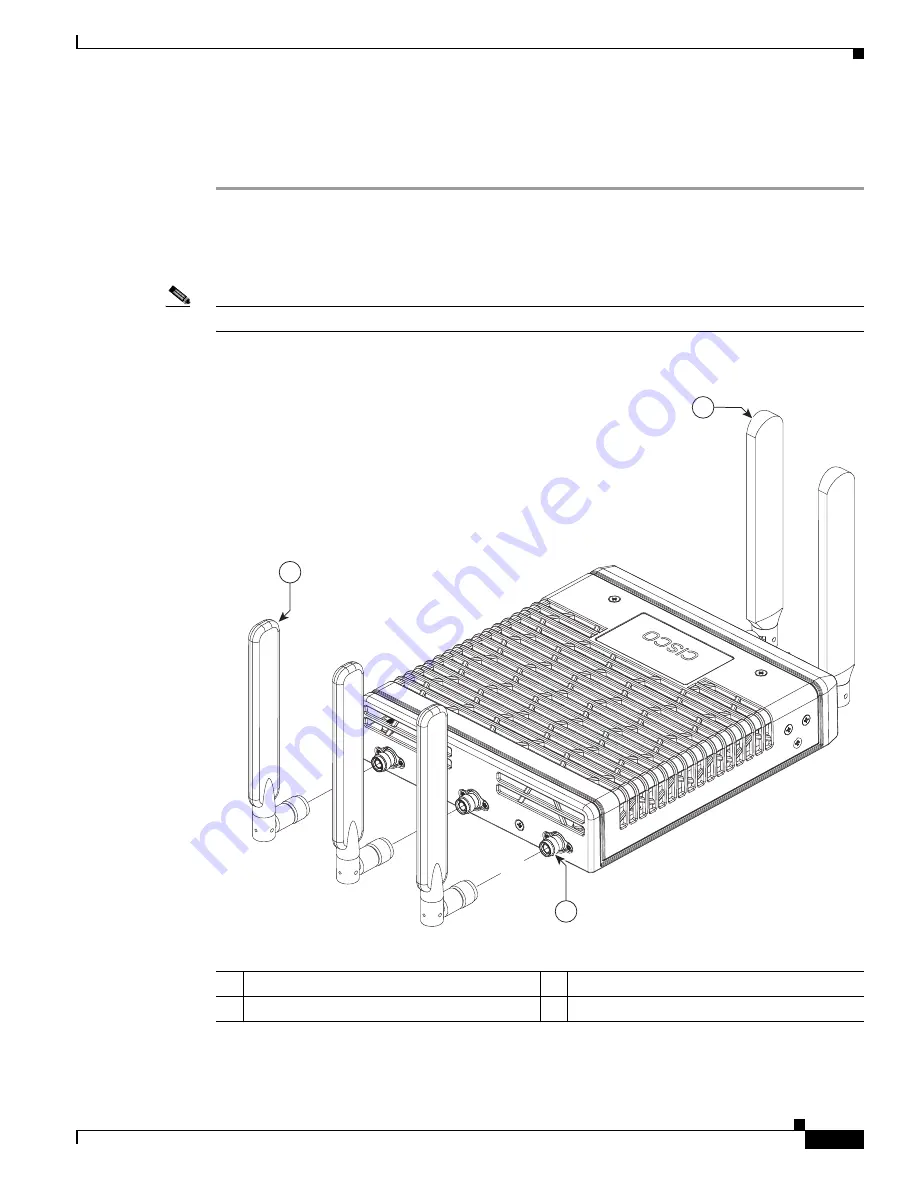
Installing a WiFi External Antenna

This section describes how to install a WiFi external antenna.

Step 1

Install the lightning arrestor. For details in installing lightning arrestor, see 

Cisco Aironet Lightning 

Arrestor (AIR-ACC245LA-R)

.

Step 2

Rotate the knurled portion of the WiFi external antenna clockwise to screw the antenna to the RP-TNC. 
(See 

Figure 2-24

.)

Note

WiFi antennas should be generally perpendicular to each other to achieve best coverage.

Figure 2-24

Cisco WiFi Antenna Assembly

2

3

1

344030

1

3G/4G Dipole External Antenna

3

RP-TNC Connector

2

WiFi 2.4/5 Ghz Dipole External Antenna

Summary of Contents for 866VAE

Page 1: ...97VAMW Router 1 344770 1 LEDs 7 6 GELAN 5 4 3 2 POE 1 0 8 GE WAN 54VDC 1 2A 12VDC 2 5A VDSL ADSL overPOTS CONSOLE RESET 344772 11 1 2 3 4 7 8 9 10 5 6 1 GE WAN interface 7 On Off switch 2 SFP port 8 Reset button 3 USB port 9 Earth ground connection 4 8 port Gigabit Ethernet switch1 10 Kensington security slot 5 Console Auxiliary port 11 VDSL ADSL over POTS 6 Power connector 1 Port 0 through 3 can ...

Page 2: ...er Figure 1 70 Front Panel of the Cisco 898EA Router 7 6 GELAN 5 4 3 2 POE 1 0 8 GE WAN SFP 8 54VDC 1 2A 12VDC 2 5A SHDSL RJ45 ONLY CONSOLE RESET Cisco 898EA AUX 344774 11 1 2 3 4 7 8 9 10 5 6 1 GE WAN interface 7 On Off switch 2 SFP port 8 Reset button 3 USB port 9 Earth ground connection 4 8 port Gigabit Ethernet switch1 1 Ports 0 through 3 can be configured as POE which is an optional feature f...

Page 3: ... 38 Hardware Specifications of Cisco C897VAB K9 ISR Hardware Description Flash Memory 256 MB Main Memory 1 GB DDR RAM fixed and not extendable USB port A USB 2 0 compliant port located on the back panel FAN Fanless chassis PoE Optional Four internal PoE ports Primary WAN VDSL ADSL over POTS Backup WAN 10 100 1000 GE port RJ 45 SFP Console or auxiliary port RJ 45 LAN switch 8 port 10 100 1000 GE Sw...

Page 4: ...ir pins those just adjacent to the center pair to provide the 2 bonded VDSL lines For more information see Cisco 890 Series Integrated Services Routers Data Sheet 2 2 Ports 0 through 3 can be configured as POE which is an optional feature for this model If this feature is not configured with the factory order you must order and install it to enable the PoE function 364227 CD0 CD1 B1 B2 ISDN 1 3 2 ...

Page 5: ... being transmitted SFP WAN 8 Green Off No link On Link Blinking Data is either being received or being transmitted 6 VPN Green Off No tunnel On At least one tunnel is up 7 PPP Green Off No PPP session On At least one PPP session established 8 xDSL CD0 Green Off Interface is shutdown On Showtime Link up Slow Blinking Modem initialization Fast Blinking Training up the line If both CD0 CD1 are ON the...

Page 6: ...f the Cisco C891 Series Routers For detailed hardware specifications see the Cisco C890 Series hardware data sheet at http www cisco com en US prod collateral routers ps380 data_sheet_c78 519930 html Cisco C891F Router Figure 1 73 shows the front panel of the Cisco C891F Router Table 1 40 Hardware Specifications of Cisco C891 Series ISR Hardware Description Flash Memory 256 MB Main Memory 1 GB DDR...

Page 7: ...gure 1 73 Front Panel of the Cisco C891F Router For detailed description about the LEDs on the Cisco C890 Series Routers see the LEDs section on page 1 25 361136 Cisco Cisco 800 Series OK OK POE OE PPP PPP GE GE LAN VPN V 92 V 92 ISDN ISDN OK OK 0 1 2 3 4 5 6 7 GE8 GE8 SFP8 SFP8 FE0 FE0 WAN WAN B1 B1 B2 B2 POE OE 1 1 LEDs ...

Page 8: ...1FW Router For detailed description about the LEDs on Cisco C890 Series Router see LEDs section on page 1 25 361137 FE FE WAN AN ISDN ISDN GE GE WAN AN SFP SFP V 92 92 7 6 GE GE LAN AN CON ONSOLE OLE Ci Cisco 89 891F RES RESET AUX UX 5 4 3 2 POE POE 1 0 0 0 8 8 0 54V 54VDC 1 5A 5A 3 5 5A 3 5 5A 12V 12VDC POE POE 1 2 3 4 5 7 8 13 12 9 11 10 6 1 Back up WAN port FE WAN 8 Console Auxiliary port 2 ISD...

Page 9: ...ardware installation guide 2Instal l880 860 html 361139 FE FE WAN AN ISDN ISDN GE GE WAN AN SFP SFP V 92 92 7 6 GE GE LAN AN CON ONSOLE OLE Ci Cisco 89 891FW FW RES RESET AUX UX 5 4 3 2 POE POE 1 0 0 0 8 8 0 54V 54VDC 1 5A 5A 3 5 5A 3 5 5A 12V 12VDC POE POE 1 2 3 4 5 7 8 13 12 9 11 10 6 1 Back up WAN port FE 8 Serial port Console or auxiliary 2 ISDN 9 Power connector 3 Primary WAN port GE 10 On Of...

Page 10: ...supports PoE on 8 switch ports Cisco C891 24X K9 ISR supports WAN connectivity through dual GE or SFP ports Table 1 41 provides information about important hardware specifications pertaining to Cisco C891 24X K9 ISR Figure 1 77 shows the front panel of the Cisco C891 24X K9 ISR Figure 1 77 Front Panel of the Cisco C891 24X K9 ISR Table 1 41 Hardware Specifications for Cisco C891 24X K9 ISR Hardwar...

Page 11: ...tures This section provides an overview of the following hardware features for the Cisco 860 Series 880 Series and 890 Series ISRs A feature summary is available at the end of this section Kensington Lock Reset Button LEDs Memory USB Port Fan Power Supply Power over Ethernet Module 3G Cellular Data WAN Connectivity Small Form Factor Pluggable Port Feature Summary 364240 SYSTEM Cisco C891 24X POE E...

Page 12: ...isco 860VAE Routers Custom Configuration File On the Cisco 860VAE routers the reset button can be used to load a custom configuration file without having to use the CLI The configuration file can be located on an external USB flash drive or on the router s compact flash The custom configuration file must be named one of the following customer config SN customer config where SN is the unique hardwa...

Page 13: ...teps Step 1 Turn the power on Step 2 Press and hold the Reset button until the system status LED begins to flash Typically this occurs within 5 seconds The router reloads itself after the startup configuration has been replaced with the new customer configuration In the second method the configuration file can be located on an external USB flash drive or on the router s compact flash The custom co...

Page 14: ...able 1 42 LED Descriptions for the Cisco 860 Series Cisco 880 Series and Cisco 890 Series ISRs LED Color Description 860 Series 880 Series 890 Series Power OK Green On DC power is being supplied to the router and the Cisco IOS software is running Blinking Bootup is in process or the router is in Rommon monitor mode Off Power is not supplied to the router All models All models All models Link Statu...

Page 15: ...On Wireless link is up Blinking Ethernet link is up and data is either being received or being transmitted Off Wireless link is down Wireless models Wireless models Wireless models WLAN LINK Unified Mode Green On Ethernet link is up and wireless access point AP is communicating with LWAPP2 controller Blinking Ethernet link is up but wireless AP is not communicating with LWAPP controller Off Ethern...

Page 16: ... is passing through ISDN channel 2 887 887V 888 models 892 models 3G8 WWAN9 Green On Service is established Slow Blinking Searching for service Fast Blinking Data is either being received or being transmitted 3G models 3G RSSI10 Green Off Low signal strength lower than 100 dBm On High RSSI 69 dBm or higher Slow Blinking Low or medium RSSI 99 to 90 dBm Fast Blinking Medium RSSI 89 to 70 dBm 3G mode...

Page 17: ...lure SFP S Green Blinking Blinking frequency indicates port speed 892F models 1 SSID service set identifier 2 LWAPP Lightweight Access Point Protocol 3 PPP Point to Point Protocol 4 xDSL General term referring to various forms of DSL including ADSL asymmetric digital subscriber line and VDSL very high data rate digital subscriber line 5 DSLAM digital subscriber line access multiplexer 6 ATM Asynch...

Page 18: ...AN mode Note In Cisco IOS DSL_WAN mode DSL_LINK LED will be solid after DSL training complete or flashing during training xDSL1 ACT 1 xDSL General term referring to various forms of DSL includi ng ADSL asymmetric digital subscriber line and VDSL very high data rate digital subscriber line Green On DSL interface is up Blinking DSL WAN activity traffic in either direction Faster blinking Heavier tra...

Page 19: ...rmal operation Blink Boot up phase or in ROM Monitor mode GE0 Green Amber Link Status Green On Ethernet port is connected Amber On Fault with PoE There is a fault with the inline power supply Green Amber Blinking Data is either being received or being transmitted Green Amber Off Ethernet port is not connected GE1 GE2 GE3 GE4 GE5 Green Link Status On Ethernet port is connected Blinking Data is eith...

Page 20: ...tors Figure 1 79 Close up of the BRI and FXS LED Indicators Memory The Cisco 860 series 880 series and 890 series routers contain flash memory and main memory Flash Memory The Cisco 860 series 880 series and 890 series ISRs use non upgradable flash memory storage The onboard flash memory contains the Cisco IOS software image the boot flash contains the ROMMON boot code and a separate non volatile ...

Page 21: ... maximum of 768 MB Cisco 880 series routers with embedded WLAN antennas 512 MB Not expandable Cisco 892FSP 896VA 897VA 898EA routers 512 MB Expandable to 1 GB Table 1 47 USB Ports Models USB Cisco 860 series non VAE No USB ports Cisco 860VAE series One USB 1 1 compliant port located on the back panel The USB port does not support eToken Cisco 860VAE W A K9 Cisco 860VAE W E K9 and Cisco 860VAE POE ...

Page 22: ... non PoE 12 VDC 60 W power supplies Power over Ethernet Module The Cisco 880 series ISRs can include an optional Power over Ethernet PoE module that provides power to 802 3af compliant devices connected to FE ports 0 and 1 The Cisco 890 series ISRs can include an optional PoE module that provides power to 802 3af compliant devices connected to FE ports 0 1 2 and 3 The PoE module is an option avail...

Page 23: ... 880G for 3 7G HSPA 3 5G HSPA Wireless LAN Connectivity The embedded Wi Fi CERTIFIED 802 11a b g n compliant wireless AP is preinstalled in the router as an optional feature The Cisco 860 series routers support autonomous features and network configurations The Cisco 880 series and 890 series routers support both autonomous and unified features and network configurations The wireless AP does not h...

Page 24: ... is highly dependent on your wireless environment 2 The antennas require some minor installation They must be screwed onto the RP TNC antenna connectors on the I O side of the chassis See the following document on Cisco com for feature information http www cisco com en US docs routers access wireless hardware notes antdip html Table 1 48 Wireless Device Radios and Antennas Radio Module Platform Ra...

Page 25: ...n these routers eliminates the need for a crossover cable and enables the router to detect MDI2 or MDIX3 in any other PC or hub with a straight through cable or a crossover cable All models All models 891 892 892F GE4 built in switch port Provides connection to 10 100 1000BASE T 10 100 1000 Mb s Gigabit Ethernet networks The autosensing function in these routers eliminates the need for a crossover...

Page 26: ...891 892 892F GE WAN port 10 100 1000 GE WAN Port 866VAE 867VAE 866VAE K9 867VAE K9 All models VDSLoPOTS12 port Provides connection to a VDSL network 887V ADSLoPOTS Provides ADSL connection over basic telephone service with Annex A and Annex B ITU G 992 1 ADSL G 992 3 ADSL2 and G 992 5 ADSL ADSLoISDN Provides ADSL connection over ISDN DSL Multi mode VDSL and ADSL2 2 Provides ADSL2 2 or VDSL connect...

Page 27: ... port PoE module Models with PoE Models with PoE G SHDSL14 port Provides 2 wire or 4 wire connection to a G SHDSL network 888 898EA 3G15 card slot Provides backup data link 3G models Dying gasp Detects when the router is losing power and sends a power fail signal to warn the DSLAM16 about the impending line drop 866VAE 867VAE 866VAE K9 867VAE K9 xDSL models 888EA xDSL models 892FSP 896VA 897VA 897...

Page 28: ... This applies to most models of the Cisco 880 series routers 10 This applies to Cisco 880 series routers with embedded wireless antennas 11 xDSL General term referring to various forms of DSL including ADSL asymmetric digital subscriber line VDSL very high data rate digital subscriber line and G SHDSL 12 VDSLoPOTS very high data rate digital subscriber line 2 over plain old telephone service 13 Po...

Page 29: ...1 136 Cisco Integrated Services Router Hardware Installation Guide Chapter 1 Product Overview Cisco 860 880 890 Series ...

Page 30: ...hipped with your Router page 2 2 Items Shipped with your PoE Splitter page 2 2 Installing the Cisco PoE Splitter page 2 2 Installing the SIM Card page 2 6 Installing the 3G Antenna page 2 8 Mounting the Cisco 812 ISR page 2 9 Warning Installation of the equipment must comply with local and national electrical codes Statement 1074 Warning Voltages that present a shock hazard may exist on Power over...

Page 31: ... splitter C810 POE SPL The following items are shipped with your PoE splitter GE Cat5 cable Power cable Power cord lock Screws needed for the installation Shelf bracket Note The above items are acceptable for use in Plenums and Air handling spaces Installing the Cisco PoE Splitter The PoE splitter C810 POE SPL is an optional accessory that is intended to be mounted to the ceiling tile rails 24 inc...

Page 32: ... Guide Chapter 2 Installing the Router Installing the Cisco 810 ISR Figure 2 1 10 24 Screws Step 2 Install the PoE splitter into the mounting plate with four 6 32 screws See Figure 2 2 285667 1 1 3 2 1 10 24 screws 2 Box hanger 3 Shelf bracket PID 700 39491 01 ...

Page 33: ...our PoE source to the PoE in port on the PoE splitter Step 5 Place the power cord lock onto the power cord behind the connector overmold as shown in Figure 2 3 Slide the power cord lock forward so that it captures the overmold and is fully seated Figure 2 3 Placement of the Power Cord Lock onto the Power Cord 285668 1 2 3 4 1 6 32 screws 3 To PoE power source 2 Power cable with power cord lock ins...

Page 34: ...with both arms locking into the slots Figure 2 4 shows the installation of the power cord lock and other cables In the event that the power cord lock needs to be removed user your thumb and index fingers to squeeze the ends of the tabs while pulling away from the PoE splitter Figure 2 4 Installation of the Power Cord Lock and Other Cables Step 7 Remove one ceiling tile to gain access Step 8 Instal...

Page 35: ... part of the exposed PCB circuit area when the SIM cover is removed Warning Hot surface Statement 1079 To install the SIM card perform these steps Step 1 Power off the router and disconnect the power cable from the power source Step 2 Place the router on a sturdy solid surface and orient the SIM access panel up to gain access Ensure that any installed antennas are oriented appropriately to avoid d...

Page 36: ...talling the Cisco 810 ISR Figure 2 6 Accessing the SIM Card Step 4 Remove the SIM card and install the new cards Step 5 Reinstall the same 6 32 flat head screws using a screw driver to secure the access panel back in place Figure 2 7 shows the SIM card installed and the SIM access panel closed 344397 ...

Page 37: ...are not to come into contact with such circuits because they may cause serious injury or death For proper installation and grounding of the antenna please refer to national and local codes for example U S NFPA 70 National Electrical Code Article 810 Canada Canadian Electrical Code Section 54 Statement 1052 To install the 3G antennas to the router perform these steps Step 1 Manually screw the anten...

Page 38: ...ular with respect to the floor Figure 2 9 shows the 3G antenna installed Figure 2 9 3G Antenna Installed Mounting the Cisco 812 ISR This section describes the steps in mounting the Cisco 812 ISR in several configurations including on a suspended ceiling on a hard ceiling or wall and on an electrical or network box This section contains the following topics Mounting Hardware page 2 10 344395 344396...

Page 39: ...rackets which connect to the bottom of the router and ceiling grid clips which connect the bracket to a suspended ceiling The bracket that you need depends on the mounting location for the router The ceiling grid clip that you need depends on the type of suspended ceiling where you need to install the router You do not need ceiling grid clips if you are mounting the router to a hard surface ceilin...

Page 40: ... the ceiling tiles on your ceiling There are two types of ceiling grid clips Ceiling Grid Clip Recessed AIR AP T RAIL R If your ceiling tiles hang below the ceiling grid this clip provides the best fit between the router and the ceiling Ceiling Grid Clip Flush AIR AP T RAIL F If your ceiling tiles are flush with the ceiling grid this clip provides a snug fit between the router and the ceiling The ...

Page 41: ... ceiling rail However other types of ceiling rails such as channel rails and beam rails require an additional adapter clip AIR CHNL ADAPTER You need two adapter clips for each router Set screws on the clips hold them securely on the ceiling rail Figure 2 12 shows the three types of ceiling rails T rail channel and beam Figure 2 13 shows the Cisco Access Point installed with mounting bracket ceilin...

Page 42: ...etails on installing the PoE splitter Use a flat screwdriver if there is a need to remove the GE console cables To mount the Cisco 812 ISR below a standard or recessed suspended ceiling perform these steps Step 1 Decide where you want to mount the router on your suspended ceiling Step 2 Open the ceiling grid clip completely Step 3 Place the ceiling grid clip over the T rail and close it to the app...

Page 43: ...ble protruding from the hole Step 9 Optional Use the ground screw to ground the router to a suitable building ground See the Grounding the Cisco 812 ISR section on page 2 18 for general grounding instructions Step 10 Connect the Ethernet and power cables to the router Step 11 Align the router feet over the keyhole mounting slots on the mounting bracket If you created a hole for the cables make sur...

Page 44: ...ed on horizontal surfaces such as a table top or ceiling For advanced features such as voice location and router detection ceiling mounting is strongly recommended However for smaller areas such as conference rooms kiosks transportation environments or hot spot usage where data coverage is the primary concern the unit may be wall mounted using wall anchors or screws 344533 1 2 7 8 4 3 6 5 1 To PoE...

Page 45: ...rs and mount the router using no less than four fasteners Caution Do not use plastic wall anchors for ceiling installations When mounting the router on a hard ceiling use four fasteners capable of maintaining a minimum pullout force of 20 lbs 9 kg Figure 2 15 Universal Mounting Bracket Details Step 2 Use a 29 drill 0 1360 inch 3 4772 mm bit to drill a pilot hole at the mounting hole locations you ...

Page 46: ...g the Cisco 812 ISR section on page 2 18 for the general grounding instructions Step 8 Position the mounting bracket mounting holes with indents down over the pilot holes Step 9 Insert a fastener into each mounting hole and tighten Step 10 Connect the Ethernet and power cables to the router Step 11 Align the router feet with the large part of the keyhole mounting slots on the mounting plate Step 1...

Page 47: ...nt If grounding is required in your area or you wish to ground your router perform the following steps Warning Use copper conductors only Statement 1025 Warning This equipment must be grounded Never defeat the ground conductor or operate the equipment in the absence of a suitably installed ground conductor Contact the appropriate electrical inspection authority or an electrician if you are uncerta...

Page 48: ...res for successfully installing the Cisco 819 ISR and contains the following sections Equipment Tools and Connections page 2 20 Installing the Router page 2 22 Mounting the DC Power Supply page 2 39 Note For compliance and safety information see the Regulatory Compliance and Safety Information Roadmap that ships with the router and the Regulatory Compliance and Safety Information for Cisco 800 Ser...

Page 49: ...afety design of the product Do not operate the unit without the covers installed Statement 1077 Warning Do not locate the antenna near overhead power lines or other electric light or power circuits or where it can come into contact with such circuits When installing the antenna take extreme care not to come into contact with such circuits because they may cause serious injury or death For proper i...

Page 50: ...he router but are required for installation ESD preventive cord and wrist strap Screws for mounting the router on a wall Two number 10 wood screws round or pan head with number 10 washers or two number 10 washer head screws for mounting on a wall stud The screws must be long enough to penetrate at least 3 4 inch 20 mm into the supporting wood or metal wall stud Two number 10 wall anchors with wash...

Page 51: ... The same clearances apply when mounted vertically This section also describes how to attach external antennas to the routers and contains the following topics Warnings page 2 22 Accessing the SIM Card page 2 23 Installing Antennas page 2 26 Installing a WiFi External Antenna page 2 27 Installing on a Table page 2 28 Mounting on a Wall page 2 28 Installing a DIN Rail page 2 29 Installing the Route...

Page 52: ...uding heating vents Accessing the SIM Card This section describes how to install and replace the SIM card Ensure that the router is not mounted to a wall floor or DIN rail Caution Do not touch any part of the exposed PCB circuit area when the SIM cover is removed Warning Hot surface Statement 1079 To access the SIM card in the Cisco 819 ISR follow these steps Step 1 Power off the router and discon...

Page 53: ... Figure 2 19 Opening the SIM Socket Cover Step 5 Gently lift the cover on its hinges See Figure 2 20 Figure 2 20 Lifting the Socket Cover Step 6 Slide the SIM card into the slot in the cover Gently push down the cover to close The SIM card will come in contact with the metal contacts in the socket See Figure 2 21 364622 364623 ...

Page 54: ...outer Hardware Installation Guide Chapter 2 Installing the Router Installing the Cisco 810 ISR Figure 2 21 Sliding the SIM Card into the Slot Step 7 To lock the cover slide it in the direction of the lock arrow See Figure 2 22 364624 ...

Page 55: ...antennas on the front panel It is difficult to install the antennas after the router is installed To attach the radio antennas to your wireless router follow these steps Step 1 Manually screw the antenna tight to the TNC connectors on the back of the router See Figure 2 23 Figure 2 23 Installing the Antenna Step 2 Orient the antennas For optimum wireless performance antennas should be generally pe...

Page 56: ...or For details in installing lightning arrestor see Cisco Aironet Lightning Arrestor AIR ACC245LA R Step 2 Rotate the knurled portion of the WiFi external antenna clockwise to screw the antenna to the RP TNC See Figure 2 24 Note WiFi antennas should be generally perpendicular to each other to achieve best coverage Figure 2 24 Cisco WiFi Antenna Assembly 2 3 1 344030 1 3G 4G Dipole External Antenna...

Page 57: ...sing a location for wall mounting the router consider cable limitations and wall structure To mount the router on a wall follow these steps Step 1 Remove the screws on the sides of the routers Step 2 Attach the standard brackets to the chassis using the three screws provided for each bracket See Figure 2 25 Figure 2 25 Attaching the Standard Brackets Step 3 Install the router to a wall stud using ...

Page 58: ...the cables so that they do not put a strain on the connectors or mounting hardware To comply with IP 41 cables should be routed down relative to the router to prevent water from travelling on the cables Installing a DIN Rail You can use either the 7 5 mm or the 15 mm thick DIN rail for the Cisco 819 ISR Secure the DIN rail to the mounting surface approximately every 7 8 inches 200 mm and use end a...

Page 59: ...de the DIN rail out while the tab is pressed down Figure 2 28 DIN Rail Tab Step 3 Turn the router sideways so that the antenna is at the top Step 4 Position the rear edge of the router directly in front of the DIN rail making sure that the DIN rail fits in the space between the latch and hook Step 5 Position the router so that the hook on the DIN rail bracket hooks onto the top edge of the DIN rai...

Page 60: ...2 31 Cisco Integrated Services Router Hardware Installation Guide Chapter 2 Installing the Router Installing the Cisco 810 ISR Figure 2 29 Cisco 819 ISR Installed with the DIN Rail 282626 ...

Page 61: ...ow Profile DIN Mount If space is limited between the DIN rail and the enclosure cover the Configurable Low Profile DIN Mount can be utilized to mount the router flat against the DIN rail It can also be configured in three different ways to allow router cabling to exit from the bottom right or left Figure 2 30 Configurable Low Profile DIN Mount standard configuration 391198 ...

Page 62: ...t Screws Item 2 2 Slide the DIN Rail Latch Brackets Item 5 and DIN Rail Latch Item 6 against the spring pressure towards the edge of the tray and remove the bracket and latch assembly Be careful not to lose the springs 3 Remove the DIN Rail Latch Springs Item 4 4 Identify the desired mounting configuration and replace the latch assemblies in slots with the matching labels using the reverse order o...

Page 63: ... with the longer 6 32 x 375 Philips Pan Head screws with locking washer Cisco 48 0422 01 which are included with the kit 4 Remove the screw near the middle on the back of the router 5 Locate the L bracket that came with the mount and screw the bracket to the router with the other 6 32 x 375 Philips Pan Head screw and locking washer Cisco 48 0422 01 6 Now screw the bracket to the mount with the sho...

Page 64: ...or the terminal Step 2 Crimp the ground wire to the ring terminal using the wire crimper Step 3 If you choose to install the power switch lock perform Step 5 to Step 7 Otherwise perform Step 4 Step 6 and Step 7 Step 4 Attach the ring terminal to the chassis Use the single screw provided Tighten the screws to a torque of 8 to 10 inch pound 0 9 to 1 1 newton meter See Figure 2 33 Figure 2 33 Chassis...

Page 65: ... the power cord will not come out from the router For the complete list of Cisco 819 ISRs that support power cord retention lock see Table 1 7 This section describes how to install the power cord retention lock Step 1 Pre assemble the o ring onto the barrel of the power cord as shown in Figure 2 34 Figure 2 34 Pre assemble the O Ring onto the Barrel Step 2 Place the power cord lock onto the power ...

Page 66: ...our thumb and index fingers to squeeze ends of tabs while pulling away from the router See Figure 2 37 Figure 2 37 End of Tabs Installing the Power Switch Lock The Cisco 819 ISRs have a power switch lock as an accessory The power switch lock prevents unauthorized access to a tampered proof router for example router in a bus For the complete list of Cisco 819 ISRs that support power switch lock see...

Page 67: ...pter 2 Installing the Router Installing the Cisco 810 ISR Figure 2 38 Installing Power Switch Lock Figure 2 39 Power Switch Lock Installed 344033 1 2 3 4 5 1 Ring terminal 4 Power switch lock 2 Power switch lock washer 5 Pan head screw 3 Power switch lock standoff 344034 ...

Page 68: ...an head The screws must be long enough to penetrate and tap at least 0 75 inches 19 1 mm into the supporting wood or metal wall stud For hollow wall mounting the power supply requires the use of appropriate sized wall anchors that work with the drywall thickness the unit is to be installed in Use hollow wall anchors that support using 6 screws and use 6 pan or round head screws to secure the power...

Page 69: ...atory Compliance and Safety Information for Cisco 800 Series Routers Warning All wireless LAN products in the 5 2 5 3GHz band cannot be used outdoors Use the product only indoors Statement 372 Warning Read the installation instructions before connecting the system to the power source Statement 1004 Warning Only trained and qualified personnel should be allowed to install replace or service this eq...

Page 70: ...shers or two number 10 washer head screws for mounting on a wall stud The screws must be long enough to penetrate at least 3 4 in 20 mm into the supporting wood or metal wall stud Table 2 1 Items and Their Quantities That Are Shipped with the Cisco 860 Series Cisco 880 Series and Cisco 890 Series ISRs Item Cisco 860 Series Routers Cisco 860VAE Series Routers1 1 By default no cables are shipped wit...

Page 71: ...II terminal or a PC that is running terminal emulation software to connect to the console port If you plan to connect a modem provide the modem and modem cable If you plan to use the Data BRI port provide an NT1 device and an ISDN S T cable If you plan to use the cable lock feature provide a Kensington or equivalent locking cable Installing the Cisco 860 880 and 890 Series Routers This section des...

Page 72: ...ated on both sides of the router otherwise overheating could occur and cause damage to the router Caution Do not place anything on top of the router that weighs more than 10 pounds 4 5 kilograms and do not stack routers on a desktop Excessive weight on top of the router could damage the chassis Caution Do not install the router or power supplies next to a heat source of any kind including heating ...

Page 73: ...wall follow these steps Step 1 Determine the required distance between mounting holes on the router Figure 2 41 shows the wall mount holes located on the underside of the router Note For most router models the distance between mounting holes is 8 2 inches 208 mm as shown in Figure 2 41 For the Cisco 866 and Cisco 867 models the distance is 7 85 inches 199 mm Verify the required distance before dri...

Page 74: ...ce the power adapter on a nearby horizontal surface See Figure 2 42 Figure 2 42 Router Mounted on the Wall Step 4 Connect the chassis to a reliable earth ground For the chassis ground connection procedures see the Installing Cisco 890 Series in a Rack section on page 2 54 1 Two number 10 wood screws mounted on the wall 3 Horizontal surface on which to place the power adapter 2 Wall mount holes 4 D...

Page 75: ... for the ground lug or terminal Step 2 Crimp the ground wire to the ground lug or ring terminal using the wire crimper Step 3 Attach the ground lug or ring terminal to the chassis as shown in Figure 2 43 For a ground lug use the two provided screws with captive locking washers For a ring terminal use one of the screws provided Tighten the screws to a torque of 8 to 10 in lb 0 9 to 1 1 N m Figure 2...

Page 76: ...2 47 Cisco Integrated Services Router Hardware Installation Guide Chapter 2 Installing the Router Installing the Cisco 860 880 890 ISR Step 1 Remove the four mounting screws of the top cover 284921 ...

Page 77: ... Router Installing the Cisco 860 880 890 ISR Step 2 Install the left side FIPS cover as shown in detail A Step 3 Rotate and bring into the close position to hinge to the correct hexagon Step 4 Place the adapter plate before closing by aligning the mounting holes 284922 Detail A Adapter Plate ...

Page 78: ...de Chapter 2 Installing the Router Installing the Cisco 860 880 890 ISR Step 5 Secure the FIPS cover with two mounting screws Step 6 Install the right side FIPS cover the same way as the left side FIPS cover Step 7 View after both covers are installed 284923 284924 ...

Reviews: