background image


Page 

3

 of 

12


Part A: Cisco IP Phone Quick installation Guide 


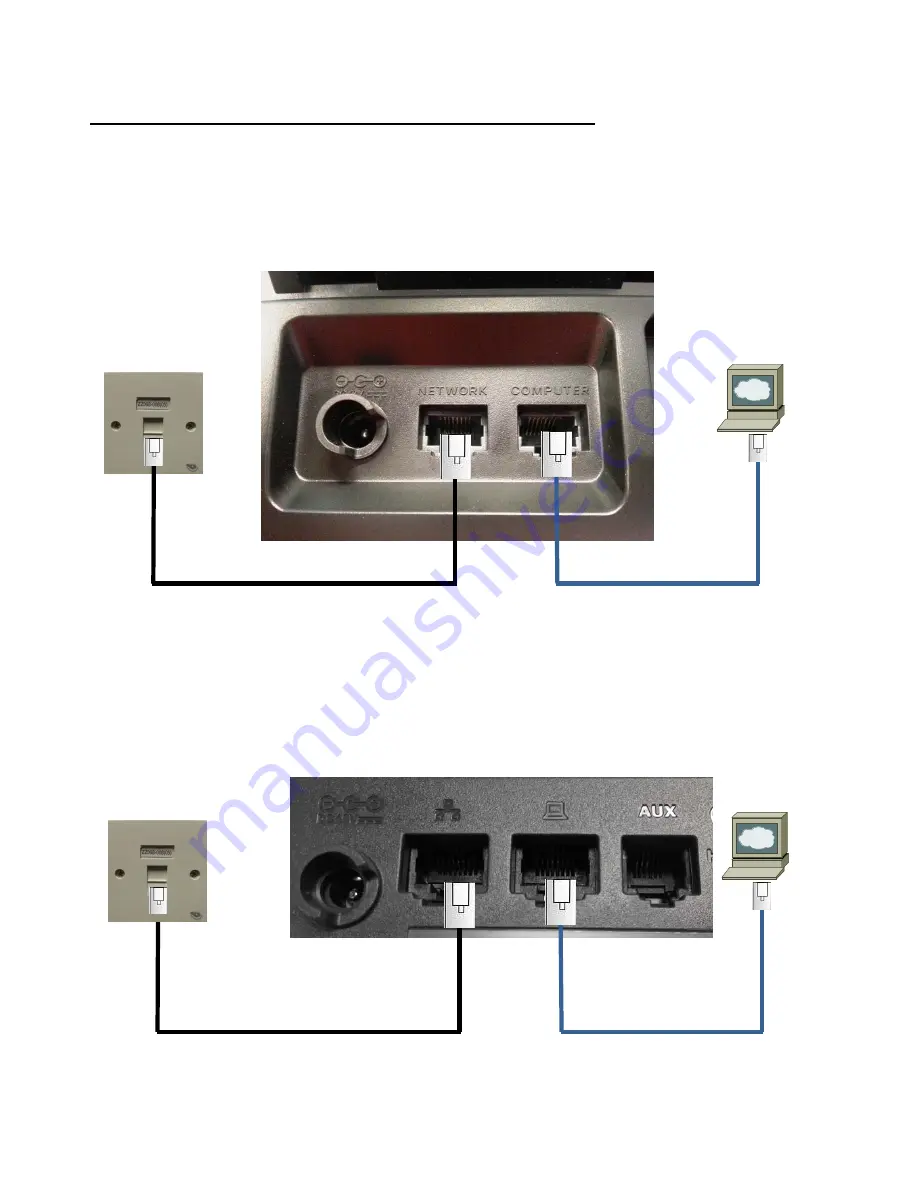
Step 1: Physical network cables connection 

 
Connect the network cables to network socket and user’s PC as the figure shows 
below:


To 

Network


Outlet


To 

End


User’s


PC


IP Phone 6921/6945 rear view


IP Phone 7821/7841 rear view


To 

Network


Outlet


To 

End


User’s


PC


All manuals and user guides at all-guides.com

Summary of Contents for 7821

Page 1: ...Cisco Unified IP Phone 6921 6945 7821 7841 Quick Installation User Quick Reference Guide 6921 6945 7821 7841 All manuals and user guides at all guides com a l l g u i d e s c o m ...

Page 2: ...e 2 of 12 Contents A Cisco Unified IP Phone 6921 6945 7821 7845 Quick installation Guide 3 B Cisco Unified IP Phone 6921 6945 7821 7845 User Quick Reference 6 All manuals and user guides at all guides com ...

Page 3: ...work cables connection Connect the network cables to network socket and user s PC as the figure shows below To Network Outlet To End User s PC IP Phone 6921 6945 rear view IP Phone 7821 7841 rear view To Network Outlet To End User s PC All manuals and user guides at all guides com ...

Page 4: ...Page 4 of 12 Step 2 Wait for phone starts Wait for the IP phone start up for around one minute 6921 6945 7821 7841 All manuals and user guides at all guides com ...

Page 5: ... phone will show your extension number when started You can make receive phone calls and access the network after started 6921 6945 7821 7841 Showed your extension number Showed your extension number All manuals and user guides at all guides com ...

Page 6: ...Page 6 of 12 Part B Cisco IP Phone User Quick Reference 6921 6945 All manuals and user guides at all guides com a l l g u i d e s c o m ...

Page 7: ...om conference select a party Remove Call Hold put a line on hold the 1st line button flashes green To reconnect the call Resume Call Pickup group PickUp Answer Call Back when the extn is no answer busy set up call back the extn Callback Exit Message shown when the extn has becomes available Press Dial to call that extn Call Forward set up all calls Fwd All Extn No Screen shows Call forwarded to XX...

Page 8: ...elect a call log record EditDial to edit the displayed number if necessary Dial lift the handset to start calling Contrast 2 User Preferences 2 Contrast Up Down to adjust 15 levels Save to confirm Ring Tone 2 User Preferences 1 Ring Tone Up Down to change 9 items select Ring Tone Play to listen Set Apply to use Remark Soft key button All manuals and user guides at all guides com ...

Page 9: ...Page 9 of 12 7821 7841 All manuals and user guides at all guides com ...

Page 10: ...om conference select a party Remove Call Hold put a line on hold the 1st line button flashes green To reconnect the call Resume Call Pickup group PickUp Answer Call Back when the extn is no answer busy set up call back the extn Callback Exit Message shown when the extn has becomes available Press Dial to call that extn Call Forward set up all calls Fwd All Extn No Screen shows Call forwarded to XX...

Page 11: ... log record EditDial to edit the displayed number if necessary Dial lift the handset to start calling Contrast 2 User Preferences 2 Contrast Up Down to adjust 15 levels Save to confirm Ring Tone 2 User Preferences 1 Ring Tone Up Down to change 9 items select Ring Tone Play to listen Set Apply to use Remark Soft key button All manuals and user guides at all guides com a l l g u i d e s c o m ...

Page 12: ...Page 12 of 12 All manuals and user guides at all guides com ...

Reviews: