2
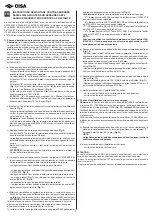
f) Install the square spindle (quality higher than/equivalent to FE360 galvani-
zed) by de
fi
ning the projection out of the door outline
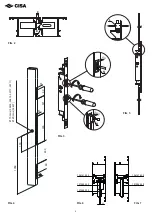
(Fig. 1)
.
Door inside (for coupling to panic exit device):
-
“
Y
” =
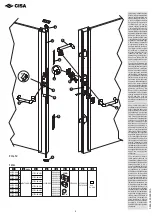
9 mm
for series 59600 using the square spindle item 07085.77.0 or
a commercially available part
-
“
Y
” =
8 mm
for series FAST Push 59607.10.0 using the square spindle
item 07206.00.0 or a commercially available part
.
-
"
Y
" =
18 mm
for series SBLOCK 59710.00/01.0 using the square spindle
item 07085.77.0 with a 9 to 8 mm adapter
.
-
“
Y
” =
18 mm
for series FAST Touch 59711.00/01.0 using the square spindle
item 07085.77.0 or a commercially available part
.
NOTE:
If a commercially available square spindle or the CISA item CISA 07206-
00-0 is used, it must be cut so that it rests against the pro
fi
le without
protruding from the panic exit device
.
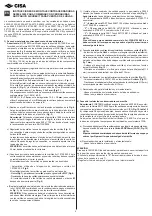
g) Installation steps with the automatic extended bolt release device (
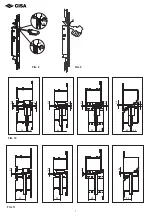
Fig. 10
).
- Check (according to the pro
fi
le used) if the corner joint allows to carry out
the installation or if the device should be shimmed with the supplied spacers
(the device can operate correctly if the distance between the striker and the
extended bolt release device front is comprised between
4 and 7 mm
).
- Position the extended bolt release device and striker according to the
pro
fi
le used (
Fig. 10
).
- Drill a hole in the striker to let the extended bolt through (dia. 10 mm tip).
A dia. 12 mm hole is advised.
h) Installation steps with manual extended bolt restoring (
Fig. 11
).
- Position the striker item 1.06141.80.0 according to the pro
fi
le used (
Fig. 11
).
- Drill a hole in the striker to let the extended bolt through (dia. 10 mm tip). A
dia. 12 mm hole is advised.
I) Recommended installation and maintenance instructions:
- Refer to the panic exit device operation and maintenance handbook.
- Refer to the lock instruction sheet.
2) Safety lock installation steps with handle
Caution:
the SYSTEM (certi
fi
ed according to the directive 89/106/CE in
compliance with the standard EN 179:2008 for panic exit systems) must be
assembled and installed by using items supplied by CISA (
Fig. 12 - table 12/A
– optional component
8
), checking that the adjustment directions provided under
point 2 of the lock instruction sheet and point 1a) of the safety lock instruction
sheet have been followed.
The handle comes with a facsimile of the certi
fi
cate no. 082 BD where all the
codes of the components that are suitable for installation with the CISA system
are indicated.
a) Proceed from point 1a) onwards bearing in mind that you are dealing with a
handle instead of a panic exit device. The max
“Y”
value is in this case 34 mm
(32 to 34 mm) (
Fig. 12
).
NOTE:
The supplied square spindle must be cut to ensure that it rests against
the pro
fi
le without protruding from the handle
.
b) Recommended installation and maintenance instructions:
- Refer to the lock instruction sheet.
CAUTION:
If you use a CARRY BAR, to obtain correct door opening the following instruc-
tions must be followed:
- Remove the lock antipicking bolt
“P”
(see the lock instruction sheet, point 7)
- Adjust the latchbolt feeler pin to its max protrusion value.
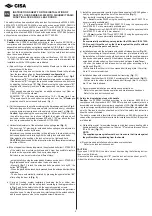
INSTRUCTION SHEET FOR THE INSTALLATION OF
SAFETY LOCKS SERIES 43295 WITH SIKUREXIT PANIC
FUNCTION LOCKS FOR 2 LEAF DOORS
This safety lock can be associated with panic function locks series 43225-43235-
43236-43725-43735-43825-43835, panic exit devices series 59600, SBLOCK
59710.00/01, FAST Push 59607.10.0 and FAST Touch 59711.00/01.0 (for panic
exit systems in compliance with the standard EN 1125:2008 and CE Certi
fi
cation
according to the directive 89/106/CE) and with handle series 1.07070.66 (for panic
exit systems in compliance with the standard EN 179:2008).
1) Safety lock installation steps with panic exit device
Caution:
the SYSTEM (certi
fi
ed according to the directive 89/106/CE in
compliance with the standard EN 1125:2008 for panic exit systems) must be
assembled and installed by using items supplied by CISA (
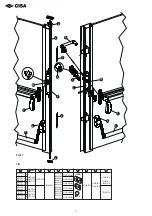
Fig. 1
- table 1A -
optional components
6-9
), checking that the adjustment directions provided under
item 2 of the lock instruction sheet and item 1a) of the safety lock instruction
sheet have been followed.
The lock is supplied with specimens of the certi
fi
cates no. 122 AD - 123 AD
-
130 AD - 135 AD where all the codes of the components that are suitable for
installation with the CISA system are indicated.
a)
Spacer
fi
tting and adjustment of the deadbolt feeler pin to obtain correct
association with the locks.
Holding down the panic exit device bar, the deadbolt feeler will protrude
from the faceplate outline by
3 mm (standard con
fi
guration).
The ideal dimension
“X”
is
5 mm
(minimum 3 mm, maximum 9 mm) -
Fig. 2
If the dimension
“X”
is smaller than
5 mm
, feeler pin needs no adjustment.
If the dimension
“X”
is bigger, the required compensation can be achieved
by adjusting the feeler pin
“S” (Fig. 3)
and/or using the nylon spacers
“R”
supplied with the safety lock (one
5 mm
spacer and two
3 mm
spacers) –
Fig. 2.
If not enough spacers are supplied an additional spacer set (item no.
1.06141-88-0) must be ordered.
EXAMPLE:
“X”
=
15 mm
; adjustment value 15-5 =
10 mm
(two 3 mm
“R” spacers should be used under the safety lock and the
“S”feeler pin
projection should be increased by
4 mm
) - Fig. 3.
b) Cut the recesses on the pro
fi
le according to the dimensions provided in
Fig. 4
.
Before drilling a hole for the square spindle (on the inside only), check how
many spacers are required under the safety lock (see point 1a)
(Fig. 2)
.
Caution:
By positioning the square spindle at a distance of 1.058 mm from
the pro
fi
le lower base (as is shown in
Fig.4
), the height of the panic exit
device bar will be comprised between 900 and 1.100 mm above the
fl
oor
level, as recommended by the standard EN 1125:2008.
c) Horizontal adjustment of the extended bolt coupling area
(Fig. 5)
The
bushings
“L”
provided for extended bolt coupling can be adjusted in
the horizontal direction by
18 mm
.
Adjustment is necessary according to the pro
fi
le used, to stop the diverting
device deadbolts from interfering with the safety lock extended bolts.
After adjusting the bushings, the lock nuts must be tightened hard.
CAUTION:
the extended bolts distance from the lock faceplate must always
be at least 26 mm.
d) When the panic exit device is operated, the extended bolts item 1.07088.03.0
of the safety lock must stay withdrawn and it must be possible to restore
them to active operation when the door is closed again.
Bolt closure can be restored in two different ways:
- automatically by using the extended bolt release device item 1.07089-52-0
Fig. 6
(extended bolts restored when the door is closed).
- Manually
(
fi
g. 7)
: to lock the extended bolts press and turn by 90° the
button
“M”
(Fig. 8)
- When the panic device touch bar is pressed down the extended bolts will stay
withdrawn
- The bolts are automatically restored by pressing the special button
“M”
after pulling the door to
(Fig. 9).
e) Carry out locking system installation (including the
fl
oor striker item
06142.85.0 supplied with the safety lock) according to the diagram shown
in
Fig. 1
and
fi
x the safety lock with the specially supplied screws.
CAUTION:
if there are spacers under the safety lock faceplate, longer screws
should be used. To stop the screws from interfering with the extended bolts,
add the used spacers’ size to the supplied screws’ dimension.
EN


