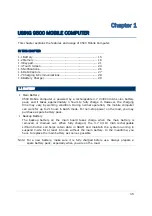
background image

20


9500 Mobile Computer 

Reference Manual


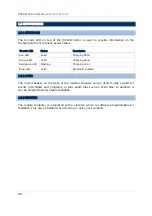
Double-tap 

My Device

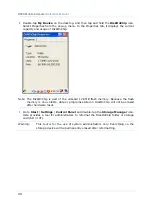
 on the desktop, and then tap and hold the 

DiskOnChip

 icon. 

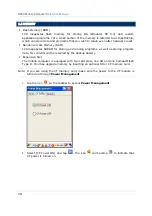
Select Properties from the pop-up menu. In the Properties tab, it displays the current 
capacity and usage of DiskOnChip. 


Note: The DiskOnChip is part of the onboard 128 MB flash memory. Because the flash 

memory is non-volatile, data or programs stored in DiskOnChip will not be erased 
after hardware reset. 


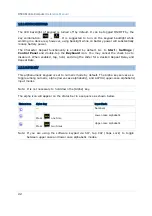
Go to 

Start

 | 

Settings

 | 

Control Panel

 and double-tap the 

Storage Manager

 icon. 

Here provides a tool for administrators to reformat the DiskOnChip folder or storage 
card (SD or CF). 

Warning: 

This tool is for the use of system administrators only. Everything on the 
storage device will be permanently erased after reformatting. 


Summary of Contents for 9500 Series

Page 1: ...Windows CE Mobile Computer 9500 Version 2 14 ...

Page 2: ...ort them to us in writing CIPHERLAB does not warrant that this document is error free No part of this publication may be reproduced stored in a retrieval system or transmitted in any form or by any means electronic mechanical photocopying recording or otherwise without the prior written permission of CIPHERLAB CO LTD For product consultancy and technical support please contact your local sales rep...

Page 3: ...lies with Part 15 of the FCC Rules Operation is subject to the following two conditions 1 This device may not cause harmful interference and 2 this device must accept any interference received including interference that may cause undesired operation FOR CANADA This digital apparatus does not exceed the Class B limits for radio noise emissions from digital apparatus as set out in the interference ...

Page 4: ...the equipment and shall be easily accessible Make sure there is stable power supply for the mobile computer or its peripherals to operate properly CARE MAINTENANCE This mobile computer is intended for industrial use The mobile computer is rated IP 64 however it may do damage to the mobile computer when being exposed to extreme temperatures or soaked wet When the body of the mobile computer gets di...

Page 5: ...UPC EAN Security Level Modified Appendix IV Add Intercharacter Gap Size under Codabar and Code 39 2 09 Mar 04 2009 Modified 9500PPC removed Modified Appendixes I IV GS1 128 EAN 128 GS1 DataBar Omnidirectional RSS 14 GS1 DataBar Limited RSS Limited GS1 DataBar Expanded RSS Expanded 2 08 Aug 05 2008 Modified 2 6 Upgrading OS Image automatic cold boot at the last step 2 07 July 09 2008 Modified 1 7 C...

Page 6: ...5 5 Backup Utility Backup directory Auto Restore settings 1 09 June 11 2007 New 3 2 3 Auto Run New 5 5 Backup Utility New Appendix II IV Modified 4 2 Connections Modified 5 3 ReaderConfig settings Modified Appendix I Scan Engine Settings 1 08 Feb 26 2007 Modified 1 5 6 Status LED Remove indication for Low Battery Modified 5 3 2 4 General tab Data Output Windows Message Event 1 07 Dec 26 2006 Modif...

Page 7: ...ling Battery 9 Charging Communications 11 Using Wireless Networks 11 Using Cradle 12 Calibrating the Screen 13 USING 9500 MOBILE COMPUTER 15 1 1 Battery 15 1 1 1 Understanding the Battery Icons 16 1 1 2 Power Management 17 1 2 Memory 18 1 2 1 Caution of Data Loss 19 1 2 2 Checking the Storage Space 19 1 3 Keypad 21 1 3 1 Keypad Settings 22 1 3 2 Alpha Key 22 1 3 3 Function Key 23 1 3 4 Task Key 23...

Page 8: ...ore 43 2 4 Using Windows Explorer 44 2 4 1 Add a Program to Start Menu 44 2 4 2 Create a new Folder 45 2 5 System Reset 46 2 5 1 Software Reset Warm Reboot 46 2 5 2 Hardware Reset Cold Reboot 46 2 6 Auto Run 47 CONFIGURING 9500 MOBILE COMPUTER 49 3 1 Application Manager 49 3 2 Device Name Configuration 50 3 2 1 Changing Device Name 50 3 2 2 Understanding Device Configuration 51 3 3 System Settings...

Page 9: ...ection 87 6 2 1 Connecting to GPRS Modem 87 6 2 2 Configuring Dialing Properties 88 6 2 3 Configuring GPRS Properties 89 USING READER CONFIGURATION UTILITY 91 7 1 Run ReaderConfig exe 92 7 2 Barcode Reader Settings 93 7 3 RFID Reader Settings 94 7 3 1 Read Operation 95 7 3 2 Write Operation 95 7 4 Data Output 96 7 5 Notifications for Good Read 97 7 6 Symbology Settings 97 MORE APPLICATIONS 99 8 1 ...

Page 10: ...NEAR IMAGER CCD LASER SE950 117 Reader Settings Table 117 Symbology Settings Table 118 LR ELR LASER 123 Reader Settings Table 123 Symbology Settings Table 125 Miscellaneous 128 AIM Code ID Code Characters 129 AIM Code ID Modifier Characters 129 2D IMAGER 131 Reader Settings Table 131 Symbology Settings Table 133 1D Symbologies 133 2D Symbologies 138 Image Capture Miscellaneous 139 AIM Code ID Code...

Page 11: ...n construction to meet industry grade requirements and has been found durable and resistant to shock water and dust It is specifically designed for all day everyday use as well as for data intensive applications in harsh environments This manual serves to guide you through how to install configure and operate the mobile computer The Care Maintenance section is specifically prepared for those who a...

Page 12: ...and peripherals when no GPRS card is present One Secure Digital SD expansion slot for memory card Dual mode support One scan engine integrated barcode scanner imager plus one RFID reader Total wireless solution connectivity includes Bluetooth 802 11b g and GPRS A 3 5 color transflective TFT display delivers excellent visibility in all lighting conditions Programmable feedback includes speaker and ...

Page 13: ...d Strap Product CD Note For battery charging you will need to purchase a charging cradle separately ACCESSORIES Rich choices of optional accessories are available for you to enhance the total performance of the mobile computer Pistol Grip detachable Belt Holster Protective Cover Memory Card SD or CF card if no GPRS card in the CF slot Spare rechargeable Li ion battery 4 Slot Battery Charger Chargi...

Page 14: ...4 9500 Mobile Computer Reference Manual ...

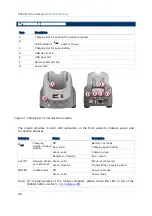
Page 15: ...5 OVERVIEW QUICK START Figure 1 Overview ...

Page 16: ...le computer before use When the hand strap is desired install it to the mobile computer by following these steps 1 Place the mobile computer face down on a flat and clean surface 2 Screw one end of the hand strap to the shield like cover on the back of the mobile computer 3 Insert and hook the other end of the hand strap to the bottom of the mobile computer 4 Make sure the hand strap is securely a...

Page 17: ...ace 2 Remove the shield like cover on the back of the mobile computer by unscrewing If the hand strap is installed remove it first Keep the cover and screws for future use when the pistol grip is not desired 3 Connect the power connector from the pistol grip to the receptacle on the mobile computer 4 Screw the pistol grip to the back of the mobile computer 5 Make sure all screws are tightened up 6...

Page 18: ...computer 2 Remove the top enclosure of the mobile computer by unscrewing the four screws 3 Insert your card properly 4 Replace the top enclosure and tighten the screws Warning Make sure the mobile computer is set to Suspend mode otherwise it may cause damage to the mobile computer If not factory installed the Ingress Protection rating of enclosures may not be the same as claimed Figure 4 Inserting...

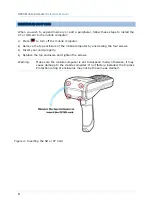
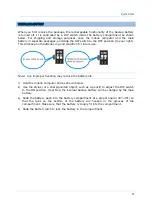
Page 19: ...in good condition for future use Note Any improper handling may reduce the battery life 1 Hold the mobile computer still as shown below 2 Use the stylus or a sharp pointed object such as a pencil to adjust the DIP switch to the ON position top Now the internal backup battery can be charged by the main battery 3 Slide the battery pack into the battery compartment at a proper angle 30 45 so that the...

Page 20: ...10 9500 Mobile Computer Reference Manual Figure 5 Installing the Main Battery ...

Page 21: ...arging is done In order to charge the backup battery the main battery must be inserted and left inside whether the mobile computer is in use or not However it is not necessary to fully charge the backup battery for the mobile computer to work Charging Temperature It is recommended to charge the battery at room temperature 18 C to 25 C for optimal performance Battery charging stops when the tempera...

Page 22: ...ble power outlet The cradle is ready for charging the mobile computer as well as the spare battery pack 3 Seat the mobile computer in the cradle 4 If data communications are desired at the same time you can establish a proper connection with a computer or remote host For example you may establish a USB connection for ActiveSync Refer to 2 3 Using ActiveSync Note Make sure that you have Microsoft A...

Page 23: ...ting from OS version 1 44G0409 101122 the recalibration process is required to ensure touch screen accuracy for initial use Follow the on screen instruction to complete the recalibration process and then press the Enter key to save new settings ...

Page 24: ...14 9500 Mobile Computer Reference Manual ...

Page 25: ...ation the mobile computer can work for up to 21 hours in batch mode For non stop power on the road you may purchase a spare battery pack Backup Battery The backup battery on the main board takes charge when the main battery is removed or drained out When fully charged the 3 7 V 110 mAh rechargeable Lithium button cell helps retain data in SRAM and maintain the system running in suspend mode for at...

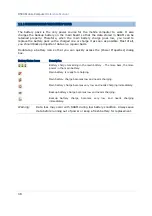
Page 26: ...ular basis Double tap a battery icon so that you can quickly access the Power Properties dialog box Battery Status Icons Description Battery charge remaining in the main battery The more bars the more power in the main battery Main battery is ready for charging Main battery charge becomes low and needs charging Main battery charge becomes very low and needs charging immediately Backup battery char...

Page 27: ...con Refer to 1 4 1 Adjusting the Backlight Go to Start Settings Control Panel and double tap the Power icon 1 In the Battery tab left below you can always monitor the charging status 2 Tap the Schemes tab right above 3 Select the desired power scheme and options for suspending operation when not in use The system can be set to three different states to conserve power User Idle state System Idle st...

Page 28: ... for storing and running programs as well as storing program data Its contents will be retained by the backup battery Expansion Slot The mobile computer is equipped with two card slots one SD and one CompactFlash Type II You may upgrade memory by inserting an optional SD or CF memory card Note If you are using the CF memory card make sure the power to the CF module is turned on through Power Manag...

Page 29: ...at data loss occurs when both the main and backup batteries discharge completely Therefore it is necessary to backup data and files before putting away the mobile computer 1 2 2 CHECKING THE STORAGE SPACE Go to Start Settings Control Panel and double tap the System icon 1 In the Memory tab it displays the current capacity and usage of the onboard SDRAM 2 You may tap hold and drag the slider to re ...

Page 30: ...f the onboard 128 MB flash memory Because the flash memory is non volatile data or programs stored in DiskOnChip will not be erased after hardware reset Go to Start Settings Control Panel and double tap the Storage Manager icon Here provides a tool for administrators to reformat the DiskOnChip folder or storage card SD or CF Warning This tool is for the use of system administrators only Everything...

Page 31: ... rubber has been chosen for their durability and prompt feedback Note Functionality of keys is application dependent The 27 key keypad includes alphanumeric navigation function keys and so on This keypad is set to numeric mode by default Figure 6 27 key Layout ...

Page 32: ...check box to disable it When enabled tap hold and drag the slider for a desired Repeat Delay and Repeat Rate 1 3 2 ALPHA KEY This alphanumeric keypad is set to numeric mode by default The Alpha key serves as a toggle among numeric alpha lower case alphabetic and ALPHA upper case alphabetic input modes Note It is not necessary to hold down the Alpha key The alpha icon will appear on the status bar ...

Page 33: ...sary to hold down the Func key Below is a list of the factory setting for a variety of key combinations Key Combination Action PgUp red coded move text up one screenful PgDn red coded move text down one screenful Home red coded move to the beginning of screen or document End red coded move to the end of screen or document Toggle ON OFF the backlight of keypad only Turn ON the backlight of LCD and ...

Page 34: ...utomatically turn off the mobile computer when not in use 1 4 1 ADJUSTING THE BACKLIGHT The LED backlight of the screen can be turned on and adjusted decreasingly or increasingly by the following key combinations Keep pressing the key combination until the luminosity is decreased or increased to a desired level Key Combination Action Turn ON the backlight of LCD and decrease its luminosity Turn ON...

Page 35: ...automatically turned on by pressing any key or tapping the screen Tap hold and drag the slider for AC and battery powered respectively For more luminosity move the slider to the right 1 4 2 RE CALIBRATING THE SCREEN This LCD is also a touch screen that can be calibrated through screen alignment For initial use the recalibration process is required to ensure touch screen accuracy 1 Go to Start Sett...

Page 36: ...Solid Charging done Red green LED Flashing Charging error Blue LED Solid Bluetooth enabled 1 5 2 AUDIO The mono speaker on the back of the mobile computer can be used to play sounds for events in Windows and programs or play audio files such as WAV files In addition it can be programmed for status feedback 1 5 3 VIBRATOR The mobile computer is integrated with a vibrator which is software programma...

Page 37: ...er to Appendixes for details on scan engine settings Appendix I Scan Engine Settings lists the symbologies and RFID tags supported Appendix II Linear Imager CCD Laser SE950 provides information on the reader settings as well as symbology settings for the CCD or Laser scan engine Appendix III LR ELR Laser provides information on the reader settings as well as symbology settings for the Extra Long R...

Page 38: ...te power and connection statuses Indicators Status Description Off Battery not ready Red solid Charging spare battery Green solid Charging done Charging Status of Spare Battery Red green flashing Error occurs Green solid Ethernet connected Link TX Network Status over Ethernet Green flashing Transmitting Receiving data Off Power not ready POWER Cradle Power Green solid Power ready Note For charging...

Page 39: ... contacts facing to back 3 Connect the power supply cord to the power receptacle on the charger Connect the other end of the power supply cord to a suitable power outlet 4 Press the power switch on and the Battery Charger s LED will be red 5 While charging the LED of the battery compartment will be red When fully charged the LED will be green Indicator Status Description Power Off Red solid Power ...

Page 40: ...30 9500 Mobile Computer Reference Manual ...

Page 41: ...e tap an item to select it Tap and hold an item to see a menu that enables tasks such as cut copy rename delete etc Tap and drag to select multiple items Tap or on the toolbar to close an active window a dialog box or a running application If the button is not displayed press ESC on the physical keypad Tap on the toolbar to save the current settings and exit the application or minimize the window ...

Page 42: ...9500 Mobile Computer functions when it is turned on This is because the Windows CE operating system eliminates the booting process and runs continuously Turn On Resume from Suspend Press to turn on the mobile computer Turn Off Suspend Press to turn off the mobile computer Alternatively you may select Suspend from the Start Menu The system is now ready for use but not in use This is referred to as ...

Page 43: ...hen the mobile computer is turned on Tap and hold anywhere blank on the screen to manage or configure the desktop Alternatively you may tap to the right of the taskbar and then select Desktop Note To customize the desktop tap anywhere blank on the desktop and select Properties ...

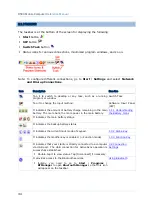
Page 44: ...y charge remaining in the main battery The more bars the more power in the main battery It indicates the main battery status It indicates the backup battery status 1 1 1 Understanding the Battery Icons It indicates the current input mode of keypad 1 3 2 Alpha Key It indicates the modifier key is enabled Function mode 1 3 3 Function Key It indicates that your cradle is directly connected to a compu...

Page 45: ... If the icon persists it means the GPRS connection is successfully established Double tap it to view status Tap Disconnect if necessary Using GPRS It indicates a CF card other than GPRS is enabled It indicates the Wi Fi module 802 11b g is enabled The more green bars the stronger the signal See wireless status icons below The Wi Fi connection fails disconnected Double tap it to access the Wireless...

Page 46: ...es access to your favorite links to webpages that are stored in the directory Windows Favorites Documents Provides access to recent opened documents in the directory Windows Recent Settings Provides access to Control Panel Network and Dial up Connections Taskbar and Start Menu Run Opens a program or folder or document Suspend Enters the Suspend mode Note To configure the Start menu and taskbar go ...

Page 47: ...tions e g WordPad CipherLab s FORGE Application Generator etc Software Keypad Type or write using SIP Soft Input Panel Tap the SIP button on the taskbar to select a SIP mode or hide the input panel In each mode the characters appear as typed text on the screen Options Description Keyboard To type using the virtual keyboard Transcriber To write freely on the screen in applications such as WordPad I...

Page 48: ...The program will become available in the Start Menu To add a new program or subfolder to the Programs folder you can either use Windows Explorer or ActiveSync Windows Explorer to move the program by Copy and Paste Shortcut ActiveSync on the desktop computer to create a shortcut to the program and place the shortcut in the Programs folder Warning To avoid making any changes to the program configura...

Page 49: ... way you are recommended to exit a program when it is not desired any longer Warning Always remember to save data or settings before you exit a program Tap or to close an active window a dialog box or a running application If the button is not displayed on the toolbar press ESC on the physical keypad Tap to save the current settings and exit the application or minimize the window in some applicati...

Page 50: ...e Microsoft ActiveSync Help 2 3 1 SYNCHRONIZATION WITH YOUR COMPUTER 1 Follow these instructions for initial ActiveSync operation Connect the USB cable from the cradle s USB device port to your computer Connect the power cable from the cradle to a nearby power outlet Turn on the mobile computer and seat it in the cradle 2 Your computer will automatically detect the USB device Click OK when the con...

Page 51: ...o the target folder e g the Programs folder Windows Programs depending on where you wish to access the program 4 Navigate through file folders on your computer to find the new program CAB EXE etc 5 Right click the program and select copy from the pop up menu 6 Back to the target folder in step 3 Right click anywhere blank and select Paste from the pop up menu 7 On the mobile computer go to Start P...

Page 52: ...e Windows Programs 7 Right click anywhere blank on the window and select Paste from the pop up menu The new program will be added to the Programs folder 8 On the mobile computer go to Start Programs and the new program will appear now Note Create Shortcut Cut and Paste The same result can be performed by Copy and Paste Shortcut Create a New Folder 1 When connected open the Microsoft ActiveSync win...

Page 53: ... up information on your mobile computer You can perform a backup by during the ActiveSync operation The backup file is stored on your desktop computer Note The CipherLab Backup Utility is provided in OS 1 20 0409 070524 or later versions for the same purposes and will save the backup file to the DiskOnChip folder ...

Page 54: ...launch Windows Explorer 2 Navigate through file folders to find the program you desire 3 Tap and hold the program to select Copy from the pop up menu 4 Navigate to the Programs folder My Device Windows Programs 5 Tap and hold anywhere blank on the screen to select Paste Shortcut from the pop up menu The new program will be added to the Programs folder 6 Go to Start Programs and the new program wil...

Page 55: ...lect Windows Explorer Alternatively you can press the Task key on the keypad to launch Windows Explorer 2 Navigate through file folders to find where you wish to create a new folder 3 Tap and hold anywhere blank on the window and select New Folder from the pop up menu A subfolder will be created ...

Page 56: ...he Reset button During operation the removal of main battery will start software reset too Warning Data loss may occur when files are not properly closed before software reset 2 5 2 HARDWARE RESET COLD REBOOT Hardware reset also known as a cold boot will restart the mobile computer and initializes SDRAM Data and program files stored in SDRAM will be erased after hardware reset But you can restore ...

Page 57: ... file cab must be specified with two dots for the absolute path For example DiskOnChip cerdisp exe DiskOnChip ReaderConfig exe DiskOnChip RF9500_CE exe DiskOnChip cerdisp cab DiskOnChip ReaderConfig cab Upon warm boot the OS shall automatically check the contents of AutoRun ini and execute any line that is prefixed with a colon Any line prefixed with a semicolon is supposed to be a comment line on...

Page 58: ...48 9500 Mobile Computer Reference Manual ...
Page 59: ...s 55 3 5 Upgrading OS Image 58 3 1 APPLICATION MANAGER Application Manager has powerful features and is easy to use Provides full control over executable files of the Programs folder desktop and Control Panel Can limit access to essential device settings Can prevent from potentially distracting applications Can execute routine application automatically upon a reboot Provides user name and or passw...

Page 60: ...nual 3 2 DEVICE NAME CONFIGURATION 3 2 1 CHANGING DEVICE NAME 1 Go to Start Settings Control Panel and select System to obtain essential system information 2 Select the Device Name tab to change the identification for the mobile computer ...

Page 61: ...engine that employs Extra Long Range Laser scan engine Integrated communications Bluetooth and Wi Fi modules An RFID reader Device Code Modular Component Types 1st digit Reader module 0 none 1 CCD scan engine 2 Laser scan engine 3 2D scan engine 4 Long Range Laser scan engine 5 Extra Long Range Laser scan engine 2nd digit Wireless module 3 Bluetooth GPRS 4 Bluetooth 802 11b g 5 Bluetooth only 7 Bl...

Page 62: ...sual warnings for system sounds Display tab Select High Contrast to improve screen contrast with alternative colors Mouse tab Select MouseKeys to enable the keyboard to perform mouse functions General tab Select Automatic Reset if you wish to turn off accessibility features after a specific period of time select Notification if you wish to hear a sound when turning a feature on or off In the Certi...

Page 63: ... Properties dialog box you may configure and test your double click settings In the Network and Dial up Connections window you may configure settings for the mobile computer connects to a network directly or through a modem Alternatively you may tap Start Settings Network and Dial up Connections USB Connection via USB device port on the cradle GPRS through a GPRS modem AX88772 via Ethernet port on...

Page 64: ...use of system administrators only In the Stylus Properties dialog box Double Tap tab You may configure and test your double tap settings Calibration tab You may need to re calibrate the touch screen if it is not responding properly to your taps In the System Properties dialog box General tab You may view the system information Memory tab You may move the slider and adjust the SDRAM allocation Devi...

Page 65: ... panel for direct PC connection Start Settings Control Panel The USB connection is specifically for performing the ActiveSync operation via the cradle Generally it will automatically establish the connection and start the ActiveSync operation when you seat the mobile computer in the cradle To stop the ActiveSync operation simply remove the mobile computer Alternatively you may double tap the statu...

Page 66: ...nal strength and the network status icon will become When disconnected this icon will become again This is the control of Bluetooth module for wireless personal area networking WPAN connection which is not available until Bluetooth Manager is executed When available the connection status icon will appear on the taskbar When connected this icon will become When disconnected this icon will become ag...

Page 67: ...e connection you select Tap this button to toggle on off the connection you select The toggle is used for Enable Disable or Connect Disconnect Tap this button to delete the connection you select Tap this button to view the properties of the connection you select Tap and hold the icon of a desired connection type Then select an option from its associated menu ...

Page 68: ...all Microsoft ActiveSync on your computer For initial ActiveSync operation refer to 2 3 Using ActiveSync for details Now disable the ActiveSync operation as shown below 2 Run the Image Tool DLDR exe on your computer 3 Press Reset to perform hardware reset on 9500 and then immediately press in three seconds so that 9500 can enter the Download mode 4 Seat 9500 in the cradle 5 Press Enter on 9500 to ...

Page 69: ...will take approximately 5 minutes before a message is displayed on the mobile computer to indicate the OS upgrade is completed successfully It will then perform hardware reset on 9500 automatically Warning Do not press any key on the mobile computer while upgrading OS image and make sure the power cord is connected ...

Page 70: ...60 9500 Mobile Computer Reference Manual ...
Page 71: ...nnection 62 4 1 TURN ON WI FI POWER 1 Tap the icon on the taskbar to access Power Management 2 Select Wi Fi Power ON and tap 3 It takes several seconds to turn on the power to module The icon indicates that 802 11b g power is turned on and the green bars indicate the wireless signal strength The more the bars the stronger the signal Chapter 4 USING 802 11 RADIO ...

Page 72: ... you have configured A strong signal five bars usually means that the wireless network is close or there is no interference For best performance connect to the wireless network with the strongest signal However if an unsecured network has a stronger signal than a security enabled one it s safer for your data if you connect to the security enabled network but you must be an authorized user of that ...

Page 73: ... CONFIGURING WI FI PROPERTIES 1 Double tap Add New to add a new network option 2 If the network configuration is correct tap OK in the Wireless Properties dialog box 3 Tap Advanced on the Wireless Information tab for more network settings ...

Page 74: ...oint the mobile computer will seamlessly switch the network connection for example while moving in and out of range between different access points Select Adaptive Connection and pick up a suitable value Cancel the selection of Adaptive Connection when you are using a third party application capable of configuring the switching itself in order to maintain a constant connection to the network ...

Page 75: ...rial Port Service 78 5 7 Manage Local Services 82 5 1 TURN ON BLUETOOTH POWER 1 Go to Start Programs BTManager to open Bluetooth Manager 2 It takes several seconds to enable Bluetooth services The associated icon will appear on the taskbar Meanwhile the LED on the mobile computer will turn blue Tap and select Exit from the drop down menu as shown right above to exit the application The LED on the ...

Page 76: ... Bluetooth service to establish a quick link You will have to make a connection and created a shortcut to a specific Bluetooth service first Tap this button to view Bluetooth devices discovered during this session If you tap the button for the first time it will start the inquiry process to discover nearby Bluetooth devices Tap this button to view Bluetooth services provided on 9500 By default the...

Page 77: ... computer go to Start Settings Control Panel and select System Security tab Authentication Setting It is disabled by default When enabled PIN code is required Discoverability It is set discoverable by default If you do not wish to provide Bluetooth services to other remote devices cancel the check box Default PIN It is disabled by default You may set a link key to skip the PIN code input Options t...

Page 78: ...assigned automatically COM6 by default Tap this button and tap Connect via Cradle to stop ActiveSync via Bluetooth Tap this button to minimize Bluetooth Manager window Tap this button to stop inquiring Tap this button to refresh the device list When using the File Transfer service on a remote device you can tap this button to move up one level if a subfolder exists Tap this button to view Bluetoot...

Page 79: ... access the menu that allows you to set your device discoverable 2 In the Security tab cancel the check box if you want to hide the mobile computer from other Bluetooth devices When Bluetooth Manager window is minimized tap on the taskbar to maximize the window ...

Page 80: ...l 5 2 SEARCH DEVICES 1 Tap to discover nearby Bluetooth devices 2 Wait for a few seconds and it will list the discovered devices 3 If you do not see the device that you want to connect to make sure it is set discoverable Tap to search again ...

Page 81: ...71 Chapter 5 Using Bluetooth 5 3 PAIR DEVICES 5 3 1 IDENTIFY REMOTE DEVICE From the device list tap and hold the desired device to select Properties from the pop up menu ...

Page 82: ...cation is enabled on the remote device you will have to exchange a passkey pair with it before starting a connection 1 From the device list tap and hold the desired device to select Pair from the pop up menu 2 Enter the PIN code that is specified on the remote device ...

Page 83: ...73 Chapter 5 Using Bluetooth 3 Once paired successfully the paired device will be displayed along with a lock icon 4 Double tap the remote device to find out the available Bluetooth services ...

Page 84: ... connected service will be displayed along with a plug icon 7 If you wish to add a service to the Q_Link list for establishing a quick connection in the future tap and hold the service to select Create Shortcut from the pop up menu 5 3 3 UNPAIR From the device list tap and hold the desired device to select Unpair from the pop up menu Note The mobile computer must be unpaired on the remote device a...

Page 85: ...old the File Transfer service 2 Select Connect and assign COM port if necessary 3 Tap and hold anywhere blank to select Add file from the pop up menu 4 Choose the file you wish to upload to the remote device 5 The mobile computer will start uploading the file to the remote device ...

Page 86: ...OWNLOAD A FILE 1 Tap and hold the File Transfer service 2 Select Connect and assign COM port if necessary 3 Tap and hold a desired file to select Get File from the pop up menu The mobile computer will start downloading the file from the remote device ...

Page 87: ...ng Bluetooth 5 5 OBJECT PUSH 1 Tap and hold the Object Push service 2 Select Push file to send a file or PIM item e g a business card 3 Choose the file you wish to send 4 The mobile computer will start sending the file ...

Page 88: ...t Service 2 Select Connect from the pop up menu If Auto Client COM Port is disabled in you will need to select a COM port 3 Once the connection has been established the connected service will be displayed along with a plug icon 4 To stop using the service tap and hold it to select Disconnect The plug icon will disappear ...

Page 89: ... 6 2 BLUETOOTH ACTIVESYNC For ActiveSync via Bluetooth you must configure Bluetooth settings correctly on your computer first 1 Configure Bluetooth settings for your computer such as Turn discovery on adding a COM port Incoming etc ...

Page 90: ...ctions to the specified COM port in ActiveSync 3 Connect the mobile computer to your computer 4 On the mobile computer tap and hold Serial Port Service to select Connect to ActiveSync from the pop up menu It uses COM8 to connect to your computer by default ...

Page 91: ...81 Chapter 5 Using Bluetooth 5 To stop ActiveSync via Bluetooth tap and then tap Connect via Cradle ...

Page 92: ...M Port You can change the COM port Tap and hold it to select Properties from the pop up menu If Auto Server COM Port is enabled in the Setting button the COM port providing Serial Port service will be assigned automatically COM6 by default If Auto Server COM Port is disabled you can select a COM port by following these steps Stop Start Service You can disable or enable the service When disabled it...

Page 93: ...u can cancel the check box to prohibit uploading Stop Start Service You can disable or enable the service When disabled it becomes unavailable to a remote device 5 7 3 OBJECT PUSH Change Local Path You can change the exchange folder for Object Push Tap and hold it to select Properties from the pop up menu Stop Start Service You can disable or enable the service When disabled it becomes unavailable...

Page 94: ...84 9500 Mobile Computer Reference Manual ...

Page 95: ... to GPRS module Refer to Inserting SD or CF Card Note This icon on the taskbar indicates that other CF card is present instead of GPRS IN THIS CHAPTER 6 1 Turn On GSM GPRS Power 85 6 2 GPRS Connection 87 6 1 TURN ON GSM GPRS POWER 1 Tap the icon on the taskbar to access Power Management 2 Select CF Power ON and tap Chapter 6 USING GPRS ...

Page 96: ...t matches the PIN code of your SIM card you will have to manually input the correct PIN code If you succeed the PIN code you input will overwrite the factory setting and become the default PIN code If you fail two times the PIN will be blocked and you will need to obtain the PUK code from your network operator and unblock the SIM card on your cellular phone 4 It takes several seconds to turn on th...

Page 97: ...nection dialog box Refer to 6 2 2 Configuring Dialing Properties Note You must connect to the GPRS modem specified by the mobile phone operator 4 After you tap the Connect button the GPRS status will go through opening port user authenticated device connected until it is connected finally The status icon will appear on the taskbar to indicate the GPRS connection has been established successfully I...

Page 98: ...anual 6 2 2 CONFIGURING DIALING PROPERTIES If you need to configure the dial up settings tap the Dial Properties button in the Dial Up Connection dialog box Note Alternatively you may go to Start Settings Control Panel and select Dialing ...

Page 99: ...GPRS 6 2 3 CONFIGURING GPRS PROPERTIES 1 Go to Start Settings Network and Dial up Connections 2 Tap and hold GPRS to select Properties from the pop up menu 3 The default GPRS modem will appear as shown below Tap Configure ...

Page 100: ... Mobile Computer Reference Manual 4 Select the Call Options tab The special modem commands inserted into the dial string must be CGDCONT 1 AP name For example change INTERNET below to the name of your GPRS AP ...

Page 101: ...and RFID readers integrated on the mobile computer IN THIS CHAPTER 7 1 Run ReaderConfig exe 92 7 2 Barcode Reader Settings 93 7 3 RFID Reader Settings 94 7 4 Data Output 96 7 5 Notifications for Good Read 97 7 6 Symbology Settings 97 Chapter 7 USING READER CONFIGURATION UTILITY ...

Page 102: ...the reader if it is enabled If the RFID Reader is installed the option will be available 3 To meet your application requirements proceed to configure associated reader settings as well as barcode settings Note 1 The ReaderConfig exe utility will automatically detect the reader module s that is currently installed in the mobile computer 2 If you wish to reload the default settings delete the Reader...

Page 103: ...r CCD or Laser scan engine Refer to the Reader Settings Table in Appendix II Linear Imager CCD Laser SE950 Extra Long Range Laser Reader If installed tap the Barcode Reader button to configure the reader settings for Long Range Laser or Extra Long Range laser scan engine Refer to the Reader Settings Table in Appendix III LR ELR Laser 2D Reader The 2D scan engine is capable of reading linear and 2D...

Page 104: ... on a page by page basis You may find it necessary to define your own read write operation For reference only the table below lists the start page for read write operation on a number of RFID tags Start Page Tag Type Standard 1 Start from byte 0 of the default page see below for all tags 3 Mifare ISO 14443A 4 SR176 ISO 14443B 3 ICODE SLI ISO 15693 0 LRI512 ISO 15693 3 SRF55VxxP ISO 15693 0 EM4135 ...

Page 105: ...rite to a tag By default the string is written to the tag from byte 0 of the default page However the default page amount of bytes and number of pages of each tag may be different Therefore the input string will automatically be truncated to fit into pages and data may be discarded when it comes to the end of pages available Generally it will write the input string to the user block which is free ...

Page 106: ...ssage in your application Call Windows API ReadMsgQueue in your application to retrieve the decoded data Disable Windows Event When selected a Windows event will be broadcasted after decoding Intercept the decode event in your application Call Windows API ReadMsgQueue in your application to retrieve the decoded data Disable Note 1 Refer to CipherLab WinCE Products Programming Guide for details on ...

Page 107: ...ode or an RFID tag Code type barcode data and code length if more than one field is displayed UID and user data if both are displayed comma 7 5 NOTIFICATIONS FOR GOOD READ Tap the Notifications button on the General tab to configure how you want to be notified of a successful decoding Sound Vibration Default Good Read via speaker Mute or Sound 1 9 Sound 1 Good Read via vibrator 0 5 0 sec 0 Disable...

Page 108: ...98 9500 Mobile Computer Reference Manual ...

Page 109: ... are made accessible from START Programs Backup Utility lets you manipulate the way to backup programs and data Inbox lets you send and receive e mail by connecting to a POP3 or IMAP4 server IN THIS CHAPTER 8 1 Backup Utility 100 8 2 Inbox 105 Chapter 8 MORE APPLICATIONS ...

Page 110: ...to select Registry so that you can restore your mobile computer to an operational state following a disaster Partial Restore Operation Backup a few specific files here so that you can restore small numbers of files after you have deleted them by accident or found them corrupted Easy Cloning Backup everything including Registry necessary for cloning settings to other 9500 Mobile Computers 8 1 1 MAN...

Page 111: ...ING FOR BACKUP Tap the Backup tab and it will automatically start scanning the file system Within a few minutes it will generate a list for the backup operation If the items Wi Fi and Registry are not listed it means no Wifi dat and Registry dat are found in DiskOnChip Sysbak Take necessary steps before you tap Refresh to refresh the list of available items Wi Fi Turn on the power to the 802 11b g...

Page 112: ... directory or file name bkp By default it will save the selected items to the DiskOnChip folder by the current date the format of filename is Backup_ 4 digit year 2 digit month 2 digit date 3 Tap Start to pack all the selected items into one bkp file 4 Once the backup process is completed tap Report to view the log file if necessary 5 Tap OK to close the current window ...

Page 113: ...ound earlier than 1 00 0010 a warning message This file is invalid for Auto Restore will be displayed automatically Close the warning dialog and it will abort the Auto Restore setting File Manipulation Tap Refresh to refresh the list of available backups If a backup file is not desired any more select it and tap Delete Auto Restore Select a desired backup file from the list and tap AutoRestore It ...

Page 114: ...settings and exit the application Manual Restore Depending on specific requirements you may perform a full or partial restore manually Full Restore Operation 1 Select a desired backup file from the list 2 Tap Restore 3 Tap Start to run the restore process 4 Once the restore process is completed you will be asked to perform a warm boot Tap No if you wish to warm boot later You may tap Report to vie...

Page 115: ...n the toolbar from left to right are for these functions Button Description See Also Compose a new message Compose New Message Reply to sender Compose Reply to Sender Reply to all Compose Reply to All Forward this message Compose Forward Delete this message File Delete Synchronize folders multiple mailboxes for IMAP4 Services Synchronize Folders Send and receive mail manually Services Send Receive...

Page 116: ...06 9500 Mobile Computer Reference Manual 8 2 1 CREATING AN E MAIL BOX 1 Select Services Options from the menu bar 2 Tap and drag the dialog box to show the right edge Tap Add to create an e mail service ...

Page 117: ...oceed with the POP3 or IMAP4 Mail Service Definition from 1 3 to 3 3 GPRS Send and Receive e mail through GPRS connection Network Connection Send and Receive e mail through Ethernet 802 11b g or Bluetooth PAN connection USB Connection Send and Receive e mail through USB connection via the cradle 6 After you have successfully created an e mail service you may start using it now ...

Page 118: ...seat the mobile computer in the cradle and connect it to your computer for the first time ActiveSync 3 7 1 will guide you through setting up a partnership between the mobile computer and your desktop computer Refer to 2 3 Using ActiveSync Select the check box of Inbox as shown below and click Settings to configure it Note ActiveSync 4 x does not support Inbox Synchronization We recommend that you ...

Page 119: ...rd such as GPRS card COMMUNICATIONS DATA CAPTURE Communications USB via Cradle USB 1 1 Specification Host port type A Device port type B Ethernet via Cradle 10 100BASE TX for 10 100 Mbps over twisted pair cable Cat 5 WPAN Built in module for Bluetooth Class 2 connectivity WLAN Built in module for 802 11b g networking WWAN Ordering Option built in module for GPRS Data Image Capture Barcode Reader O...

Page 120: ...Working Time Laser one scan per 5 seconds Batch Mode with backlight 21 hours Wi Fi Mode with backlight 20 hours PHYSICAL CHARACTERISTICS Color Touch Screen Display Display 3 5 Transflective TFT LCD 65536 colors Resolution 240 W x 320 L QVGA size Keypad Layout 27 keys for alphanumeric layout Backlight LED backlight for display and keypad Notifications Status LED Triple color LED Red Green Blue Audi...

Page 121: ...t Tools Integrated Development Environment Visual Studio 2005 Visual Studio NET 2003 eMbedded Visual C 4 0 SP4 Software Development Kit 9500 SDK or Windows CE 5 0 Standard SDK System API LIB and DLL for system configuration Reader API DLL for reader configuration Software Utilities Cipherlab software package Reader Configuration Utility MIRROR Emulator CipherNet for VT100 220 or IBM 5250 emulation...

Page 122: ... Reference Manual ACCESSORIES Accessory Options Memory Card SD or CF Pistol Grip Belt Holster Protective Cover Spare rechargeable battery pack 4 Slot Battery Charger Charging Communication Cradle Vehicle Cradle Travel Charger ...

Page 123: ...arcode in position or an RFID tag in proximity depending on which one comes first Note 1 You cannot have 1D 2D scan engines installed on the mobile computer because they are both barcode readers 2 You can run only one utility or application at a time to control the reader s For example while running ReaderConfig exe you should not run FORGE Application Generator STREAM Wireless Studio MIRROR Brows...

Page 124: ...alian Pharmacode Code 32 French Pharmacode EAN UPC EAN 8 EAN 13 Bookland EAN ISBN UPC E0 UPC E1 UPC A GS1 DataBar RSS GS1 DataBar Omnidirectional RSS 14 GS1 DataBar Truncated GS1 DataBar Stacked GS1 DataBar Stacked Omnidirectional GS1 DataBar Limited RSS Limited GS1 DataBar Expanded RSS Expanded GS1 DataBar Expanded Stacked 2D Symbologies PDF417 MicroPDF417 Data Matrix Maxicode QR Code ...

Page 125: ...d below for your reference The results found with RFID module version 1 0 are different from those found with version 0 9 or older versions Note You should study the specifications of RFID tags before use RFID Module Version 1 0 UID Only Read Page Write Page ISO 14443A Mifare Standard 1K Mifare Standard 4K Mifare Ultralight Mifare DESFire Mifare S50 SLE44R35 SLE66R35 ISO 14443B SRIX 4K SR176 ISO 1...

Page 126: ...116 9500 Mobile Computer Reference Manual ...
Page 127: ... with scanning The scanning won t stop until you press the trigger again Laser Mode Hold down the scan trigger to start with scanning The scanning won t stop until a a barcode is read b the preset timeout expires or c you release the trigger Auto Off Mode Press the scan trigger to start with scanning The scanning won t stop until a a barcode is read or b the preset timeout expires Read Redundancy ...

Page 128: ...tor 0x1D it will be changed to No ISBT 128 Enable Industrial 25 Discrete 25 Enable Start Stop Selection This decides the readability of all 2 of 5 symbology variants For example flight tickets actually use an Industrial 2 of 5 barcode but with Interleaved 2 of 5 start stop pattern In order to read this barcode the start stop pattern selection parameter of Industrial 2 of 5 should set to Interleave...

Page 129: ... not provided in UI but it is controlled by the same setting of Code 39 Code 39 Enable Transmit Start Stop Character Decide whether to include the start stop characters in the data being transmitted No Verify Check Digit Decide whether to verify the check digit If the check digit is incorrect the barcode will not be accepted No Transmit Check Digit Decide whether to include the check digit in the ...

Page 130: ...in the data being transmitted Yes Transmit Application ID Decide whether to include the Application ID 01 in the data being transmitted Yes Transmit Check Digit Decide whether to include the check digit in the data being transmitted Yes GS1 DataBar Limited RSS Limited Disable Transmit Code ID Refer to RSS 14 Yes Transmit Application ID Refer to RSS 14 Yes Transmit Check Digit Refer to RSS 14 Yes G...

Page 131: ... the data being transmitted Yes UPC A Transmit System Number Decide whether to include the UPC A System Number in the data being transmitted Yes UPC E Enable UPC E0 UPC E1 Decide whether to decode the UPC E0 barcodes only or both UPC E0 and UPC E1 barcodes UPC E0 only Convert to UPC A The UPC E barcode will be expanded into UPC A and the next processing will follow the settings configured for UPC ...

Page 132: ...122 9500 Mobile Computer Reference Manual ...

Page 133: ...if aiming is not desired No aiming Read Redundancy Level 1 Level 1 The following barcodes must be successfully read twice before being decoded Barcode Types Code Length Codabar All MSI 4 characters or less Industrial 25 Discrete 25 8 characters or less Interleaved 25 8 characters or less Level 2 All barcodes must be successfully read twice before being decoded Level 3 All barcodes except for the f...

Page 134: ...e barcode for each scanning Laser Mode Hold down the scan trigger to start with scanning The scanning won t stop until a a barcode is read b the preset timeout expires or c you release the trigger Timeout between Same Symbol When in Continuous mode set the minimum time that must elapse before the scan engine decodes a second barcode which is identical to the one that has just been decoded This red...

Page 135: ...Code 128 barcodes without leading FNC1 character Enable GS1 128 UCC EAN 128 Read UCC EAN 128 barcodes with leading FNC1 character Enable ISBT 128 Read ISBT 128 barcodes Enable Industrial 25 Discrete 25 Enable Select Length One or two fixed lengths Range 1 55 4 55 Interleaved 25 Enable Convert to EAN 13 Convert a 14 character barcode into EAN 13 if the following requirements are met The barcode mus...

Page 136: ...Range 1 55 4 55 Code 93 Enable Select Length One or two fixed lengths Range 1 55 4 55 MSI Enable Verify Check Digit If Two Check Digits option is selected an additional verification is required to ensure integrity Select one of the algorithms below If the check digit is incorrect the barcode will not be accepted Check Digit Algorithm One Check Digit Single Modulo 10 Two Check Digits Mod 10 Mod 11 ...

Page 137: ...it Check Digit Decide whether to include the UPC A check digit in the data being transmitted Yes Transmit Preamble Decide whether to include the UPC A preamble System Number and Country Code in the data being transmitted System Number Addon 2 Addon 5 Refer to UPC EAN Addon setting UPC E0 Enable Transmit Check Digit Decide whether to include the UPC E0 check digit in the data being transmitted Yes ...

Page 138: ...l decreases the scan engine s aggressiveness choose only that level of security necessary for the application Level 0 Select this option for the scan engine to operate in its most aggressive state providing sufficient security in decoding most in spec UPC EAN barcodes Level 1 As barcode quality level diminish certain characters become prone to mis decodes before others i e 1 2 7 8 Select this opti...

Page 139: ...e 39 7 Result of option values 3 and 4 0 Standard data packet No Function Code 1 FNC1 in the first character position 1 Function Code 1 FNC1 in the first character position Code 128 2 Function Code 1 FNC1 in the second character position 0 No check digit processing 1 Check digit has been verified Interleaved 25 3 Check digit has been verified and stripped Codabar 0 No check digit processing Code 9...

Page 140: ...anual 2 Five digit addons only 4 EAN 8 data packet A UPC A with Addon 2 barcode 012345678905 10 is transmitted to the host as a 21 character string E00012345678905 E110 Bookland EAN 0 Always transmit 0 Trioptic Code 39 0 Always transmit 0 ...

Page 141: ...n Decide whether to flash illumination on every barcode capture to aid decoding Turn On Internal LED Turn Off On Aiming Pattern Decide whether to project the aiming pattern during barcode capture Turn On Turn Off On Read Redundancy Level 1 Level 1 The following barcodes must be successfully read twice before being decoded Barcode Types Code Length Codabar 8 characters or less MSI 4 characters or l...

Page 142: ... barcodes such as Code 128 Code 93 UPC EAN Security Level 0 This default setting allows the scan engine to operate in its most aggressive state providing sufficient security in decoding most in spec barcodes Security Level 1 Select this option if misdecodes occur This level should eliminate most misdecodes Security Level 2 Select this option if Security Level 1 fails to eliminate misdecodes Securi...

Page 143: ... intercharacter gap that is typically quite small Due to various barcode printing technologies this gap can grow larger than the maximum size allowed preventing the scan engine from decoding a barcode If this problem occurs set it to Large Intercharacter Gaps to tolerate these out of specification barcodes Normal intercharacter gaps Large intercharacter gaps Normal Code 128 Code 128 Read standard ...

Page 144: ...alphanumeric and special characters Disable Trioptic Code 39 Decide whether to decode Trioptic Code 39 Trioptic Code 39 is a variant of Code 39 used in the marking of computer tape cartridges It always contains six characters Disable Select Length One or two fixed lengths Range 1 55 4 55 Intercharacter Gap Size The Code 39 and Codabar symbologies have an intercharacter gap that is typically quite ...

Page 145: ...imited barcodes not decoded as part of a Composite barcode Convert to EAN 13 Strip the leading 010 from barcodes 01 is the Application ID and must be followed by a single zero the first digit encoded Convert to UPC A Strip the leading 0100 from barcodes 01 is the Application ID and must be followed by two or more zeros but not six zeros No EAN 8 Enable Convert to EAN 13 The EAN 8 barcode will be e...

Page 146: ...A The UPC E1 barcode will be expanded into UPC A and the next processing will follow the settings configured for UPC A No UCC Coupon Extended Code Disable Read UPC A barcodes starting with digit 5 EAN 13 barcodes starting with digits 99 and UPC A GS1 128 Coupon Codes UPC A EAN 13 and GS1 128 must be enabled first Use Addon Redundancy to control auto discrimination of the GS1 128 right half of a co...

Page 147: ...mposite TLC 39 Disable GS1 128 Emulation Mode for UCC EAN Composite Codes Transmit UCC EAN Composite Code data as if it was encoded in GS1 128 barcodes Disable UPC Composite Mode UPC barcodes can be linked with a 2D barcode during transmission as if they were one barcode UPC Never Linked Transmit UPC barcodes regardless of whether a 2D barcode is detected UPC Always Linked Transmit UPC barcodes an...

Page 148: ...ged to C2 The first codeword of MicroPDF417 is 910 or 911 The original Code ID L5 will be changed to C0 Disable Data Matrix Enable Maxicode Enable QR Code Enable 2D Symbologies Macro PDF Macro PDF is a special feature for concatenating multiple PDF barcodes into one file known as Macro PDF417 or Macro MicroPDF417 Transmit Decode Mode Decide how to handle Macro PDF decoding Buffer All Symbols Trans...

Page 149: ...ion Decide whether to flash illumination on every image capture to aid decoding Turn On Internal LED Turn Off On Image Capture Autoexposure Decide whether to manually specify the gain and exposure time only recommended for advanced users with difficult image capture situations On Gain Time Only applies when Image Capture Autoexposure is disabled Gain is a means of amplifying the raw image data bef...

Page 150: ...0 represents the highest quality image 65 Select JPEG Size Set a value from 5 to 150 which represents the file size in multiples of 1024 bytes 1K For example setting this value to 8 permits the file size to be as large as 8192 bytes 40 Bits per Pixel Select the number of significant bits per pixel BPP to use when capturing an image 1 bit per pixel for black and white images 4 BPP to assign 1 of 16...

Page 151: ... ID MODIFIER CHARACTERS Code Type Option Value Option 0 No check character or Full ASCII processing 1 Check digit has been verified 3 Check digit has been verified and stripped 4 Full ASCII conversion has been performed 5 Result of option values 1 and 4 Code 39 7 Result of option values 3 and 4 0 Standard data packet No Function Code 1 FNC1 in the first character position 1 Function Code 1 FNC1 in...

Page 152: ...14 barcode 10012345678902 is transmitted as e00110012345678902 Note In GS1 128 emulation mode RSS is transmitted using Code 128 rules C1 Native mode transmission 0 Standard data packet 1 Data packet containing the data following an encoded symbol separator character 2 Data packet containing the data following an escape mechanism character The data packet does not support the ECI protocol 3 Data pa...

Page 153: ...nsmission protocol enabled is transmitted as L2ABCD 0 ECC 000 140 not supported 1 ECC 200 2 ECC 200 FNC1 in first or fifth position 3 ECC 200 FNC1 in second or sixth position 4 ECC 200 ECI protocol implemented 5 ECC 200 FNC1 in first or fifth position ECI protocol implemented Data Matrix 6 ECC 200 FNC1 in second or sixth position ECI protocol implemented 0 Mode 4 or 5 1 Mode 2 or 3 2 Mode 4 or 5 E...

Reviews: