background image

  CIAS Elettronica S.r.l. 


Ed. 1.2 

Installation Manual 

Page  26  of  36 

NEWTON-L 


6. INSTALLATION 


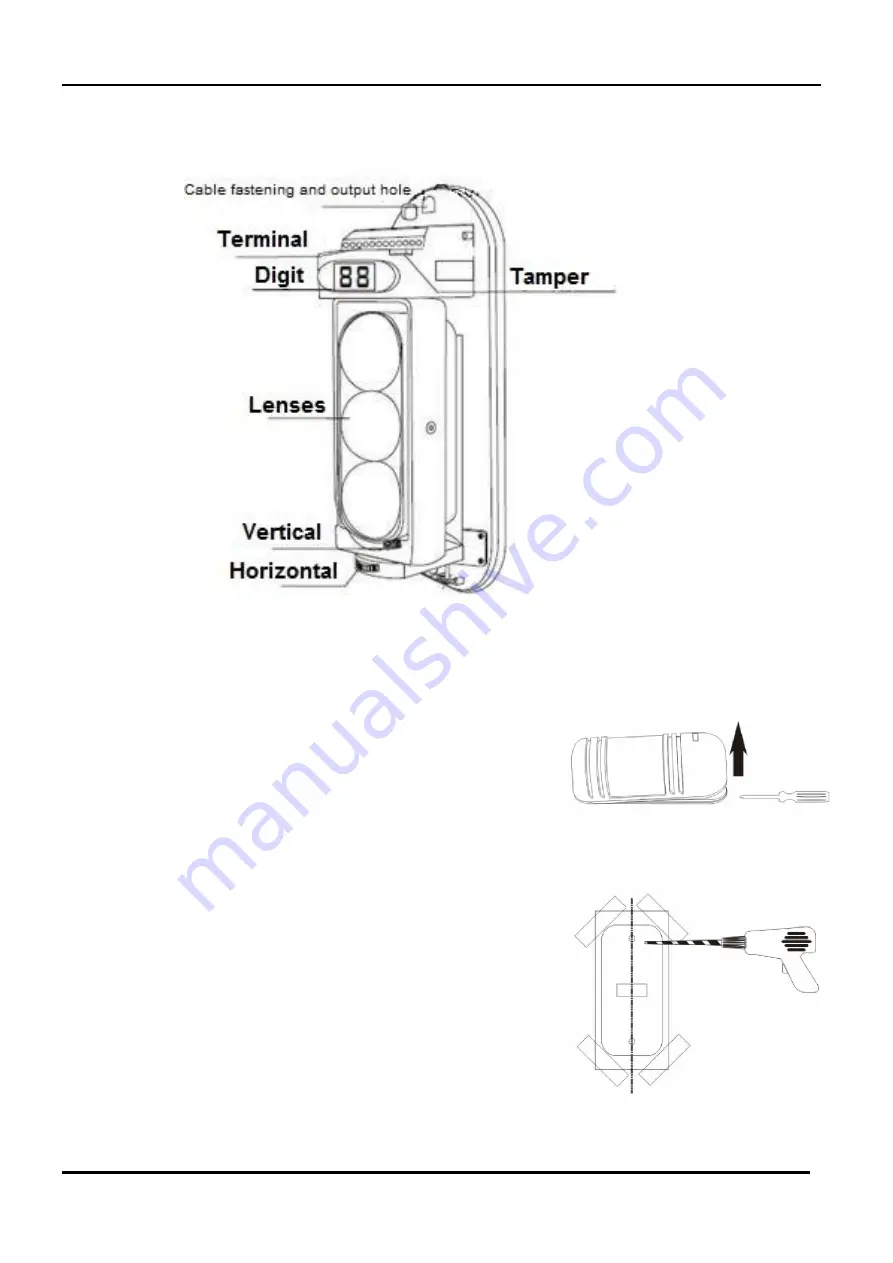
NEWTON-L barriers can be installed directly on walls or on poles. 
 
 
A: direct mounting to walls 

  Remove  the  front  cover  by  unscrewing  the  screw 

located  at  the  bottom  of  the  module.  Using  a 
screwdriver,  lift  the  top  part  until  the  front  separates 
from the bottom (see fig. to the side) 

  Using  the  template  provided,  arrange  the  position  of 

the fastening holes at the desired height 

  Pass the alarm cable in the corresponding hole at 

the upper part of the bottom 

  Fasten  the  bottom  to  the  wall  using  suitable 

dowels  

  Perform  correct  wiring,  following  the  diagrams 

contained in the previous chapters 

  Adjust for correct alignment of optics 


Summary of Contents for NEWTON-L

Page 1: ...ggio per esterno 8 frequenze selezionabili con disqualifica Portate 50 100 200 mt Manuale di installazione Outdoor triple beam infrared barrier 8 selectable frequencies with disqualification Range 50...

Page 2: ...ti Rel 10 7 4 4 Funzioni Led 8 4 4 1 Power 8 4 4 2 Allarme 8 4 5 Rel 8 4 5 1 Allarme 8 4 5 2 Disqualifica 8 4 5 3 Contatto Tamper 8 5 REGOLAZIONE VELOCITA DI RILEVAMENTO 8 6 INSTALLAZIONE 9 7 FISSAGGI...

Page 3: ...3 3 Relay Contact Selection 10 24 4 4 LED functions 25 4 4 1 Power 25 4 4 2 Alarm 25 4 5 Relay 25 4 5 1 Alarm 25 4 5 2 Disqualification 25 4 5 3 Tamper Contact 25 5 ADJUSTING DETECTION SPEED 25 6 INST...

Page 4: ...tabile La serie NEWTON L dispone di differenti portate 50 100 200 mt che devono essere tenute in considerazione durante la fase progettuale Nelle installazioni multiple dove pi trasmettitori sono orie...

Page 5: ...ivo GND Power Morsetto 3 Non Utilizzato Morsetto 4 Non Utilizzato Morsetto 5 Non Utilizzato Morsetto 6 Contatto Tamper NC Morsetto 7 Contatto Tamper NC Morsetto 8 Non Utilizzato Morsetto 9 Non Utilizz...

Page 6: ...7 Canale 8 1 OFF ON OFF ON OFF ON OFF ON 2 OFF OFF ON ON OFF OFF ON ON 3 OFF OFF OFF OFF ON ON ON ON Il canale selezionato per il modulo trasmettitore dovr corrispondere allo stesso impostato sul ric...

Page 7: ...tto 2 Negativo GND Power Morsetto 3 Contatto NC NO Rel Allarme Alarm Morsetto 4 Contatto NC NO Rel Allarme Alarm Morsetto 5 Contatto NC NO Rel Disqualifica Fault Morsetto 6 Contatto Comune Rel Disqual...

Page 8: ...nza selezionata Verificare che l influenza dei moduli adiacenti sia inferiore di un valore numerico pari almeno a 0 5 rispetto al proprio livello di segnale ricevuto par 4 3 1 4 3 1 Visualizzazione Li...

Page 9: ...normalmente aperto predisponendo il dip switch 10 Il suo intervento ritardato di circa 3 secondi quindi si attiva se le condizioni di disqualifica perdurano per un tempo superiore ed entra in funzion...

Page 10: ...vite sollevare la parte superiore fino alla avvenuta separazione del frontale dal fondo vedi fig a lato Utilizzando la dima in dotazione predisporre la posizione dei fori di fissaggio ad altezza desid...

Page 11: ...i di uscita cavi Avvitare saldamente la staffa metallica alla ganascia Posizionare il fondo plastico del modulo sulla staffa metallica facendo passare il cavo di connessione all interno dell apposito...

Page 12: ...te riferirsi al capitolo 12 Effettuare le regolazioni per il corretto allineamento Se possibile sigillare il foro di entrata del cavo nel basamento della colonna onde evitare l ingresso di insetti all...

Page 13: ...CIAS Elettronica S r l Ed 1 2 Manuale di installazione Pagina 12 di 36 NEWTON L 8 PRECAUZIONI PER L INSTALLAZIONE...

Page 14: ...di Allarme e di Tamper ad un adeguata centrale di allarme 11 ALIMENTATORE SUPPLEMENTARE NEWTON ALIM opzionale Nel caso in cui i collegamenti fossero troppo lunghi si consiglia l utilizzo dell alimenta...

Page 15: ...verso ulteriori eventuali resistenze Normalmente il termostato aperto temperature superiori ai 24 C 20 e di conseguenza il loro assorbimento nullo Quando la temperatura scende sotto i 17 C 20 il termo...

Page 16: ...del modulo vedi figura sotto Osservare attraverso il mirino ad una distanza di circa 5 cm la colorazione diversificata del contenitore del modulo ne favorisce la localizzazione Agendo sulla apposita r...

Page 17: ...e completamente con schermi oscuranti di adeguato spessore le parti trasmittenti non coinvolte nell allineamento Questo accorgimento permette di allineare il primo trasmettitore sul proprio ricevitore...

Page 18: ...antiorario ne consente una maggiore immunit Nel caso di protezioni perimetrali di aree di parcheggio mezzi o rilevamento di attraversamenti di grossi oggetti regolare opportunamente la sensibilit senz...

Page 19: ...dell ingresso centrale Controllare i cavi e il contatto di allarme Connettere correttamente il cavo o adeguare la configurazione di ingresso alle caratteristiche della centrale NC Bilanciamento ecc I...

Page 20: ...50mS attraversamenti lenti Uscita Allarme Rel contatto NC o NO Selezione dip 10 Uscita Disqualifica Rel Contatto NC o NO Selezione dip 10 Tensione massima applicabile ai contatti rel Carico resistivo...

Page 21: ...ON L series offers different ranges 50 100 200 mt which should be taken into account during the design phase In multiple installation where multiple transmitters are directed toward multiple receivers...

Page 22: ...ve 13 8 Vdc Power Terminal 2 Negative GND Power Terminal 3 Not used Terminal 4 Not used Terminal 5 Not used Terminal 6 NC Tamper Contact Terminal 7 NC Tamper Contact Terminal 8 Not used Terminal 9 Not...

Page 23: ...l 8 1 OFF ON OFF ON OFF ON OFF ON 2 OFF OFF ON ON OFF OFF ON ON 3 OFF OFF OFF OFF ON ON ON ON The channel selected for the transmitter module must correspond with the same set on the receiver In the c...

Page 24: ...al 2 Negative GND Power Terminal 3 NC NO Contact Alarm Relay Alarm Terminal 4 NC NO Contact Alarm Relay Alarm Terminal 5 NC NO Contact Disqualification Relay Fault Terminal 6 Common Contact Disqualifi...

Page 25: ...receivers with the same selected frequency Verify that the influence of adjacent modules is less than a numerical value of at least 0 5 with respect to its received signal level par 4 3 1 4 3 1 Signal...

Page 26: ...or normally open by setting dip switch 10 Its intervention is delayed by about 3 seconds it therefore activates if disqualification conditions persist for longer and enters into operation when the vo...

Page 27: ...he module Using a screwdriver lift the top part until the front separates from the bottom see fig to the side Using the template provided arrange the position of the fastening holes at the desired hei...

Page 28: ...holes Tighten the metal bracket to the clamp Position the plastic bottom of the module on the metal bracket passing the connection cable inside the corresponding hole Tighten the plastic bottom fasten...

Page 29: ...hapters see chapter 12 for the thermostat resistance diagram Adjust for correct alignment If possible seal the cable entry hole at the column base to prevent insects from entering inside equipment Clo...

Page 30: ...CIAS Elettronica S r l Ed 1 2 Installation Manual Page 29 of 36 NEWTON L 8 PRECAUTIONS FOR INSTALLATION...

Page 31: ...and Tamper outputs to a suitable alarm control unit 11 ADDITIONAL NEWTON ALIM POWER PACK optional If connections are too long it is advisable to use an additional NEWTON ALIM power pack which is equi...

Page 32: ...is normally open temperatures exceeding 24 C 20 and consequently their absorption is null When the temperature goes below 17 C 20 the thermostat closes its contact and resistances are powered with res...

Page 33: ...of the module see figure below Look through the viewfinder at a distance of about 5 cm The diversified colouring of the module container favours localisation Adjust vertical angulation by means of th...

Page 34: ...r parts not involved in alignment with adequate thickness obscuring screens This precaution allows you to align the first transmitter on its receiver and so forth for all other optics An additional ch...

Page 35: ...direction allows for increased immunity In the case of perimeter protection of vehicle parking areas or the detection of crossings of large objects suitably adjust sensitivity without reaching extreme...

Page 36: ...arm contacts or in central control unit input configuration Check cables and the alarm contact Connect the able correctly or adapt the input configuration to central control unit characteristics NC Ba...

Page 37: ...50mS slow crossing Alarm Output Relay NC or NO contact dip 10 selection Disqualification output Relay NC or NO contact dip 10 selection Maximum voltage applicable to relay contacts Resistive load 30V...

Page 38: ...NOTE...

Page 39: ...NOTE...

Page 40: ...ne nazionale vigente Il prodotto pu essere riconsegnato al distributore installatore a fine vita o in occasione di un nuovo acquisto This product is marked in compliance with the European Directive 20...

Reviews:

Related manuals for NEWTON-L