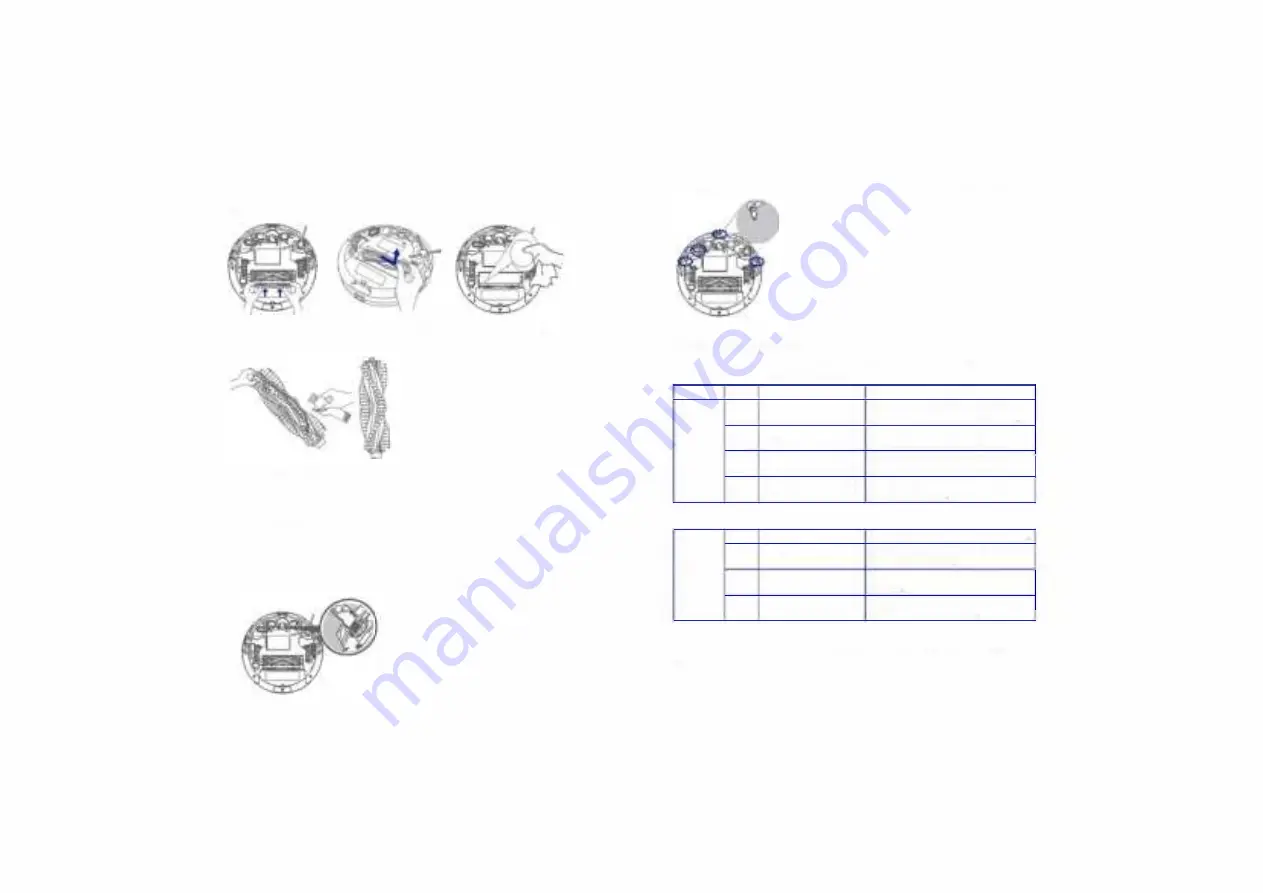
background image

Clean ma

i

n brush, s

i

de brush, sw

i

vel wheel and sensors 

Take ou

t t

he Ma

i

n  Brush, clean 

t

he vacuum

i

n

a

i

sle by a clo

t

h. 

Clean 

t

he  Ma

i

n Brush. Cu

down 

t

he ha

i

r w

i

nded 

i

t

he  Ma

i

n  Brush w

it

t

he 

p

rov

i

ded dean

i

n

g t

ool's kn

if

Remove 

t

he S

i

de Brush, use a clo

t

t

o remove 

t

he dus

t fr

om 

t

he brush 

Pull ou

t t

he Sw

i

vel Wheel, 

t

hen  clean 

t

he Sw

i

vel Wheel w

it

t

he clean

i

n

g t

ool 

Dus

off 

t

he An

ti

-Dro

Sensors and  O

pti

cal Sensor ma

i

n

t

a

i

t

he  bes

t p

erformance 

Troubleshootin

g

Any error 

t

ha

occurs dur

i

n

o

p

era

ti

on w

i

ll be no

tifi

ed by 

t

he Robo

t t

hrou

g

h  l

ig

h

sta

t

us and bee

p

s, 

t

he 

i

ns

t

ru

cti

on  as below: 

Ind

i

ca

ti

on 

Bee

p

Error 

Solu

ti

on 

G

yr

oscope error 

Kee

p t

he Robo

a

a s

t

able 

p

lace 

t

res

t

art and do no

move 

t

he Robo

Bum

p

er error 

Check 

t

he bum

p

er and remove any 

Flash

i

n

ob

j

ec

t t

ha

could be block

i

n

g it. 

red l

ig

h

An

ti

-Dro

Sensor error 

Check 

if t

he sensor d

i

r

ty 

and clean 

sensor. 

Low power or char

gi

n

Robo

t p

ower 

i

t

oo low and needs 

error 

manually char

gi

n

Dr

ivi

n

Wheel error 

Check 

if t

he Dr

i

v

i

n

Wheel 

i

s blocked 

S

i

de  Brush error 

Check 

if t

he S

i

de Brush 

i

s blocked and 

Sol

i

d red 

clean 

t

he S

i

de Brush 

l

ig

h

Fan error 

Clean u

p t

he 

g

arba

g

e and a

i

r  duc

t

channel 

Ma

i

n Brush error 

Check 

if t

he Ma

i

n Brush 

i

s en

t

an

g

led 

and clean 

t

he Ma

i

n Brush 

Tip

l

f t

he above me

t

hod can no

solve 

t

he 

p

roblem, 

p

lease 

t

ry 

t

he 

fo

llow

i

n

g: 

Turn off 

t

he Power Sw

it

ch a

t t

he bo

tt

om  o

f t

he Robo

and res

t

ar

t. 

Summary of Contents for RV-500

Page 1: ...User Manual Robot Vacuum Cleaner RV 500 ...

Page 2: ...aint or other chemicals or anything wet lf the room to be cleaned contains a balcony a physical barrier should be used to prevent access to the balcony and ensure safe operation This appliance is not intended for use by persons including children with reduced physical sensory or mental capab由ties or lack of experience and knowledge unless they have been given supervision or instruction concerning ...

Page 3: ...ng Button Auto Cleaning Start Stop Button Press and hold on to Power On or P凇er Off Press to start Cleaning Button Circular lndicator Light O仔 I Solid Blue Flashing Purple WiFi lndicator Light Off Flashing Blue Solid Blue Anti drop Sensors Opti笠I Sensor Driving Wheels Power Switch Dust Bin Charging Dock Charging Indicator Signal Transmission闪ea Charging Contact Pins Swivel Wheel Side Brush Battery...

Page 4: ...t Turn On Off the Robot Turn on a仔 the power switch on the bottom ofthe device Activate the Robot Place the Robot onto Charging Dock and make sure the Charging Contact Pins on the Charging Dock match up with those underneath the Robot lf successful you will hear a series oftones Once the button illuminates the Robot is ready for use 己 Start Cleaning Press the button once to wake up the Robot Press...

Page 5: ... to lay the Boundary Strip flat on the floor Make sure the stnp 1s placed FLAT on the floor 二卢 二荨 App Download Search for DreamCatcher Life in App Store Google Play then create an account and follow the in app instruction to add the robot vacuum cleaner on your smart phone DrearnCatcherLtfe I Q oo 仑 气 _ 0 Note If the Boonctary Stnp iS rolled up remCNe andthen re p y on the floor with adhesr e tape...

Page 6: ... Filters Once every week Every 2 month Main Brush Once every week Every 6 12 months Side Brush Once every month Every 3 6 months or when visibly worn Sensors Once every month Charging Pins Once every month Swivel Wheel Once every month Empty Dust Bin Press bin release button to remove the bin 臼 Open bin s door to empty it 畸 Clean Fi lter Remove filter by grasping the white tab Shake off debris by ...

Page 7: ...tion Beeps Error Solution 1 Gyroscope error Keep the Robot at a stable place to restart and do not move the Robot 2 Bumper error Check the bumper and remove any Flashing object that could be blocking it red light 3 Anti Drop Sensor error Check if the sensor dirtyand clean sensor 4 Low power or charging Robot power is too low and needs error manually charging 1 Driving Wheel error Check if the Driv...

Page 8: ... suction inlet Empty the Dust Bin Suction power is weak Clean the filters with a vacuum cleaner or a cleaning brush Check ifthe filters are wet due to water or other liquid on the floor Air dry the filters completely before use Check if the indicator on the Charging Dock lights up If not repair or replace the Charging Dock Robot can t be Dust off the charging contact pins with a dry doth charged C...

Reviews: