- 18 -
020-000410-01 Rev.1 (05-2011)
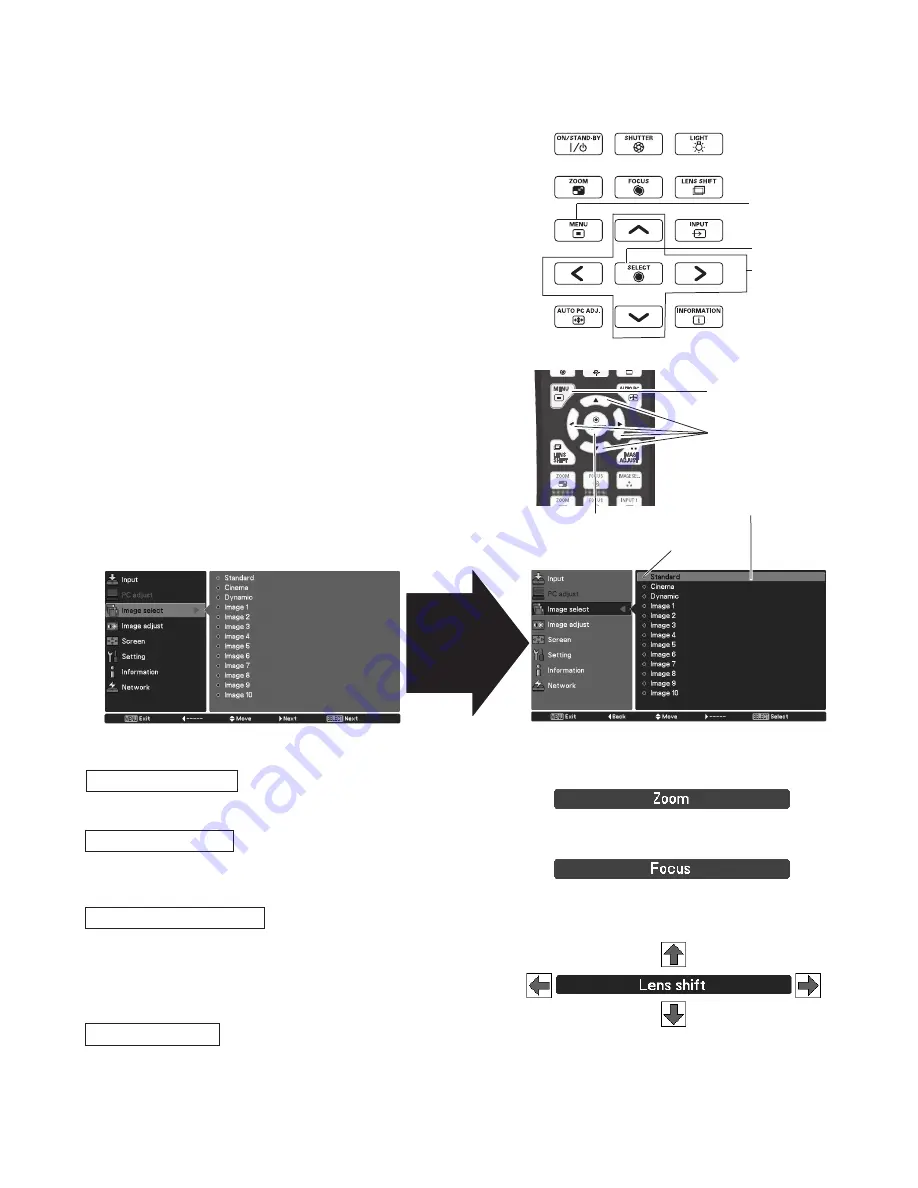
How to Operate the On-Screen Menu
Operating with Projector Control
The projector can be adjusted or set via the on-screen
menu. For each adjustment and setting procedure, refer
to respective sections in the user’s manual (CD-ROM).
Use the Point
ed
buttons to highlight or select a main
menu item. Press the Point
8
or the SELECT button
to access the submenu items. (The selected item is
highlighted in orange.)
Use the Point
ed
buttons to select the desired
submenu item and press the SELECT button to set or
access the selected item.
Press the MENU button on the side control or the
remote control to display the on-screen menu.
1
2
3
Use the Point
ed7 8
buttons to adjust the setting or
switch between each option and press the SELECT
button to activate it and return to the submenu.
4
Side Control
MENU button
Remote Control
POINT buttons
SELECT button
MENU button
POINT buttons
SELECT button
On-screen menu
Point
8
or
SELECT button
The selected item is
highlighted in orange.
The currently set
item is marked.
Lens Shift Adjustment
Zoom Adjustment
Focus Adjustment
Shutter Function
Shutter function allows you to completely block out light to the
screen. Press the SHUTTER button to close the shutter inside the
projector. To open up the shutter, press the SHUTTER button again.
Press the LENS SHIFT button and “Lens shift” will be displayed
on the screen. Use the Pointed
ed
7 8
buttons to position
the projection image to the desired point without having picture
distortion. Press and hold the LENS SHIFT button for more than 5
seconds to return the lens to the central position.
Press the ZOOM button and “Zoom” will be displayed on the screen.
And then press the Point
ed
buttons to zoom in and out the image.
Press the FOCUS button and “Focus” will be displayed on the
screen. And then press the Point
ed
buttons to adjust the focus of
the image.


