background image

FHQ841-T LCD Panels User Manual

27

020-000735-01 Rev. 1 (06-2014)

Operation

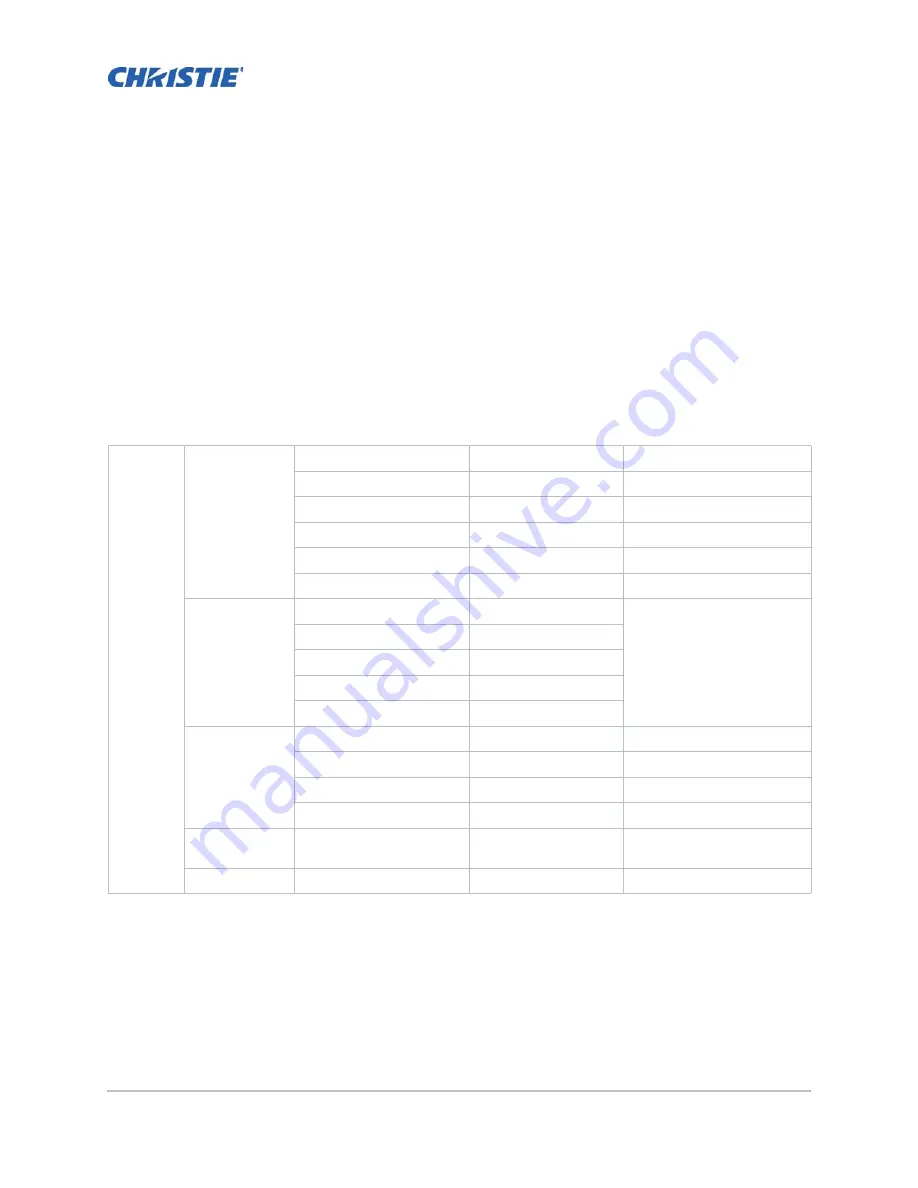
Using the On-Screen Menus 

The OSD menus are arranged hierarchically, as shown here and on the next page. Depending on the 
selected input source and signal characteristics, some menu options may not be available.

• To display the on-screen menus, press MENU on the remote control or built-in keypad. 

• To select a sub-menu, use the 

 and 

 buttons to highlight it. Then, press SEL to enter that 

sub-menu. 

• To select a menu item, use the 

 and 

 and buttons to highlight it. Then, press 

 or 

 to 

adjust that setting, and then the menu by pressing the menu button and exit.

PICTURE

Picture Mode

Standard/Dynamic/User

Brightness

0-100

Contrast

0-100

Black Level

0-100

Color

0-100

Sharpness

0-100

Screen

Auto Adjust

For VGA source

H-Position

0-100

V-Position

0-100

Clock

0-100

Phase

0-100

Color Temp

Normal/Warm/Cool/User

Red

0-100

Green

0-100

Blue

0-100

Movie Mode

Off / Low / 
Middle / High

(Default: Off)

Picture Reset

Reset the settings related 

Summary of Contents for FHQ841-T

Page 1: ...FHQ841 T LCD Panels U s e r M a n u a l 020 000735 01 ...

Page 2: ......

Page 3: ...FHQ841 T LCD Panels U s e r M a n u a l 020 000735 01 ...

Page 4: ...r g Problems or damage caused by improper installation alignment or by equipment modification if by other than Christie service personnel or a Christie authorized repair service provider h Problems or damage caused by use of a product on a motion platform or other movable device where such product has not been designed modified or approved by Christie for such use i Problems or damage caused by us...

Page 5: ...nts that can be recycled and reused This symbol means that electrical and electronic equipment at their end of life should be disposed of separately from regular waste Please dispose of the product appropriately and according to local regulations In the European Union there are separate collection systems for used electrical and electronic products Please help us to conserve the environment we liv...

Page 6: ......

Page 7: ...istruzioni prima di utilizzare questo prodotto o sottoporlo a manutenzione このドキュメントの翻訳版がこのドキュメントの裏面の CD で提供されています CD に は追加の製品マニュアルも収められています この製品を使用したり 機能させたりす る前に すべての指示をお読みください 이 문서의 번역된 사본이 이 문서 후면의 CD 에서 제공됩니다 이 CD 에는 추가 제품 설명 서가 포함되어 있을 수 있습니다 이 제품을 사용하거나 수리하기 전에 모든 지침을 확인 하십시오 Copias traduzidas deste documento são fornecida no CD contido na parte de trás deste documento O CD pode conter docum...

Page 8: ...Control Operation 17 Quick Setup 17 Installation Considerations 18 Ambient Light 18 Ambient Heat 18 Ventilation Considerations 19 Mounting the Display 19 Connections to the Display 19 Connecting a Control System or PC 20 RS232 Connection 20 Connecting Source Components to the Display 21 DisplayPort Source Connection 21 HDMI and DVI D Source Connections 22 RGBHV VGA Source Connection 23 Turning on ...

Page 9: ...9 Black Level 29 Color 30 Sharpness 30 Screen VGA source 31 Auto Adjustment VGA source 31 Image Position VGA source 31 Size VGA source 31 Phase VGA source 32 Color Temperature 32 Red Green Blue Gain 32 Movie Mode 32 Picture Reset 33 What are color points 33 Sound Settings 33 Sound Mode 33 EQ 34 Balance 34 Sound Reset 34 OSD Settings 35 Language 35 OSD Turn off 35 OSD Reset 35 Setup Settings 35 Pow...

Page 10: ...eshooting 37 External control 39 Serial Communications 39 RS232 Connection and Port Configuration 39 Command and Response Format 39 Serial Command List 41 Specifications 42 LCD Panel 42 Signal compatibility Connectivity 42 Mechanical 42 OSD functions 42 Electrical 43 Environmental 43 Touch panel 43 Supported Timings 44 ...

Page 11: ...d type for example Press MENU to return to the previous menu In addition to these conventions underlining boldface and or italics are occasionally used to highlight important information Description Features and Benefits The FHQ841 T LCD Panel represents the cutting edge of direct view LCD technology They combine ultra high resolution and unparalleled image quality with configurable I O in a large...

Page 12: ...y no pressure required Any touch finger gloved hand or pointer Windows 7 and 8 compliant USB one cable for power and communications Parts List Your display is shipped with the following items FHQ841 T LCD Panel Remote Control Unit and battery VGA Cable Length 1800mm DVI D Cable Length 1800mm RS232 Cable Length 1800mm USB Cable Length 3000mm ...

Page 13: ...ws the key display components and the paragraphs that follow describe them A MAIN POWER SWITCH Connects or disconnects the display panel from the AC power source B IR Receiver POWER STATUS LED Lights orange to indicate that the display is Green On Red Standby ECO Normal Mode Red Power Save ECO Mode Amber Power Save Normal Mode A B C ...

Page 14: ...screen this button operates identically to the up arrow When a menu is visible on screen this button operates identically to the down arrow button on the display remote control unit Press this button to increase the volume When a menu is visible on screen this button operates identically to the right arrow or SEL button on the display remote control unit Press this button to decrease the volume Wh...

Page 15: ...mputer or external DTV decoder a break out cable is needed for BNC type connection E DVI D In HDCP compliant VESA standard digital video input from a personal computer or digital video from a DVD player or HD set top box F HDMI 1 In HDCP compliant digital video input for connecting HDMI 1 4b or DVI sources G HDMI 2 In HDCP compliant digital video input for connecting HDMI 1 4b or DVI sources H DP ...

Page 16: ...al Speaker Turns on or off the product SOURCE Select a connected source device Move to the up menu Move to the down menu SEL Confirm a menu selection Decreases the sound volume or Move to the left menu Increases the sound volume or Move to the right menu MENU Opens the product on screen menu system When the menu system is already open pressing this button will select the previous submenu INFO Prov...

Page 17: ...ure that there is nothing obstructing the infrared beam between the remote control and the IR receiver on the display If the effective range of the remote control decreases or it stops working replace the batteries with new ones The remote control may fail to operate if the infrared remote sensor is exposed to bright sunlight or fluorescent lighting Ambient conditions may possibly impede the opera...

Page 18: ...ambient temperature constant and below 35 C 95 F and 85 humidity Keep the display away from heating or air conditioning vents 2 Connect other external equipment to the display optional Automation control system RS232 See Connections to the Display on page 19 3 Connect signal sources to the display See Connecting Source Components to the Display on page 21 4 Apply power to the display See Turning o...

Page 19: ... ensure that the wall mount bracket is installed according to the instructions included with it The wall must be capable of supporting a redundant weight factor three times the weight of the display or be reinforced We recommend that this be done by a custom installation specialist Connections to the Display Proceed as follows to connect the display to your video sources external controller s if p...

Page 20: ... suffice Ensure that the cables are securely connected Tighten the thumbscrews on connectors that have them Connecting a Control System or PC RS232 Connection Use a straight through RS232 cable with a 3 5Ø stereo connector to connect a PC or control automation system if present to the RS232 port on the display For more information about using this connection refer to External control on page 39 P1...

Page 21: ...T LCD Panels User Manual 21 020 000735 01 Rev 1 06 2014 Connecting Source Components to the Display Connect your video sources to the display as shown and described in the sections that follow DisplayPort Source Connection ...

Page 22: ...display You can also connect computers with DVI output to these inputs Refer to Supported Timings on page 44 for a list of compatible input signals This display supports the VESA Display Data Channel DDC standard This standard provides Plug and Play capability the display and a VESA DDC compatible computer communicate their setting requirements allowing for quick and easy setup For Plug and Play t...

Page 23: ...he main power switch at the side of the display The power indicator light indicates that the display is in standby mode 5 Press the power button on the remote control to turn on the display or press the power button on the keypad After a brief warm up period the display will display an image Avoiding Image Retention Follow the recommendations below to prolong the life of the display Operate the Di...

Page 24: ...lay OSD language is initially set to English but can also display the menus in Simplified French German Italian Russian Spanish Danish Dutch Norwegian Finnish Swedish or Korean To change the OSD language 1 Press MENU 2 Select OSD Settings from the Main Menu 3 Select OSD Language 4 Press or to select the desired language and press SEL The change takes effect immediately Enabling the Touch Screen Be...

Page 25: ...r to the USB input as shown below After and only after making this connection turn on your host computer Touch Requirements Hardware Requirements Computer Configuration Minimum 2 2 GHz dual core processor 1 GB RAM 10 GB available hard disk space 128 MB Nvidia Geforce 6600T graphics card Computer Configuration Recommended 2 5 GHz quad core processor 3 GB RAM 10 GB available hard disk space 1 GB Nvi...

Page 26: ...osoft Windows 7 Home Ultimate Premium Enterprise Professional or Home premium Microsoft Windows 8 Requirements Single Touch Operation These operating systems natively support single touch operation only Microsoft Windows 7 Home Basic or Starter Microsoft Windows Vista Enterprise or Vista Business Edition Windows XP or Windows Server 2003 with NET Framework version 2 0 or later ...

Page 27: ...e the and buttons to highlight it Then press SEL to enter that sub menu To select a menu item use the and and buttons to highlight it Then press or to adjust that setting and then the menu by pressing the menu button and exit PICTURE Picture Mode Standard Dynamic User Brightness 0 100 Contrast 0 100 Black Level 0 100 Color 0 100 Sharpness 0 100 Screen Auto Adjust For VGA source H Position 0 100 V ...

Page 28: ...50 R50 Sound Reset Reset the settings related OSD Language English Spanish French Danish Russian German Italian Dutch Norwegian Finnish Swedish Korean Default English OSD Turn Off Off 5 10 15sec OSD Reset Reset the settings related SETUP Power Save Off On Default On Standby Mode ECO Normal Default ECO Setup Reset Reset the settings related Factory Reset Reset the all MENU ABOUT Model Number Input ...

Page 29: ...material you are viewing These presets automatically adjust the other image settings for optimal image quality Or select User to adjust Brightness Contrast and other settings manually Brightness The Backlight control changes the apparent brightness of the displayed image Its effect is similar to that of a lamp intensity control on a projector Contrast On your external test pattern source select a ...

Page 30: ...blue filter when viewing the color bar pattern as you would for adjusting color saturation Select Color from the Picture Settings menu and press or to adjust it until the cyan and magenta color bars on either side of the green bar appear to be a single shade of blue Sharpness Sharpness is the amount of high frequency detail in the image To adjust sharpness select Sharpness from the Picture Setting...

Page 31: ...mage to the right press to shift it to the left Vertical Pos Press to shift the image upward press to shift it downward Size VGA source This control sets the frequency of the pixel sampling clock indicated by the number of incoming pixels per line so that all pixels generated by a particular source are sampled Steady flickering or several soft vertical stripes or bands across the entire image indi...

Page 32: ...her setting in such cases Color Temperature Select Color Temperature from the Picture Settings menu to adjust the color temperature Red Green Blue Gain Use the Gain controls to correct color imbalances in the bright areas of the image A good way to do this is to use a test pattern consisting mostly of solid white areas such as an 80 IRE window pattern If the white areas contain traces of red green...

Page 33: ...ings What are color points A color point is an x y coordinate pair that defines a color s location on the standard CIE chromaticity graph shown below CIE stands for Commission Internationale de l Éclairage International Commission on Illumination the organization responsible for color measurement and management standards Sound Settings Sound Mode ...

Page 34: ...Audio Settings menu and press or to cut or boost the low audio frequencies EQ Select the audio frequency from EQ of the Sound Settings menu and press or to adjust the audio frequencies Balance To adjust the left right speaker balance select Balance from the Sound Settings menu and press or to make one channel louder than the other Sound Reset Returns the current the Sound settings to the default s...

Page 35: ...r to select the OSD Language English French German Italian Russian Spanish Danish Dutch Norwegian Finnish Swedish and Korean OSD Turn off Select OSD Timeout from the Basic Settings menu to specify how long the menus remain on screen after selecting them 5s 10s 15s Off OSD Reset Returns the current the OSD settings to the default settings Setup Settings ...

Page 36: ...al inputs or receives a valid RS232 command Normal The display wakes up when it receives an active signal from its VGA HDMI Display Port or DVI inputs or receives a valid RS232 command Setup Reset Returns the current the Setup settings to the default settings Factory Reset To reset ALL display settings including image settings back to their factory defaults choose Factory Reset from the Setup Sett...

Page 37: ...ower switch see Display at a Glance on page 13 to the on position Replace the batteries The display is on and menus appear but there is no picture Incorrect source selection Source component is not turned on Source component is connected incorrectly or not at all Select the correct source Turn on the source component Check connections from the source component to the display The remote control doe...

Page 38: ...good and or shorter HDMI cable Computer images do not display correctly The resolution and frequency of the video card in the computer are not compatible with the display Clock and Phase settings need adjustment Select a compatible resolution and vertical frequency refer to Supported Timings on page 44 Adjust Clock and Phase settings refer to Size VGA source on page 31 and Phase VGA source on page...

Page 39: ... to Connecting a Control System or PC on page 20 Configure the RS232 controller or PC serial port as follows no parity 8 data bits 1 stop bit and no flow control Set the baud rate to 19200bps to match that of the display RS232 port Command and Response Format Commands sent from an automation control system or PC to the display must have the following format Direct Command Format from computer Form...

Page 40: ...Y Example Source status HDMI1 ALL PON 005 SET ID is the display ID always ALL is always COMMAND is the command data 3Bytes is always Reply is the reply data 3Bytes OK Acknowledgement The Product transmits the ACK acknowledgement based on this format when receiving normal data At this time if the data is data read mode it indicates present status data If the data is data write mode it returns the d...

Page 41: ...Key On PON Power status PWR Off 000 On 001 Mute Off Execute MOF Mute On Execute MON Mute status MUT Off 000 On 001 Volume Value VOL 0 100 0 100 Current source status SRC VGA 000 DVI 001 HDMI1 005 HDMI2 009 DisplayPort 006 Source change to VGA SPC Source change to DVI SH1 Source change to HDMI1 SH2 Source change to HDMI2 SH4 Source change to DISPLAYPORT SH3 ...

Page 42: ... Horizontal Vertical Frequency Analog 31 5 67 5 KHz 50 71 Hz Digital 31 5 91 1 KHz 50 71 Hz Input Resolution 1920 x 1080 60 Hz Analog DVI 3840 x 2160 30 Hz HDMI DP Connectors DisplayPort HDMI DVI VGA PC Audio In IR Extender Audio Out Communication Ports RS232C In Glass 5mm tempered Surface treatment is Anti glare Weight Net 98 kg 216 lbs Gross 130 kg 287 lbs Wall Mount 600mm x 600mm VESA screw M8 ...

Page 43: ...al Speaker Input Max 2Vrms Output 10W x 2 Operating Temperature 0 C 40 C 85 RH Storage Temperature 20 C 60 C 90 RH Touch 4 point Touch Available touch points Max 10 touch points simultaneous 2 drawing points Over 90 area Minimum space touch to touch 60mm Input Method finger gloved hand or unsharp pointer Available Object minimum size for touch 12mm Touch Accuracy Max 5mm Interface USB 2 0 Full Spe...

Page 44: ...1280 x 768 60Hz 1360 x 768 60Hz 1280 x 1024 60 70 75Hz 1920 x 1080 60Hz 3840 x 2160 30Hz Only HDMI DP VIDEO 1920 x 1080p 50 60Hz 16 9 4 4 4 and 4 2 2 Supported 1920 x 1080i 50 60Hz 16 9 4 4 4 and 4 2 2 Supported 1280 x 720p 50 60Hz 16 9 4 4 4 and 4 2 2 Supported 720 x 480p 60Hz 16 9 4 4 4 and 4 2 2 Supported 720 x 576p 50Hz 16 9 4 4 4 and 4 2 2 Supported 3840 x 2160p 30Hz 16 9 Only HDMI DP 4 2 0 S...

Page 45: ...ph 91 080 6708 9999 Germany ph 49 2161 664540 France ph 33 0 1 41 21 44 04 Eastern Europe and Russian Federation ph 36 0 1 47 48 100 China Shanghai ph 86 21 6278 7708 China Beijing ph 86 10 6561 0240 Brazil ph 55 11 2548 4753 Australia ph 61 0 7 3624 4888 Worldwide offices Italy ph 39 0 2 9902 1161 Consultant offices Canada Kitchener ph 519 744 8005 USA Cypress ph 714 236 8610 Corporate offices 00...

Page 46: ...For the most current technical documentation please visit www christiedigital com ...

Reviews: