


Page 2 of 5
Upgrade Instructions for GSeries Software version 02.03
(FW P/N 001-112143-03 Rev 2)
**
If the projector is powered on automatically, turn off “AC Power On” by using the projector Main Menu ->
Configuration -> Power Management ->
AC Power On.
Then repeat step 8.
9.
Put the projector into flash upgrade mode by holding the “UP” key on the built-in keypad and then press and
hold the power button (at the same time as “UP”) until the 3 status LEDs begin to flash green and red
alternately (hold for approximately 6 seconds).
10.
Connect the USB cable between the computer and projector.
Install USB driver on computer
11.
Install the USB driver from the file in step 6 (This step only needs to be completed successfully one time unless
you change USB ports)
-
Make sure that you have administrative privileges on your PC.
-
Open your Device Manager. To do this manually:
o
Hold the windows key and press R
o
Type “mmc -open \WINDOWS\system32\devmgmt.msc” without the quotations and run
-
In Device Manager, look for and expand the USB device. (need active connection to projector to see this). It
may show as “USB Device”, “Unknown Device” or “Other
devices”.
-
Right click on the correct one and choose “Update
Driver…”. Browse and select the driver file from the
directory in which you unzipped the files in step 6.
e.g.
C:\Christie\20130719_PWC808_B2231_x32_128M_User
\FlashUpgrader_x32_driver
If you are running a 64-bit operating system, choose the
file from the “
FlashUpgrader_x64_driver
” folder.
-
Allow the installation to complete then press finish.
-
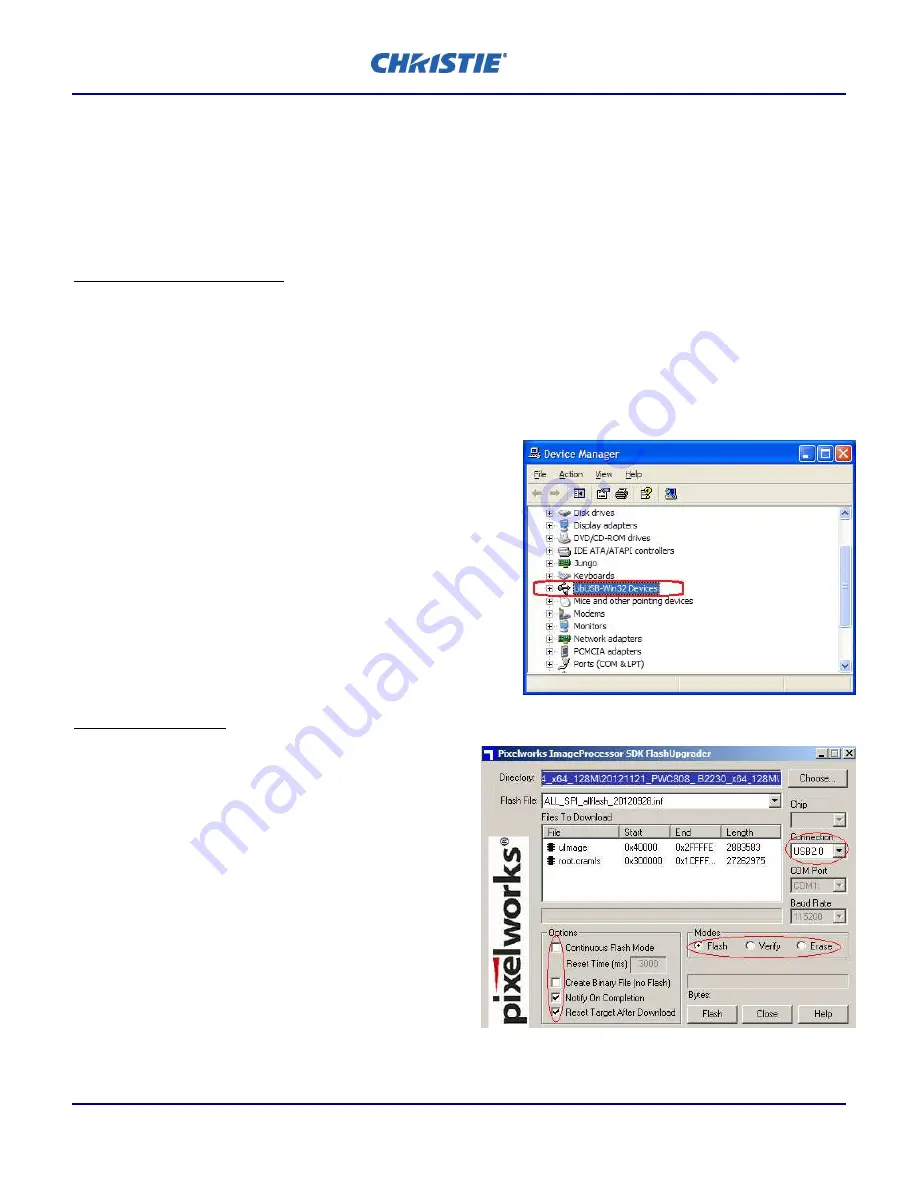
After the installation, ensure “
LibUSB-Win32 Devices
” is
shown in Device Manager.
Upgrade the firmware
12.
In the Folder extracted in step 6, run the correct file
for your operating system:
-
FlashUpgrader_x32.exe (for 32-bit systems) or
-
FlashUpgrader_x64.exe (for 64-bit systems)
13.
A window will appear, ensure the settings match the
picture on the right.
14.
Press flash and wait until the “Flash Complete” popup
appears. After it is complete, unplug the AC power
from the projector.
**
If the FlashUpgrader application is stuck at “Waiting
for target reset” for more than 30 seconds, try
unplugging the AC power and restarting at step 8.
**
Open Windows Device Manager and ensure “
LibUSB-
Win32 Devices
” is shown properly at step 11.