background image

Downloaded from Projector.com

29

COMPUTER INPUT

PICTURE SCREEN ADJUSTMENT

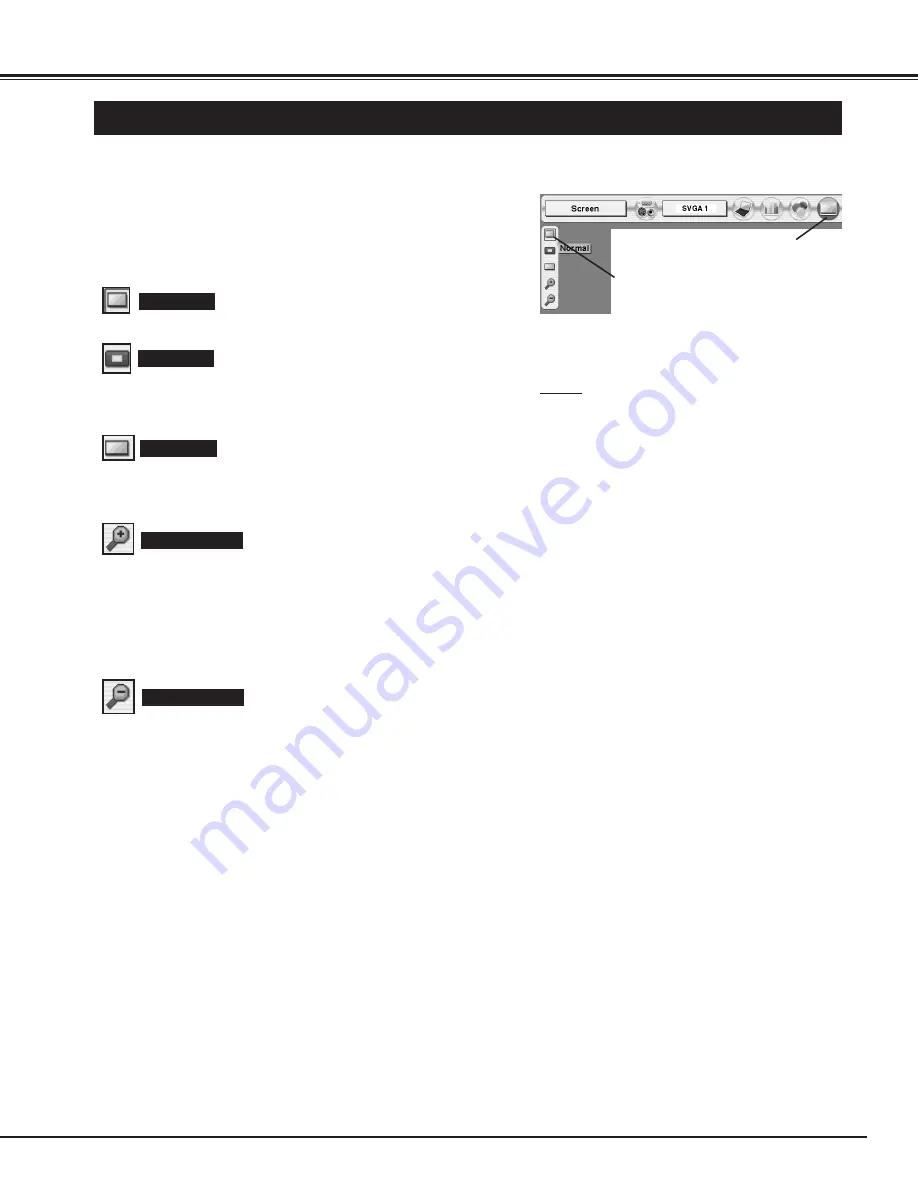
This projector has a picture screen resize function, which enables you to display desirable image size.

Press MENU button and ON-SCREEN MENU will appear.  Press
POINT LEFT/RIGHT button(s) to move a red frame pointer to
SCREEN Menu icon.

When Digital zoom + is selected, ON-SCREEN MENU disappears
and message “D. Zoom +” is displayed.  Press SELECT button to
expand image size.  And press POINT UP/DOWN/LEFT/RIGHT
button(s) to pan image.  Panning function can work only when image
is larger than screen size.
A projected image can be also expanded by pressing D.ZOOM 

button on Remote Control Unit.  

1

To cancel Digital Zoom +/– mode, press any button except D.ZOOM

/

, SELECT, POINT and LASER buttons.

Press POINT UP/DOWN button and move a red frame pointer to
function that you want to select and then press SELECT button.

2

Wide

Digital zoom +

NOTE

True and Digital zoom +/– cannot be operated
when “480i”, “575i”, “480p”, “575p”, “1035i (HDTV)”
or  “1080i (HDTV)” is selected on PC SYSTEM
Menu  (P24).

Wide cannot be selected when “720p (HDTV)”,
“1035i (HDTV)” or “1080i (HDTV)” is selected on
PC SYSTEM Menu  (P24).

This projector cannot display any resolution higher
than 1280 X 1024.  If your computer’s screen
resolution is higher than 1280 X 1024, reset
resolution to lower before connecting projector.

Image data in other than XGA (1024 x 768) is
modified to fit screen size in initial mode.

Panning function may not operate properly if
computer system prepared on PC ADJUST Menu
is used.

Provides image to fit screen size.

Normal

True

SCREEN MENU

When Digital zoom – is selected, ON-SCREEN MENU disappears
and message “D. Zoom –” is displayed.  Press SELECT button to
compress image size. 
A projected image can be also compressed by pressing D.ZOOM 

button on Remote Control Unit.  

Digital Zoom –

Provides image in its original size.  When original image size is larger
than screen size (1024 x 768), this projector enters “Digital zoom +”
mode automatically. 

Provides image to fit wide video aspect ratio (16 : 9) by expanding
image width uniformly.  This function can be used for providing a
squeezed video signal at 16 : 9.

Move red frame to function and press
SELECT button.

SCREEN Menu icon

Summary of Contents for 38-VIV303-01

Page 1: ...do not make any claim of copyright The copyright remains the property of their respective owners ABOUT PROJECTOR COM Projector com http www projector com is your review and buying guide resource for...

Page 2: ...D o w n l o a d e d f r o m P r o j e c t o r c o m User s Manual 38 VIV303 01 MODEL Projection lens is optional...

Page 3: ...S WARNING TO REDUCE THE RISK OF FIRE OR ELECTRIC SHOCK DO NOT EXPOSE THIS PROJECTOR TO RAIN OR MOISTURE This projector produces intense light from the projection lens Do not stare directly into the le...

Page 4: ...o this projector through cabinet slots as they may touch dangerous voltage points or short out parts that could result in a fire or electric shock Never spill liquid of any kind on the projector This...

Page 5: ...tes uses and can radiate radio frequency energy and if not installed and used in accordance with the instructions may cause harmful interference to radio communications However there is no guarantee t...

Page 6: ...trademarks or registered trademarks of Apple Computer Inc IBM and PS 2 are trademarks or registered trademarks of International Business Machines Inc Windows and PowerPoint are registered trademarks...

Page 7: ...age Menu Display Operation menu is displayed in English German French Italian Spanish Portuguese Dutch Swedish Russian Chinese Korean or Japanese One Touch Auto PC Adjustment Incoming computer video s...

Page 8: ...a projector is used This projector detects internal temperature and automatically controls operating power of Cooling Fans FRONT OF CABINET LAMP COVER ADJUSTABLE FEET AND FEET LOCK LATCHES This projec...

Page 9: ...connection CAUTION For safety unplug AC Power Cord when an appliance is not used When this projector is connected to the outlet with an AC Power Cord the appliance is in Stand by Mode and consumes a l...

Page 10: ...k where a projector is used and prepare a suitable lens For specifications of a Projection Lens contact sales dealer where you purchased a projector 2 For installation refer to lens replacement and in...

Page 11: ...sition and tilt 2 To shorten ADJUSTABLE FEET lift front of a projector and pull and undo FEET LOCK LATCHES Position and keystone distortion of image can be adjusted using Menu Operation Refer to P 21...

Page 12: ...by using a courier or transport service in an unsuitable transport case This may cause damage to a projector To transport a projector through a courier or transport service consult your dealer for bes...

Page 13: ...g computers and video equipment Refer to figures on pages 12 to 14 and connect properly This projector uses a micro processor to control this unit and occasionally this micro processor may malfunction...

Page 14: ...n connecting cable power cords of both a projector and external equipment should be disconnected from AC outlet Turn a projector and peripheral equipment on before computer is switched on USB port MAC...

Page 15: ...from AC outlet Audio Cable RCA x 2 AUDIO IN S VIDEO Y Cb Pb Cr Pr VIDEO Component video output equipment such as DVD player or high definition TV source Composite Video Output Component Video Output Y...

Page 16: ...FUNCTION POWER ON OFF BUTTON Used to turn projector on or off P20 LASER BUTTON Used to operate Laser Pointer Function Laser beam is emitted while pressing this button within 1 minute When using this...

Page 17: ...VOLUME MENU NO SHOW IMAGE VOLUME KEYSTONE LASER P TIMER ZOOM INPUT 1 INPUT 1 INPUT 2 INPUT 2 FOCUS LENS AUTO PC ON OFF INPUT 3 INPUT 3 COLOR M P TIMER BUTTON Used to adjust zoom P21 ZOOM BUTTON NO SH...

Page 18: ...ns to yellow when life of projection lamp draws to an end P44 Flashes red when internal projector temperature is too high P42 Used to select input source P23 24 30 Used to select an item or adjust val...

Page 19: ...SELECT BUTTON Used to move the Pointer UP DOWN RIGHT LEFT POINT BUTTONS REMOTE CONTROL UNIT LOCK FREEZE SELECT D ZOOM MUTE MUTE VOLUME MENU NO SHOW IMAGE VOLUME KEYSTONE LASER P TIMER ZOOM COMPUTER 1...

Page 20: ...2 or Input 3 Refer to P23 IMAGE ADJUST MENU Used to adjust computer image Contrast Brightness Color Tint Color management Auto picture control Color temp White balance R G B Sharpness Gamma Noise redu...

Page 21: ...ctor cannot be turned on 1 2 TO MAINTAIN LIFE OF LAMP ONCE YOU TURN PROJECTOR ON WAIT AT LEAST 5 MINUTES BEFORE TURNING IT OFF TURNING ON OFF PROJECTOR 1 Complete peripheral connections with Computer...

Page 22: ...KEYSTONE button on Remote Control Unit or select Keystone on SETTING menu Refer to page 37 Keystone dialog box appears 2 Correct keystone distortion by pressing POINT UP DOWN LEFT RIGHT button s Press...

Page 23: ...s on Top Control or on Remote Control Unit to adjust volume Volume dialog box appears on screen for a few seconds button to increase volume and button for decreasing Mute Press MUTE button on Remote C...

Page 24: ...and ON SCREEN MENU will appear Press POINT LEFT RIGHT buttons to move a red frame pointer to INPUT Menu icon Press POINT UP DOWN button and a red arrow icon will appear Move arrow to INPUT source tha...

Page 25: ...on Press POINT UP DOWN button to move a red arrow pointer to system that you want to set and then press SELECT button 1 2 PC SYSTEM MENU This projector automatically selects PC system among those prov...

Page 26: ...rol or on Remote Control Unit PC ADJUST MENU Auto PC Adj Store adjustment parameters Adjustment parameters from Auto PC Adjustment can be memorized in this projector Once parameters are memorized sett...

Page 27: ...to PC ADJUST Menu icon 1 2 Press POINT UP DOWN button to move a red frame pointer to item that you want to adjust and then press SELECT button Adjustment dialog box will appear Press POINT LEFT RIGHT...

Page 28: ...ox to previous figure Mode free Vacant Mode Shows values of Total dots Horizontal Vertical Display area H and Display area V Store icon Mode free icon Close this dialog box To store adjustment data To...

Page 29: ...et on this projector Standard Picture level with improved halftone for graphics Real User preset picture adjustment in IMAGE ADJUST Menu P36 IMAGE 1 4 IMAGE LEVEL SELECT DIRECT Select image level amon...

Page 30: ...r 1080i HDTV is selected on PC SYSTEM Menu P24 Wide cannot be selected when 720p HDTV 1035i HDTV or 1080i HDTV is selected on PC SYSTEM Menu P24 This projector cannot display any resolution higher tha...

Page 31: ...MENU Move a pointer to Video or Y Pb Cb Pr Cr and press SELECT button Source Select Menu Press POINT UP DOWN button to move a red arrow pointer to Input 3 and then press SELECT button Source Select Me...

Page 32: ...Projector automatically detects incoming Video signal and adjusts itself to optimize its performance When Video System is 1035i or 1080i select system manually first If projector cannot reproduce pro...

Page 33: ...this projector Standard Picture level adjusted for picture with fine tone Cinema User preset picture adjustment in IMAGE ADJUST Menu P36 IMAGE 1 4 IMAGE LEVEL SELECT DIRECT Select image level among St...

Page 34: ...button s to move a red frame pointer to SCREEN Menu icon Press POINT UP DOWN button and move a red frame pointer to function that you want to select and then press SELECT button 1 2 NOTE SCREEN Menu c...

Page 35: ...NT UP DOWN button to move the red frame point er to COLOR MANAGEMENT and then press the SELECT button The COLOR MANAGEMENT menu will appear and pointer mode will be enabled The image that was being pr...

Page 36: ...ol You will need to reselect and re adjust the color in this case QUIT The COLOR MANAGEMENT menu will be exited and the display will return to the normal projection screen but any settings that have b...

Page 37: ...e balance Blue Press POINT LEFT RIGHT button s to change progressive scan mode Dialog box display is changed to Off L1 L2 Off Progressive scan mode to OFF L1 Progressive scan mode to ON for active pic...

Page 38: ...mode Correct keystone distortion by pressing POINT UP DOWN LEFT RIGHT button s Refer to KEYSTONE ADJUSTMENT on page 21 Language used in ON SCREEN MENU is selectable from among English German French It...

Page 39: ...s top bottom and left right reversed This function is used to project the image from a ceiling mounting the projector Rear When this function is On picture is left right reversed This function is used...

Page 40: ...power management function operates in order to reduce power consumption and conserve lamp operating time The factory default settings for power management are Ready and 5 Min The power management func...

Page 41: ...e pointer to Factory default and then press SELECT button The message Return to Factory default is displayed Move the pointer to Yes and then press SELECT button Another confirmation dialog box appear...

Page 42: ...th POINT button Drag ON OFF button LEFT CLICK button and RIGHT CLICK button on Wireless Remote Control Unit Used to move PC mouse pointer The pointer is moved corresponding with the direction you are...

Page 43: ...After the cooling off period the Ready Indicator lights on again and the projector can be turned on by pressing the On Off button on the remote control unit or on the top control When you turn on the...

Page 44: ...particles it will reduce Cooling Fans effectiveness and may result in internal heat build up and adversely affect life of a projector Clean Air Filter following steps below Clean Air Filter with a br...

Page 45: ...aced LAMP REPLACEMENT LAMP REPLACE When the life of the Projection Lamp of this projector draws to an end the LAMP REPLACE indicator lights yellow If this indicator lights yellow replace the projectio...

Page 46: ...EPLACE INDICATOR lights up replace the lamp with a new one IMMEDIATELY after the projector has cooled down Follow carefully the instructions in the LAMP REPLACEMENT section of this manual Continuous u...

Page 47: ...0 seconds READY indicator lights green again and a projector may be turned on by pressing Power ON OFF button Check WARNING TEMP and READY indicator If both WARNING TEMP and READY indicator flashes a...

Page 48: ...urn a projector on before turning on a computer This symbol on the nameplate means the product is Listed by Underwriters Laboratories Inc It is designed and manufactured to meet rigid U L safety stand...

Page 49: ...ooled down enough and the temperature returns to nor mal the READY indicator lights green and the projector can be turned on The WARNING TEMP indicator keeps flashing Check and clean the Air Filter Th...

Page 50: ...4 x 768 60 31 74 92 VGA 7 640 x 480 43 269 85 00 575i Interlace 15 625 25 00 480i Interlace 15 734 30 00 SVGA 10 800 x 600 32 70 51 09 XGA 10 1024 x 768 62 04 77 07 SXGA 5 1280 x 1024 SXGA 6 1280 x 10...

Page 51: ...ea H Display area V Store Quit Standard Real Image 1 Image 2 Image 3 Image 4 Normal True Wide Digital zoom Digital zoom 0 31 On Off PC source PC adjust 720 x 400 800 x 600 1024 x 768 1152 x 864 1280 x...

Page 52: ...tting English German French Italian Spanish Portuguese Dutch Swedish Chinese Korean Japanese Store Reset On Off On Off On Off On Off Off Ready Shut down On Off Normal Auto Eco Yes No Keystone Menu pos...

Page 53: ...Source AA UM3 or R06 Type x 2 Operating Range 16 4 5m 30 Dimensions 2 0 x 1 4 x 7 6 50mm x 36mm x 193mm Net Weight 0 35 lbs 160 g including batteries Laser Pointer Class II Laser Max Output 1mW Wave l...

Page 54: ...CLK DATA GND GND R X D GND RTS CTS T X D GND GND ADB GND GND PS 2 Serial ADB 1 2 3 4 5 6 7 8 COMPUTER INPUT 1 TERMINAL DIGITAL Terminal DVI 24 pin 1 9 17 2 10 18 3 11 19 4 12 20 5 13 21 6 14 22 7 15...

Page 55: ...sold separately This feature enables you to use the projector for wide variety of uses For installation and replacement of the lens always contact the sales dealer The projector lens must be installe...

Page 56: ...D o w n l o a d e d f r o m P r o j e c t o r c o m 55 APPENDIX...

Page 57: ...90630 USA Telephone 714 236 8610 Fax 714 503 3385 Toll Free 1 800 407 7727 Toll Free 1 800 333 3816 CHRISTIE DIGITAL SYSTEMS Inc ViewPoint 200 Ashville Way Wokingham Berkshire U K RG41 2PL Telephone...

Page 58: ...do not make any claim of copyright The copyright remains the property of their respective owners ABOUT PROJECTOR COM Projector com http www projector com is your review and buying guide resource for...

Reviews: