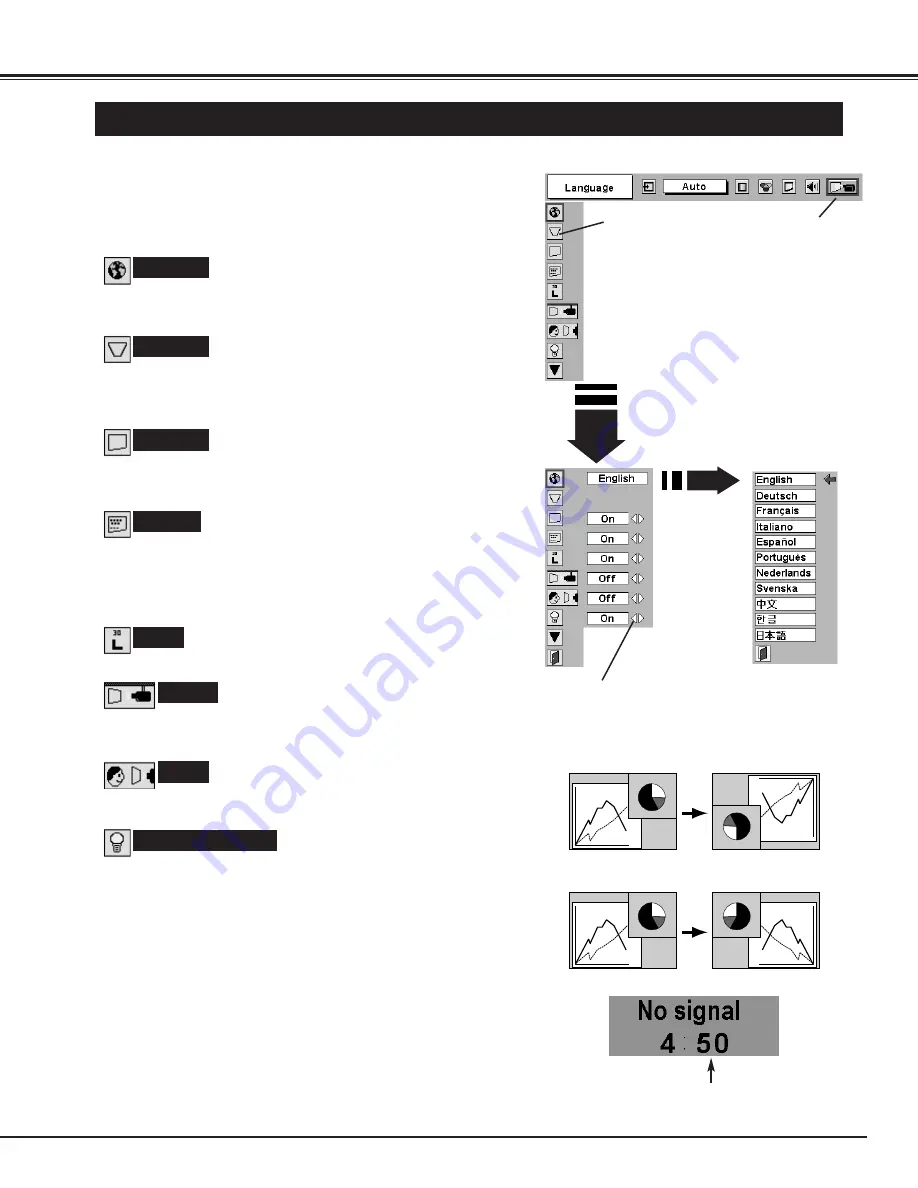
background image

35

SETTING

Ceiling

When this function is “On,” picture is top / bottom and left / right
reversed.  This function is used to project image from a ceiling mounted
projector.

Rear

When this function is “On,” picture is left / right reversed.  This function is
used to project image to a rear projection screen.

Ceiling function

Rear function

Keystone

When image is distorted, select Keystone.  ON-SCREEN MENU
disappears and Keystone dialog box is displayed.  Correct keystone
distortion by pressing POINT UP/DOWN/LEFT/RIGHT button(s).
Refer to KEYSTONE ADJUSTMENT on page 18.

SETTING MENU

Press MENU button and ON-SCREEN MENU will appear.  Press
POINT LEFT/RIGHT button(s) to move a red-frame pointer to
SETTING icon.

1

2

Language

Language used in ON-SCREEN MENU is selectable from among
English, German, French, Italian, Spanish, Portuguese, Dutch,
Swedish, Chinese, Korean and Japanese.

Display

This function decides whether to display On-Screen Displays.

On  ··· shows all On-Screen Displays.
Off ···· sets On-Screen Displays disappeared except;

ON-SCREEN MENU 

“Power off?” message 

Set a red frame
pointer to item and
press SELECT
button.

Press POINT DOWN button to move a red-frame pointer to item
that you want to set and then press SELECT button.  Setting
dialog box appears.

Blue back

When this function is “On,” this projector will produce a blue image
instead of video noise on screen when any input source is unplugged
or turned off.

Logo

When this function is “On,” projector displays our logo when starting up.

When pressing SELECT
button at Language,
Language Menu appears.

Move a pointer to item and
then press POINT
LEFT/RIGHT button(s).

SETTING MENU

SETTING Menu icon

This function turns Projection Lamp off when this projector detects
signal interruption and is not used for a certain period in order to
reduce power consumption and maintain Lamp-life.  (This projector is
shipped with this function ON.)
Power Management function operates to turn Projection Lamp off
when input signal is interrupted and any button is not pressed over 5
minutes. This function operates as follows;

1. When any input signal is interrupted, “No signal” and counting

down display appears (for 5 minutes).

2. After counting down for 5 minutes, projector lamp and READY

indicator are turned off.

3. When READY indicator flashing, Projection Lamp can be turned

on again (Power Management mode). 
In this Power Management mode, Projection Lamp is
automatically turned on when input signal connected or projector
is operated with any button on Top Control again.

Power management

Time left until Lamp off.

Summary of Contents for 38-VIV212

Page 1: ...User s Manual 38 VIV212 01 MODEL Projection lens is optional...

Page 2: ...this booklet If the problem still persists contact the sales dealer where you purchased the projector or the service center TO THE OWNER SAFETY PRECAUTIONS WARNING TO REDUCE THE RISK OF FIRE OR ELECT...

Page 3: ...s provided Never push objects of any kind into this projector through cabinet slots as they may touch dangerous voltage points or short out parts that could result in a fire or electric shock Never sp...

Page 4: ...adio frequency energy and if not installed and used in accordance with the instructions may cause harmful interference to radio communications However there is no guarantee that interference will not...

Page 5: ...8 SELECTING INPUT SOURCE 29 SELECTING VIDEO SYSTEM 30 PICTURE IMAGE ADJUSTMENT 31 IMAGE LEVEL SELECT 31 IMAGE LEVEL ADJUSTMENT 32 PICTURE SCREEN ADJUSTMENT 34 SETTING MENU 35 MAINTENANCE 37 WARNING TE...

Page 6: ...is designed to carry and work anywhere you wish to use Power Management Power Management function is provided to reduce power consumption while a projector is not in use This Power Management function...

Page 7: ...matically controls operating power of Cooling Fans FRONT OF CABINET LAMP COVER ADJUSTABLE FEET AND FEET LOCK LATCHES This projector is equipped with cooling fans for protection from overheating Pay at...

Page 8: ...ety unplug AC Power Cord when an appliance is not used When this projector is connected to the outlet with an AC Power Cord the appliance is in Stand by Mode and consumes a little electric power CONNE...

Page 9: ...his projector is designed to project on a flat projection surface ROOM LIGHT Brightness in a room has a great influence on picture quality It is recommended to limit ambient lighting in order to provi...

Page 10: ...amage to lens and cabinet When this projector is not in use for an extended period put it into case dust cover ADJUSTABLE FEET Picture tilt and projection angle can be adjusted by rotating ADJUSTABLE...

Page 11: ...uts to VIDEO Y Cb Pb and Cr Pr jacks Refer to P13 Connect computer digital analog output to one of these terminals Refer to P12 COMPUTER INPUT TERMINALS DIGITAL ANALOG This projector has input and out...

Page 12: ...MPUTER AUDIO IN 1 or 2 COMPUTER IN ANALOG Cables used for connection Cable or adapter is not supplied with this projector Audio Cable stereo NOTE When connecting cable power cords of both a projector...

Page 13: ...not supplied with this projector Video Cable RCA x 1 or RCA x 3 BNC Cable S VIDEO Cable Audio Cable RCA x 2 NOTE When connecting cable power cords of both a projector and external equipment should be...

Page 14: ...amp draws to an end P38 Flashes red when internal projector temperature is too high P37 Used to select input source P20 Used to select an item or adjust value in ON SCREEN MENU They are also used to p...

Page 15: ...nd adjust this projector through ON SCREEN MENU Refer to following pages to operate each adjustment on ON SCREEN MENU 2 MOVING POINTER 3 SELECT ITEM Move pointer see below or adjust value of item by p...

Page 16: ...ure image Contrast Brightness Color Tint Color management Auto picture control Color temp White balance R G B Sharpness Gamma Noise Reduction Progressive Refer to P32 34 FOR VIDEO SOURCE Press MENU BU...

Page 17: ...minutes before turning on projector again When WARNING TEMP Indicator continues to flash follow procedures below 1 Press POWER ON OFF button to turn a projector off and disconnect AC Power Cord from a...

Page 18: ...tone on SETTING menu Refer to page 35 Keystone dialog box appears 2 Correct keystone distortion by pressing POINT UP DOWN LEFT RIGHT button s Press POINT UP button to reduce the upper part of the imag...

Page 19: ...button and press POINT LEFT button for decreasing Press POINT LEFT RIGHT button s to cut off sound Dialog box display is changed to On and sound is cut off To restore sound to its previous level press...

Page 20: ...n press SELECT button Source Select Menu will appear 1 2 Input 1 INPUT MENU Move a pointer to either Digital or Analog and then press SELECT button 3 When your computer is connected to COMPUTER INPUT...

Page 21: ...em among those provided in this projector and PC system can be also selected manually PC ADJUSTMENT AUTO PC ADJUSTMENT Auto PC Adjustment function is provided to automatically adjust Fine sync Total d...

Page 22: ...frame pointer to PC ADJUST Menu icon 1 2 Press POINT DOWN button to move a red frame pointer to item that you want to adjust and then press SELECT button Adjustment dialog box will appear Press POINT...

Page 23: ...ses PC ADJUST MENU Quit Other icons operates as follows 3 To store adjustment parameters move a red frame pointer to Store icon and then press SELECT button Move a red arrow pointer to any of Mode 1 t...

Page 24: ...43 59 SXGA 4 1280 x 1024 64 20 70 40 62 50 58 60 63 90 60 00 63 34 59 98 XGA 1 1024 x 768 XGA 2 1024 x 768 XGA 3 1024 x 768 XGA 4 1024 x 768 48 36 60 00 68 677 84 997 XGA 6 1024 x 768 60 023 75 03 XG...

Page 25: ...GE SELECT MENU Normal picture level preset on this projector Standard Picture level with improved halftone for graphics Real User preset picture adjustment in IMAGE ADJUST Menu P26 27 IMAGE 1 4 IMAGE...

Page 26: ...d 32 8 Press either POINT LEFT button or POINT RIGHT button to Color temp level that you want to select XLow Low Mid or High The Color management function can be used to adjust the level phase and gam...

Page 27: ...used and normal projection will resume After chang ing the COLOR MANAGEMENT settings use the IMAGE ADJUST menu to store the changed settings The check mark will be cleared and the effect of the settin...

Page 28: ...ted on PC SYSTEM Menu P21 Full cannot be selected when 720p HDTV 1035i HDTV or 1080i HDTV is selected on PC SYSTEM Menu P21 This projector cannot display any resolution higher than 1280 X 1024 If your...

Page 29: ...nter to Video or Y Pb Cb Pr Cr and press SELECT button INPUT Menu icon Move a pointer red arrow to Input 2 and press SELECT button Source Select Menu Input 3 INPUT MENU INPUT Menu icon Move a pointer...

Page 30: ...TSC4 43 PAL M PAL N Projector automatically detects incoming Video signal and adjusts itself to optimize its performance When Video System is 1035i or 1080i select system manually first If projector c...

Page 31: ...LECT MENU Normal picture level preset on this projector Standard Picture level adjusted for picture with fine tone Cinema User preset picture adjustment in IMAGE ADJUST Menu P32 34 IMAGE 1 4 IMAGE SEL...

Page 32: ...pointer to COLOR MANAGEMENT and then press the SELECT button The COLOR MANAGEMENT menu will appear and pointer mode will be enabled The image that was being projected when the button was pressed will...

Page 33: ...SECAM PAL M or PAL N Progressive cannot be operated when 480p 575p or 720p is selected on AV SYSTEM MENU P30 32 32 32 15 8 Mid On On Auto picture control Color temp Press either POINT LEFT button or...

Page 34: ...ove the red frame to the function and press SELECT button SCREEN MENU SCREEN Menu icon Provides image to fit screen size 16 9 aspect ratio by expanding image width and height uniformly This function c...

Page 35: ...u want to set and then press SELECT button Setting dialog box appears Blue back When this function is On this projector will produce a blue image instead of video noise on screen when any input source...

Page 36: ...ed on just by connecting AC Power cord to a wall outlet Note Be sure to turn projector off properly refer to section TURNING OFF PROJECTOR on P17 If projector is turned off in wrong steps On Start fun...

Page 37: ...aler or a service station 3 AIR FILTER Pull up and remove Turn off a projector and disconnect AC power cord from AC outlet Turn a projector upside down and remove Air Filter 2 used by pulling latches...

Page 38: ...en the life of the Projection Lamp of this projector draws to an end the LAMP REPLACE indicator lights yellow If this indicator lights yellow replace the projection lamp with a new one promptly ORDER...

Page 39: ...eckup of the unit and replacement of the lamp Additionally check carefully to ensure that there are no broken shards or pieces of glass around the projector or coming out from the cooling air circulat...

Page 40: ...0 seconds READY indicator lights green again and a projector may be turned on by pressing Power ON OFF button Check WARNING TEMP indicator If indicator flashes red a projector cannot be turned on See...

Page 41: ...ems yourself If the projector fails to work properly see the TROU BLESHOOTING section on page 40 If after following all operating instructions you find that service is necessary contact the Christie S...

Page 42: ...watt type Projection Lamp 480i 480p 575i 575p 720p 1035i and 1080i High Definition TV Signal Accessories INT SP Stereo R and L 2 watt RMS T H D 10 41 F 95 F 5 C 35 C 14 F 140 F 10 C 60 C AC Power Cor...

Page 43: ...ontrol Cable supplied 1 2 3 4 5 8 7 6 Pin Configuration CONTROL PORT CONNECTOR R X D GND RTS CTS T X D GND GND Serial 1 2 3 4 5 6 7 8 COMPUTER INPUT 1 TERMINAL DIGITAL Terminal DVI 24 pin Connect disp...

Page 44: ...36 8610 Fax 714 503 3385 Toll Free 1 800 407 7727 Toll Free 1 800 333 3816 CHRISTIE DIGITAL SYSTEMS Inc ViewPoint 200 Ashville Way Wokingham Berkshire U K RG41 2PL Telephone 44 118 977 8000 Fax 44 118...

Reviews: