background image

Downloaded from Projector.com

3

To the User

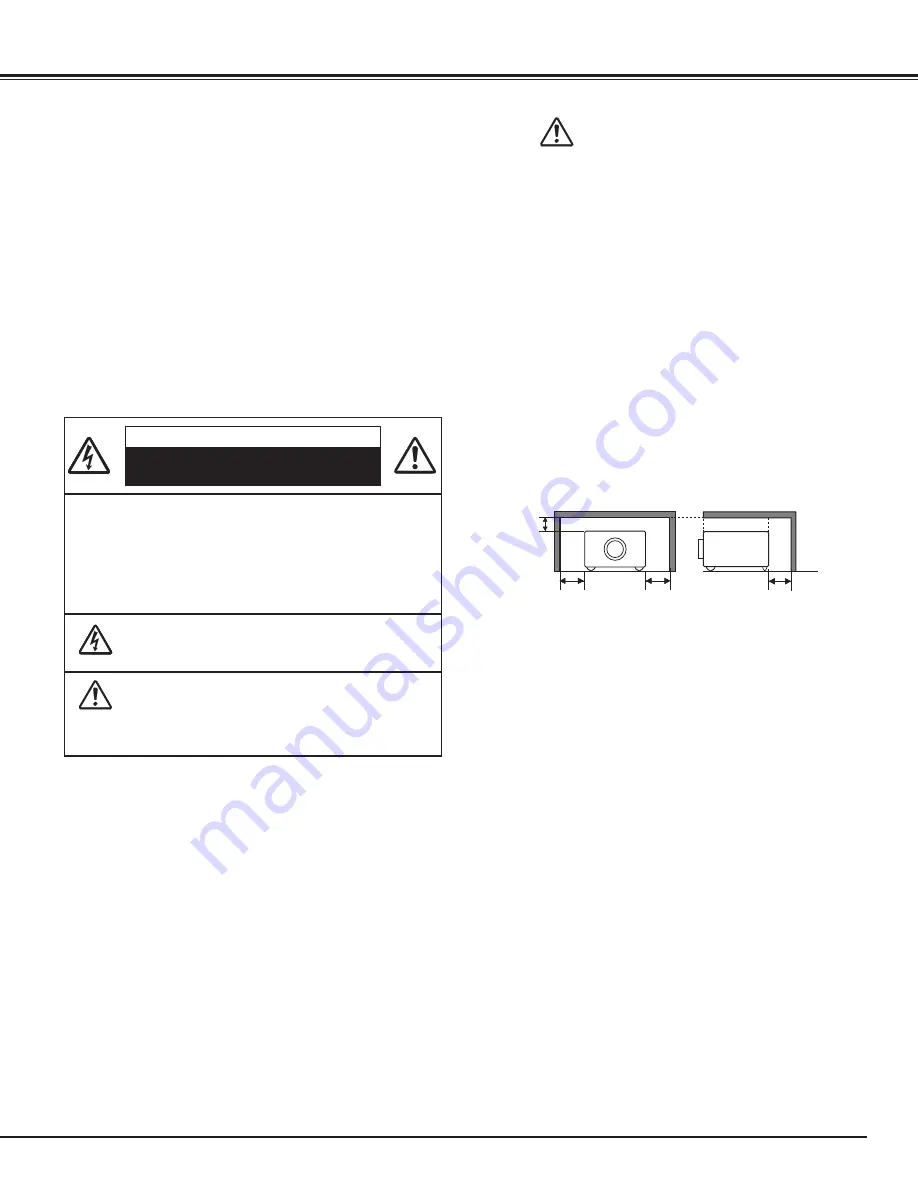
CAUTION :

TO  REDUCE THE RISK OF ELECTRIC
SHOCK, DO NOT REMOVE COVER (OR
BACK).  NO USER-SERVICEABLE PARTS
INSIDE EXCEPT LAMP REPLACEMENT.
REFER SERVICING TO QUALIFIED
SERVICE PERSONNEL.

THIS SYMBOL INDICATES THAT DANGEROUS
VOLTAGE CONSTITUTING A RISK OF ELECTRIC
SHOCK IS PRESENT WITHIN THIS UNIT.

THIS SYMBOL INDICATES THAT THERE ARE
IMPORTANT OPERATING AND MAINTENANCE
INSTRUCTIONS IN THE USER’S MANUAL WITH
THIS UNIT.

CAUTION

RISK OF ELECTRIC SHOCK

DO NOT OPEN

Before operating this projector, read this manual thoroughly
and operate the projector properly.  
This projector provides many convenient features and
functions.  Operating the projector properly enables you to
manage those features and maintains it in better condition for
a considerable time.
Improper operation may result in not only shortening the
product-life, but also malfunctions, fire hazard, or other
accidents.
If your projector seems to operate improperly, read this
manual again, check operations and cable connections and try
the solutions in the “Troubleshooting” section at the end of
this booklet.  If the problem still persists, contact the dealer
where you purchased the projector or the service center.

Safety Precaution

WARNING :  TO REDUCE THE RISK OF FIRE OR ELECTRIC

SHOCK, DO NOT EXPOSE THIS APPLIANCE
TO RAIN OR MOISTURE.

– This projector produces intense light from the projection

lens.  Do not stare directly into the lens as possible.  Eye
damage could result.  Be especially careful that children do
not stare directly into the beam.

– Install the projector in a proper position.  If not, it may

result in a fire hazard.

– Provide appropriate space on the top, sides and rear of the

projector cabinet for allowing air circulation and cooling the
projector.  Minimum clearance must be maintained.  If the
projector is to be built into a compartment or similarly
enclosed, the minimum distances must be maintained.  Do
not cover the ventilation slot on the projector.  Heat build-
up can reduce the service life of your projector, and can
also be dangerous.

– The remote control, supplied to this projector, emits a laser

beam as the Laser pointer function from laser light window
while pressing the LASER button (for 1 minute / Signal
Emission indicator lights red to indicate laser emission).  Do
not look into the laser light window or shine the laser beam
on a mirror, yourself or other people.  Eye damage may
result.

– Do not put any flammable object or spray can near the

projector, hot air is exhausted from the ventilation holes.

– If the projector is not to be used for an extended time,

unplug the projector from the power outlet.

READ AND KEEP THIS USER’S MANUAL FOR LATER USE.

20cm

50cm

50cm

50cm

SIDE and TOP

REAR

Summary of Contents for 38-VIV208-01

Page 1: ...do not make any claim of copyright The copyright remains the property of their respective owners ABOUT PROJECTOR COM Projector com http www projector com is your review and buying guide resource for...

Page 2: ...D o w n l o a d e d f r o m P r o j e c t o r c o m User s Manual 38 VIV208 01 MODEL...

Page 3: ...urning Off the Projector 19 Zoom Adjustment 20 Focus Adjustment 20 Keystone Adjustment 20 Picture Freeze Function 20 No Show Function 21 P Timer Function 21 Sound Adjustment 21 On Screen Menu 22 Menu...

Page 4: ...TO REDUCE THE RISK OF FIRE OR ELECTRIC SHOCK DO NOT EXPOSE THIS APPLIANCE TO RAIN OR MOISTURE This projector produces intense light from the projection lens Do not stare directly into the lens as pos...

Page 5: ...they may touch dangerous voltage points or short out parts that could result in a fire or electric shock Never spill liquid of any kind on the projector Do not install the projector near the ventilati...

Page 6: ...et Installing the Projector in Proper Position Install the projector properly Improper installation may reduce the lamp lifetime and cause a fire hazard 20 20 Do not tilt the projector more than 20 de...

Page 7: ...tes uses and can radiate radio frequency energy and if not installed and used in accordance with the instructions may cause harmful interference to radio communications However there is no guarantee t...

Page 8: ...or safety unplug AC power cord when the projector is not in use When this projector is connected to an outlet with AC power cord it is in Stand by mode and consumes a little electric power Connecting...

Page 9: ...imes of screen size or compress the image size allowing you to focus on crucial information at a presentation See page 31 Wireless Mouse The remote control supplied with this projector has wireless mo...

Page 10: ...ection Lens y Lens Cover See page 54 for attaching u Air Intake Vent q w e r t q Exhaust Vent q w e r q Lamp Cover w Air Intake Vent back and bottom e Air Filter r Adjustable Feet r q e w w Top Contro...

Page 11: ...t the audio output stereo from a computer or video equipment connected to q or u to this jack p17 18 r VIDEO Connect the composite video output from video equipment to VIDEO jack p18 u COMPUTER IN 2 C...

Page 12: ...1 e POWER ON OFF button Turns the projector on or off p19 t POWER indicator Flashes red until the projector gets ready to be turned on It turns red when the projector is in the stand by mode It remain...

Page 13: ...mitted while pressing this button within 1 minute When using this laser pointer for more than 1 minute release the LASER button and press it again This button is also used as a switching button to act...

Page 14: ...re than 7 seconds 3 After the Laser pointer function has switched to the Pointer function the LASER button is used as the Pointer function ON OFF switch instead of the Laser pointer function Press the...

Page 15: ...he RESET ON ALL OFF switch to the RESET and then to the ON The initial code is Code 1 2 Remote Control Code While pressing the MENU button press the IMAGE button number of times corresponding to the r...

Page 16: ...l new batteries Risk of explosion if battery is replaced by an incorrect type Dispose of used batteries according to the instructions Press the lid down ward and slide it Remove the battery compartmen...

Page 17: ...lamp Proper angle should be taken See page 5 Positioning the Projector Adjustable Feet 100 150 195 300 195 127 97 64 40 A B 25 3 7 7m 16 4 5 0m 12 5 3 8m 8 2 2 5m Max Zoom Min Zoom A B 9 1 Inch Diago...

Page 18: ...re not supplied with this projector Audio Cable stereo NOTE When connecting the cable the power cords of both the projector and the external equipment should be disconnected from AC outlet USB port MA...

Page 19: ...uipment AUDIO IN S VIDEO VIDEO AUDIO OUT Component video output equipment such as DVD player or high definition TV source Component Video Output Y Pb Cb Pr Cr Composite Video Output Video Cable RCA x...

Page 20: ...EFORE POWER INDICATOR LIGHTS RED OTHERWISE IT WILL RESULT IN SHORTENING LAMP LIFE 1 3 When the projector has cooled down enough to be turned on again the POWER indicator lights red Then you can discon...

Page 21: ...ne Adjustment Picture Freeze Function Zoom Adjustment Focus Adjustment Reduce the upper width with Point Up button Reduce the lower width with Point Down button Reduce the left part with Point Left bu...

Page 22: ...te control to adjust volume The volume dialog box appears on the screen for a few seconds button to turn up the volume and button to turn down the volume Mute Press the MUTE button on the remote contr...

Page 23: ...w the item data 1 2 4 3 You can control and adjust this projector through the On Screen Menu Refer to the following pages to operate each adjustment on the On Screen Menu ON OFF POWER KEYSTONE INPUT W...

Page 24: ...r to p34 Image Adjust Menu Used to adjust picture image Contrast Brightness Color Tint Color temp White balance R G B Sharpness Gamma Progressive Refer to p36 37 For video source Same function as menu...

Page 25: ...ct RGB PC Digital RGB PC Digital When the input source is analog coming from a computer through the DVI terminal select RGB Analog RGB Analog Move the pointer red arrow to Computer 2 and press the SEL...

Page 26: ...is required p26 27 There is no signal input from the connected computer Check the connection of the computer and see if the projector is set correctly See Troubleshooting on page 45 Auto The Auto PC...

Page 27: ...uted by pressing the AUTO PC button on the remote control Move the red frame pointer to the Auto PC Adj icon and press the SELECT button PC Adjust Menu Auto PC Adj PC Adjust Menu icon To store adjustm...

Page 28: ...press the SELECT button PC Adjust Menu PC Adjust Menu icon Adjusts an image as necessary to eliminate flicker from the display Press the Point Left Right button to adjust value From 0 to 31 Fine sync...

Page 29: ...o the Store icon and then press the SELECT button Move the red arrow pointer to any of Mode 1 to 5 in which you want to store and then press the SELECT button Resets all adjustment to their previous l...

Page 30: ...ing selected Image Select Menu Normal picture level preset on this projector Standard Picture level with improved halftone for graphics Real User preset image in the Image Adjust Menu p30 IMAGE 1 4 Im...

Page 31: ...of Image 1 to 4 where you want to set and then press the SELECT button Store icon Press the SELECT button at this icon to store the adjust ment Image Adjust Menu icon Press the Point Left button to l...

Page 32: ...n 720p HDTV 1035i HDTV or 1080i HDTV is selected in the PC System Menu p25 The True and Digital zoom cannot be selected when 480i 575i 480p or 575p is selected in the PC System Menu p25 This projector...

Page 33: ...r to the source that you want to select and then press the SELECT button 3 When selecting Auto the projector automatically detects incoming video signal and adjusts itself to optimize its performance...

Page 34: ...ter 1 Video Computer 2 COMPUTER button Computer 1 Computer 2 INPUT button Computer 2 is not displayed when the COMPUTER IN 2 COMPONENT IN MONITOR OUT terminal is used as Monitor out Input Source Selec...

Page 35: ...on PAL SECAM NTSC NTSC4 43 PAL M PAL N The projector automatically detects incoming video signal and adjusts itself to optimize its performance If the projector cannot reproduce proper video image it...

Page 36: ...Image Select Menu Normal picture level preset on this projector Standard Picture level adjusted for the picture with fine tone Cinema User preset image in the Image Adjust Menu p36 37 IMAGE 1 4 Image...

Page 37: ...utton to lighten color and the Point Right button to deepen color From 0 to 63 Press the Point Left Right button to obtain proper color From 0 to 63 Color Tint Press the Point Left button to soften th...

Page 38: ...LECT button Screen Menu Screen Menu icon Provides image at a wide screen ratio of 16 9 Wide Provides image at a normal video aspect ratio of 4 3 Normal To store the adjustment data move the red frame...

Page 39: ...tting Menu Language Setting Menu icon This function corrects distortion of a projected image Select either Store or Reset with the Point Left Right button and then press the Select button The keystone...

Page 40: ...d down the POWER indicator changes to green flashing In this condition the projection lamp will be turned on if the input signal is reconnected or any button on the top control or remote control is pr...

Page 41: ...part of the projected image with this function Choose either Spotlight or Pointer with the Point Up Down button and press the SELECT button Then select one of three different sizes Large Middle and S...

Page 42: ...ING indicator stops flashing Then check the items below Did you provide appropriate space for the projector to be ventilated Check the installing condition to see if ventilation slots are not blocked...

Page 43: ...lt in malfunction of the projector RECOMMENDATION We recommend avoiding dusty smoky environments when operating the projector Usage in these environments may cause poor image quality When using under...

Page 44: ...injury Allow a projector to cool for at least 45 minutes before you open the Lamp cover The inside of the projector can become very hot POWER WARNING LAMP REPLACE V O L U M E V O L U M E SELECT This i...

Page 45: ...CE indicator lights up replace the lamp with a new one IMMEDIATELY after the projector has cooled down Follow carefully the instructions in the Lamp Replacement section of this manual Continuous use o...

Page 46: ...r and the projection screen See page 16 Check the projection lens to see if it needs cleaning See page 42 Moving the projector from a cool temperature location to a warm temperature location may resul...

Page 47: ...o the projector with a USB cable Check cable connection between the projector and your computer Check the mouse setting on your computer Computer 2 cannot be selected The Terminal item cannot be selec...

Page 48: ...re returns to normal the POWER indicator lights red and the pro jector can be turned on The WARNING indicator keeps flashing Check and clean the Air filter Projector Condition The projector is ready t...

Page 49: ...On Off 0 63 0 63 Input RGB Analog RGB PC Digital Go to System 1 Computer 2 RGB Component Go to System 1 Computer Input Video Auto Go to System 3 Go to System 3 Computer 1 Video S Video PC Adjust 640...

Page 50: ...age 2 Image 3 Image 4 Screen Sound Setting English German French Italian Spanish Portuguese Dutch Swedish Chinese Korean Japanese Store Reset On Off On Off Off On Off On Off Off On Off Normal Code 1 Y...

Page 51: ...0 68 68 75 06 1280 x 960 75 00 75 08 1280 x 1024 80 00 75 08 XGA 11 1024 x 768 XGA 12 1024 x 768 XGA 13 1024 x 768 XGA 14 1024 x 768 61 00 75 70 XGA 15 1024 x 768 35 522 86 96 Interlace 46 90 58 20 47...

Page 52: ...Type x 2 Audio Input Jacks DVI I Terminal Digital Analog HDCP compatible Mini Jack stereo x 1 Mini DIN 8 pin x 1 Mini Jack stereo x 1 variable with volume 1 0 W RMS Computer Input 1 Terminal Computer...

Page 53: ...21 6 14 22 7 15 23 8 16 24 C1 C2 C3 C5 C4 Pin Configuration Analog Red Input Analog Ground R G B Analog Green Input Analog Horiz sync Analog Blue Input C1 C5 C2 C4 C3 T M D S Data2 No Connect T M D S...

Page 54: ...ND GND PS 2 Serial ADB 1 2 3 4 5 6 7 8 Vcc Data Data Ground 1 2 3 4 USB CONNECTOR Series B Pin Configuration 2 3 4 1 Appendix The parts listed below are optionally supplied When ordering those parts g...

Page 55: ...not used for an extended period replace the lens cover Secure the string for the lens cover through a hole of the lens cover 1 2 Turn the projector upside down and secure the string for lens cover to...

Page 56: ...D o w n l o a d e d f r o m P r o j e c t o r c o m...

Page 57: ...90630 USA Telephone 714 236 8610 Fax 714 503 3385 Toll Free 1 800 407 7727 Toll Free 1 800 333 3816 CHRISTIE DIGITAL SYSTEMS Inc ViewPoint 200 Ashville Way Wokingham Berkshire U K RG41 2PL Telephone 4...

Page 58: ...do not make any claim of copyright The copyright remains the property of their respective owners ABOUT PROJECTOR COM Projector com http www projector com is your review and buying guide resource for...

Reviews: