Chinavision CVSN-DV56 User Manual Download Page 9

9


6. Operating the DVR recorder 
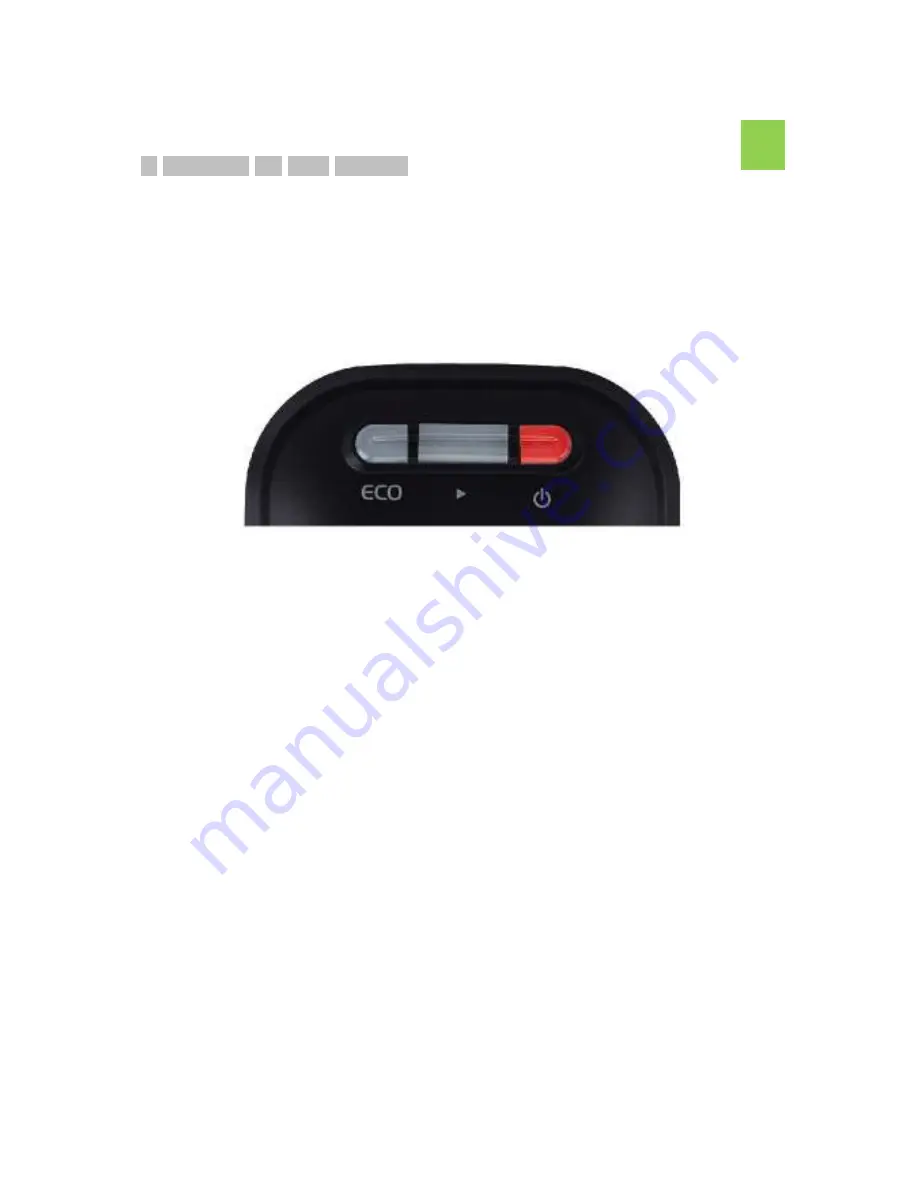
 

Event Recording 


1. Start the engine after the power cable is connected to the cigarette power jack in vehicle. 


2.  A  beep  sound  will  now  be  heard  and  all  of  the  LED  lights  will  turn  on.  After  several 

seconds, the ECO LED turns off and the Power LED is illuminated. Constant recording will 
now start and will be capturing digital video footage. 


3. Event recording will be taken automatically and an audible beep will be heard if you brake 

sharply, accelerate rapidly, corner excessively or if a sudden impact or shocks occurs. 
A Total  of  30  seconds  of  video  clip  will  be  taken  -  the  10  seconds  each  before  and  20 
seconds after an event will be stored. 

*Note: Event recording  time may  be shortened depending on  the image data especially 
when recording under  low light or  conditions  taken.


4. You can record manually by pressing the manual recording button located in the middle of 

unit should you need emergency recording. 


5.  The  main  unit  starts  recording  immediately  after  power  is  connected.  The  huge  size  of 

constant  recording  video  clip  is  stored  in  the  internal  memory  of  DVR  recorder.  Please 
note  that  constant  recording  data  is  not  copied  when  you  use  the  USB  memory 
backup.  To  download  the  constant  video  files,  connect  the  main  unit  to  PC  directly  and 
download the files direct from the unit to your PC.


Summary of Contents for CVSN-DV56

Page 1: ...a shall not be the responsibility of the manufacturer In the case of an accident the sensor may not recognize the shock if the impact is too light and as a result the DVR recorder may not begin event recording automatically When the device is connected with a computer by the USB provided all recording functions will not work Only management of recording files are available such as file move copy a...

Page 2: ...corder 7 6 Operating the DVR recorder 9 Event Recording Direct AVI connection with display USB connection USB host back up ECO driving indicator How to power off the DVR recorder properly 7 How to use the DVR manager 15 Outline of the DVR manager Button Definitions Save convert and open recording files GPS mapping window Set up 8 Specifications 19 9 Environmental Disposal 20 ...

Page 3: ...ra they may be reflected on the window and included in the video images Please do not leave unnecessary objects around the device 7 Please ensure the product is installed tightly and do not move the device after installation 8 Please ensure you use the power cable provided in the package Other power cables may cause damage to the product fire or cause electric shock 9 Do not control or operate the...

Page 4: ...surrounded by a large amount of trees 2 A GPS signal reception may take time to locate This may vary depending on weather and environmental conditions 2 Components in the package Please check if the following components are included in your package If any item is missing or an incorrect item is included please contact local store where you purchased the product User Manual DVR AV cable Cord fittin...

Page 5: ...s host port is for USB flash memory stick to back up 6 USB port USB port is used when DVR is connected to PC directly 7 AV out to Play the recorded video directly DVR should be connected to external display and speaker via AVI cable 8 Manual recording button Record events manually 9 PLAY button Play recorded event video 10 POWER LED This LED provides various information about the product 11 ECO LE...

Page 6: ...nsor and GPS GPS data is available only in DVR GPS model Convenient Backup The event recording is downloaded into the DVR manager software via a Memory Stick or USB cable allowing it to be analyzed in detail Event analyzing software Event recording can be analyzed in DVR manager PC Software It also provides useful tools such as capturing an incident printing and converting to AVI format Customizin...

Page 7: ...e DVR manager Click Set up button on the DVR manager and press Time setting button to set the correct date and time The correct time and date will now be set Time Sync Setting is necessary at least once after purchasing 2 Park the vehicle at a bright and flat location and ensure the engine is turned off before installation 3 Wipe and clean the area where the recorder will be positioned It s better...

Page 8: ...arette power jack in the vehicle DC 12V 24V Please ensure you use the enclosed power cable in the package do not use alternative cables 8 Start the vehicle engine and check all the LED s on the recorder turn on The Recorder sounds will beep once and all the LED s will turn on After a few seconds the ECO LED will turn off and the power LED will remain on The unit is now ready and will be recording ...

Page 9: ...0 seconds of video clip will be taken the 10 seconds each before and 20 seconds after an event will be stored Note Event recording time may be shortened depending on the image data especially when recording under low light or conditions taken 4 You can record manually by pressing the manual recording button located in the middle of unit should you need emergency recording 5 The main unit starts re...

Page 10: ...make sure that the power of car video player should be ON before connecting 4 Press the PLAY button of the DVR recorder 5 Please note that only event recordings are available when watching through direct playback 6 The POWER LED will turn off and the Yellow ECO LED will flash during playback 7 The Event recorded data will playback in chronological order If you press the PLAY button one more time i...

Page 11: ...d the recording function will not be available only file management options are available via the management software such as file move copy and delete etc 4 The Computer recognizes the DVR recorder as an external mass storage device Select the drive named as DVR and run it 5 Recorded digital video files in the DVR will be listed 6 Select the SJA manager exe and run it 7 When the SJA manager is la...

Page 12: ...ker blue Only the 10 most recent recordings will be downloaded to the USB flash memory If all recordings are needed the DVR recorder should be connected to PC directly 5 When the USB host back up is completed the Power LED will turn off and the ECO LED will turn green 6 If there is a problem backing up the DVR recorder will sound and beep continuously and power LED will flicker red and the ECO LED...

Page 13: ...e with different colors 3 If there is no sharp breaking no sudden acceleration or rapid cornering etc the driver will get a high ECO score and the ECO LED will turn green 4 If the ECO LED turns blue your score is average 5 If the ECO LED turns red your score is poor and you are not driving efficiently 6 As the score is evaluated over a period of time the LED color may change continuously 7 For bet...

Page 14: ...avoiding a flat battery To avoid any data loss please follow below instruction a When you are recording manually please wait for 20 seconds before power off so that the DVR recorder is able to complete the event recording b Do not power off the unit during USB memory back up Make sure you check that the ECO LED has turned green before power off This means that USB memory back up has been completed...

Page 15: ...ft Y Acceleration change between forward and backward Z Acceleration change between up and down 4 Tool button Capture Print Backup Setup 5 Play control buttons This buttons control video playback 6 Eco Score Show efficiency of driving as a score A score of over 80 means Good between 60 80 means Average and under 60 means Poor 7 File list window Shows all the video files in the selected folder 8 Pr...

Page 16: ... image from video clip with JPEG Print Print still images from video clips Back up Save and convert recorded files Speed control Control video playback speed Volume Control volume Play Play video clip Reverse play Play video clip backwards Pause Pause playback Stop Stop playing video clip Move to previous frame Move frame backwards Move to next frame Move frame forwards Open Open video files ...

Page 17: ...file list press Back Up Select the folder where you want to save the file to Click OK button for confirmation Or If you want to save the original video file in AVI Format click the AVI Back up button to save and convert the video to AVI format Select the folder where you want to save the file to Click OK button for confirmation To open AVI Files open the file via Windows Media Player or KM Player ...

Page 18: ... fps 10 fps 15 fps 30 frames per second G Sensor sensitivity Control sensitivity of G sensor If the value is high the sensitivity will be low If the value is low the G sensor will be more sensitive 0 is the most sensitive 5 is least sensitive Set it at a high sensitivity rating to ensure you do not lose any incidents sensitive level 0 2 is recommended X Detect acceleration change between right and...

Page 19: ...precision lens Resolution 640 x 480 Angle 64 8 V x 92 8 H x 125 5 D Camera Sensitivity 0 8 Lux Type C Microphone Microphone Sensitivity 38dB Memory Nand flash memory 2GB 4GB 8GB USB device USB 2 0 Device 1 1 compatible OS Window98 ME 2000 XP Vista 32 USB host USB Host 2 0 1 port Format support FAT 16 32 Interface AV Out Resolution 720x480 NTSC PAL Temperature Operation 0 C 50 C Rated Voltage 12 24...

Page 20: ......

Reviews: