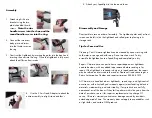
Assembly
1.
Attach ring & shoe to
bracket using the two
plastic handled thumb
screws.
Note: the star
handle screws into the shoe and the
round handle screws into the ring.
2.
Connect the two brass
baby pins and screw
into the thumb screw on
the ring.
3.
Construct the Lightbank by inserting the poles into the bank and
inserting the ends into the ring. Once the Lightbank is fully erect,
attach the diffusion front screen.
4.
Use the 2 Axis Stand Adapter to attach the
entire assembly to a light stand and focus.
5.
Attach your Speedlight to the shoe and shoot.
Disassembly and Storage
Disassemble in reverse order of assembly. The Lightbank poles and/or front
screen can be left in/on the Lightbank and rolled prior to placing in its
storage sack.
Tips for Care and Use
Cleaning - Your Chimera Lightbank can be cleaned by hand washing with
cold water, a sponge and mild soap. Do not machine wash. To dry,
assemble the Lightbank onto a Speed Ring and completely air dry.
Repair - Chimera has an expert in-house repair department. Lightbanks
need to be clean, with any added tape removed before sending in for
repair. If the Lightbank is received in dirty or in taped condition, the repair
may be refused and returned to the sender. Please call in advance to get a
Return Authorization Number and repair estimate at 888-444 1812.
At Chimera, we stand behind our Lightbanks, speed rings, and light control
accessories with a limited 5-year warranty against manufacturing defects in
materials, workmanship, and color stability. If our products are not fully
operational out of the box or if they fail to perform within five years from the
date of purchase, return it for repair or replacement at no charge. Of
course, Chimera’s warranty cannot cover damage caused by accidents,
extended period of time. This warranty does not apply to expendables, such
as light bulbs, and certain OEM products.


