Page 8
For technical questions, please call 1-800-444-3353.
Item 69582
SAFET
y
Op
ERA
TION
M
AINTENAN
c
E
SETU
p
Operating Instructions
Read the ENTIRE IMpORTANT SAFETy INFORMATION section at the beginning of this manual
including all text under subheadings therein before set up or use of this product.
TOOL SET Up
TO pREVENT SERIOUS INJURy FROM AccIDENTAL OpERATION:
Make sure the Trigger of the tool to its “OFF” position and unplug the tool from its electrical
outlet before performing any inspection, maintenance, or cleaning procedures.
TO pREVENT SERIOUS INJURy:
DO NOT OpERATE WITH ANy GUARD DISABLED, DAMAGED, OR REMOVED.
Moving guards must move freely and close instantly.
Saw Blade Installation
Note:
Blade sold separately.
1. Lift the Blade Guard up and hold it.
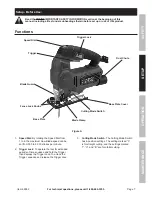
See Figure A on page 7.
2. Twist the Blade Clamp and insert the Saw Blade
with teeth pointing forward. See Figure B. Insert the
Blade completely, then release the Blade Clamp.
3. Return the Blade Guard back into place.
Figure B
Saw Blade
Blade Clamp
Adjusting the cutting Speed
1.
Speed Dial:
Adjust the speed by turning
the Speed Dial forward or backward.
2.
Trigger:
Adjust the speed to suit the material
being cut. Higher speeds will increase
work speed, but reduce blade life.
Figure c
Speed Dial
Trigger
Trigger Lock
Angle cutting Adjustment
1. Loosen the Base Plate by loosening the Angle Clamp
Screw on the underside of the tool. See Figure D.
2. Tilt Base Plate to the desired angle.
3. Tighten Angle Clamp Screw after adjustment.
Angle clamp Screw
Figure D
Summary of Contents for 69582
Page 1: ......


