background image

Page 9

For technical questions, please call 1-888-866-5797.

Item 62422

Operating Instructions

  Read the ENTIRE IMPORTANT SAFETY INFORMATION section 

at the beginning of this manual including all text under 

subheadings therein before set up or use of this product.

TO PREVENT SERIOUS INJURY FROM ACCIDENTAL OPERATION: 

Turn the Power Switch of the tool off and unplug the tool from its 

electrical outlet before adjusting tool or installing accessories.

Work Piece and Work 

Area Set Up

1.  Designate a work area that is clean 

and well-lit.  The work area must not 

allow access by children or pets to 

prevent distraction and injury.

2.  Route the power cord along a safe route 

to reach the work area without creating a 

tripping hazard or exposing the power cord 

to possible damage.  The power cord must 

reach the work area with enough extra length 

to allow free movement while working.

3.  Secure loose work pieces using 

a vise or clamps (not included) to 

prevent movement while working.

4.  There must not be objects, such as 

utility lines, nearby that will present 

a hazard while working.

Selecting Cutting Mode

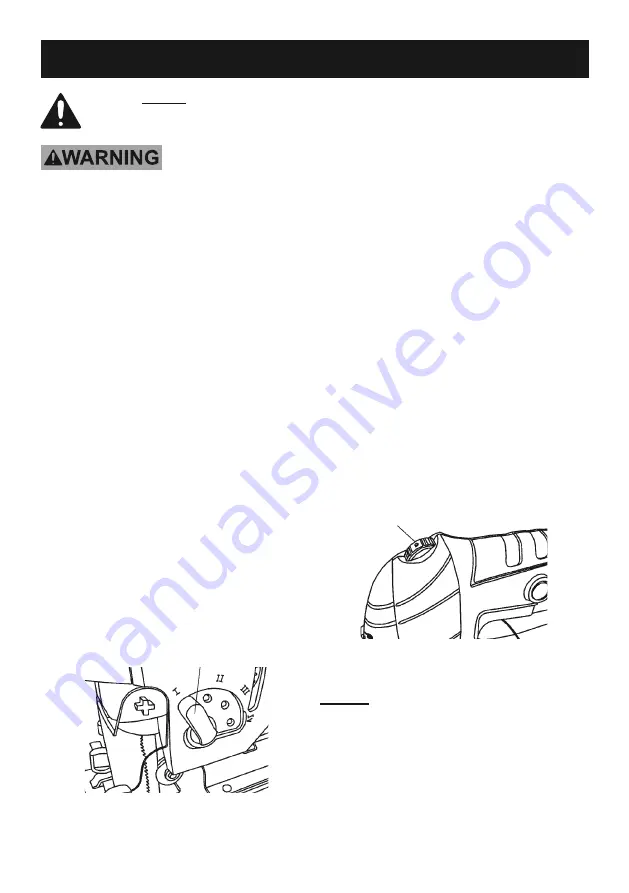
1.  The Jigsaw comes with four cutting modes 

(three cutting settings and 1 straight cutting 

mode). To change cutting mode, adjust the 

Orbital Mode Lever (16).  See Figure 2, below.

Figure 2

Orbital Mode Lever (16)

2.  The settings are:

a. I = Straight line cutting (for 

plastics and mild steel)

b. II = Small orbit (for aluminum 

and hard wood)

c. III = Medium orbit (for wood, plywood 

and fast cutting of aluminum)

d. IV = Large orbit (for fast cutting 

wood and plywood)

Adjusting Jigsaw Speed

1.  The Jigsaw’s speed can be adjusted between 

500 and 3,000 strokes per minutes.

2.  To adjust speed, turn the Speed Switch from 

1 (the slowest speed) to 6 (the fastest speed).  

See Figure 3, below.

Figure 3

Speed Switch

3.  Use higher speeds to cut work pieces faster.

NOTICE:

  Refer to the Blade Selection 

chart on page 7 to verify you are using the 

correct speed with the appropriate blade.   

Otherwise blade damage can occur.

Summary of Contents for 62422

Page 1: ...ing improvements actual product may differ slightly from the product described herein Tools required for assembly and service may not be included When unpacking make sure that the product is intact an...

Page 2: ...Keep work area clean and well lit Cluttered or dark areas invite accidents b Do not operate power tools in explosive atmospheres such as in the presence of flammable liquids gases or dust Power tools...

Page 3: ...y equipment may not provide adequate protection Eye protection must be ANSI approved and breathing protection must be NIOSH approved for the specific hazards in the work area 4 Power tool use and care...

Page 4: ...on Properly maintain and inspect to avoid electrical shock Any power cord must be properly grounded Ground Fault Circuit Interrupter GFCI should also be implemented it prevents sustained electrical sh...

Page 5: ...of it Let the tool do the work 7 To reduce vibration maintain the tool as explained in this manual If any abnormal vibration occurs stop use immediately SAVE THESE INSTRUCTIONS Grounding TO PREVENT EL...

Page 6: ...nimum cord size See Table A 6 If you are using an extension cord outdoors make sure it is marked with the suffix W A W in Canada to indicate it is acceptable for outdoor use 7 Make sure the extension...

Page 7: ...g all text under subheadings therein before set up or use of this product TO PREVENT SERIOUS INJURY FROM ACCIDENTAL OPERATION Turn the Power Switch of the tool off and unplug the tool from its electri...

Page 8: ...roved safety goggles and heavy duty work gloves when changing blade 2 Once the proper blade sold separately is selected lift the Blade Cover 14 up to access the Blade Release Lever See Figure 1 below...

Page 9: ...loose work pieces using a vise or clamps not included to prevent movement while working 4 There must not be objects such as utility lines nearby that will present a hazard while working Selecting Cut...

Page 10: ...rigger Lock to lock the Trigger in its ON position See Figure 4 below Figure 4 Trigger 17 Trigger Lock 4 Allow the Saw Blade to stroke at full speed before slowly feeding it into the work piece 5 Make...

Page 11: ...ed 3 For metal cutting be sure to use a coolant such as cutting oil during use Failure to add coolant will lead to greater blade wear If desired grease the underside of the work piece in place of addi...

Page 12: ...Do not use damaged equipment If abnormal noise or vibration occurs have the problem corrected before further use Cleaning Maintenance and Lubrication 1 BEFORE EACH USE inspect the general condition o...

Page 13: ...hes worn or damaged 1 Keep cutting accessories sharp Replace as needed 2 Have qualified technician replace brushes Excessive noise or rattling Internal damage or wear Carbon brushes or bearings for ex...

Page 14: ...crew St4 38 1 47 Right Cover 1 48 Right Name Plate 1 Parts List and Assembly Diagram PLEASE READ THE FOLLOWING CAREFULLY THE MANUFACTURER AND OR DISTRIBUTOR HAS PROVIDED THE PARTS LIST AND ASSEMBLY DI...

Page 15: ...technical questions please call 1 888 866 5797 Item 62422 Assembly Diagram 1 2 3 4 5 6 7 8 9 10 11 12 13 15 16 17 19 20 21 22 14 23 24 25 26 29 30 31 33 35 36 37 38 39 40 41 42 43 44 45 46 47 48 18 3...

Page 16: ...the exclusion or limitation of incidental or consequential damages so the above limitation of exclusion may not apply to you THIS WARRANTY IS EXPRESSLY IN LIEU OF ALL OTHER WARRANTIES EXPRESS OR IMPL...

Reviews: