background image

We have a team of dedicated technical and expert advisors that will offer you the 

support you need with any planning and technical advice through your project from 

start to finish. Freephone 0800 085 3464

AXXYS

®

 Stairparts 

Fitting Instructions

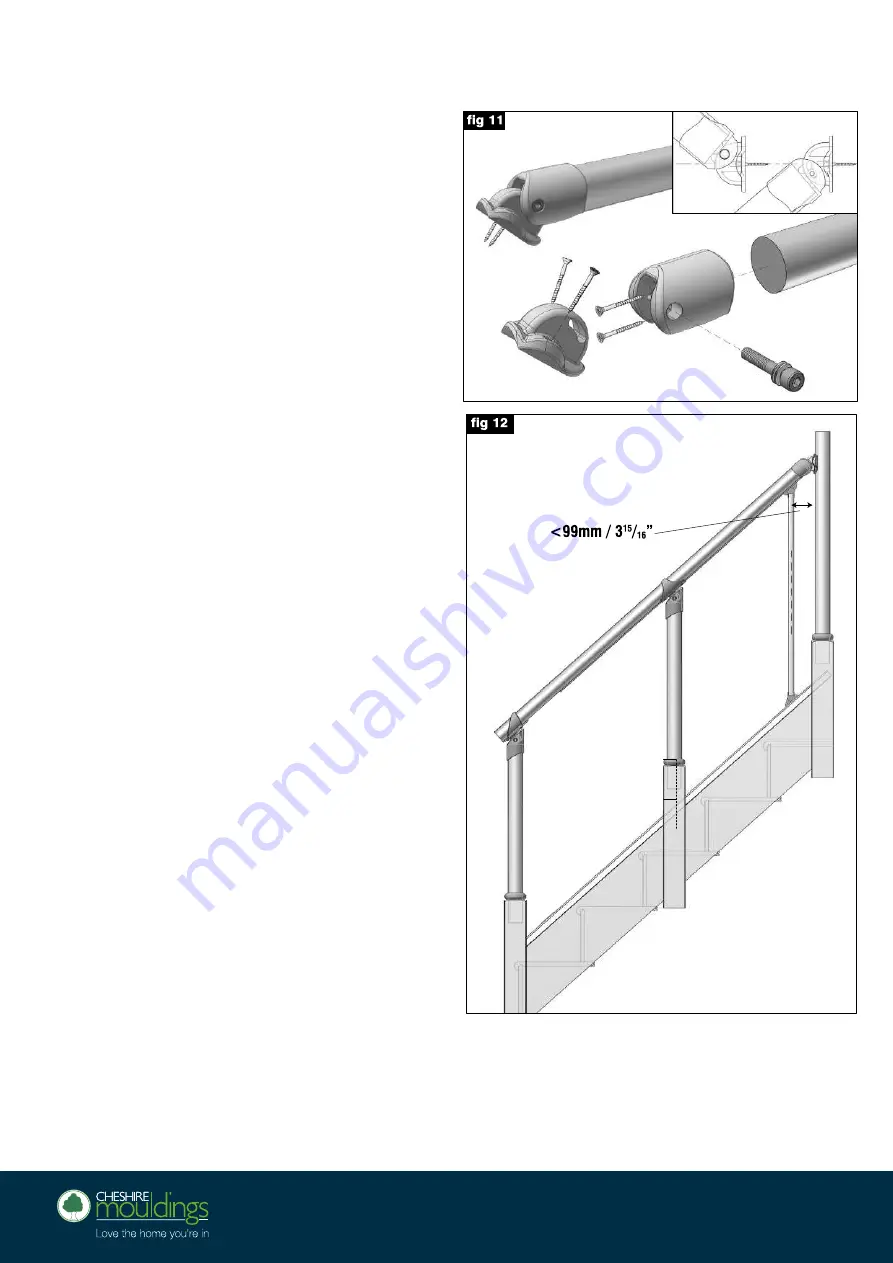
Then with a pre-assembled spindle 
(

instructions found on the following pages

secured onto the baserail no more than 
99mm away from the newel, lay the handrail 
assembly onto the spindle to determine the 
height of where the bracket sits on the newel. 
Secure using two 30mm screws provided 

(fig. 12)

If you are using an intermediate post you will 
need to slide on the intermediate connector 
on to your handrail now, before attaching the 
bottom connector 

Next slide the Bottom connector onto & up 
the handrail, line up both the intermediate and 
the bottom connector into their relevant 
newels post brackets and drop into place 
ensure the bolt holes are perfectly aligned, 
you can now pre drill and secure the handrail 

connectors in their positions using the 25mm 

screws provided.  

Then loosely fix the handrail connectors 

into 

the appropriate newel connector using the 
45mm bolt and spacer provided, making sure 

the chamfered end goes into the hole first. Do not fit any cover caps yet (fig. 8).

Fit the intermediate connector onto the top 
of the newel and secure with the two 30mm 
screws provided. 

Now fit the top connector to the handrail.  

Slide the connector onto the handrail 
and secure using the two 30mm screws 
provided.  
Loosely assemble the remaining half of the 
bracket, using the bolt and two washers 

provided (fig. 11).

Summary of Contents for B&Q AXXYS Series

Page 1: ...ish Freephone 0800 085 3464 AXXYS Stairparts Fitting Instructions Fitting Instructions for AXXYS Stairparts These Fitting Instructions are for use with the AXXYS range with metal balusters within B Q...

Page 2: ...spindles have also been tested in accordance with BS610 AXXYS is a contemporary range of stair balustrade designed to inspire As a modular system AXXYS provides the flexibility to blend components fr...

Page 3: ...lie the baserail on top of the tread nosings and push it up against the newel bases mark against the vertical lines of the newel posts and cut achieving a good finish See fig 1 Rest the cut baserail...

Page 4: ...e making sure to intersect the baserail line Now measure up 175mm from the intersecting point and mark a horizontal line fig 6 Then finally measure the remaining distance to the top of the newel and r...

Page 5: ...te Newel Base If your staircase is longer than 3 9m measured between inside newel faces then you will require an intermediate newel for added strength This will require an additional newel base to be...

Page 6: ...top of the spigot Once cut to length insert the newel post making sure the collar meets with the newel base secure using a PU glue fig 9 Repeat this step for the top newel assembly but the newel must...

Page 7: ...ottom connector Next slide the Bottom connector onto up the handrail line up both the intermediate and the bottom connector into their relevant newels post brackets and drop into place ensure the bolt...

Page 8: ...the baluster brackets should be pre drilled The bottom baluster should be fixed vertically no more than 99mm from the narrowest part of the newel post in the same way as the top baluster was previous...

Page 9: ...provided making sure you have lined it up with your landing baserail It is now ready for you to insert the handrail and secure using the two 30mm screws provided fig 16 The handrail can terminate to...

Page 10: ...You can also rotate it any angle between 90o to 180o to suit a multitude of configurations Now measure the handrail lengths you require from newel to newel including connector and cut to suit Slide b...

Page 11: ...e your balusters exactly the same way as for the rake The landing balusters should be fixed vertically no more than 99mm from the narrowest part of the newel posts or wall in the same way as the rake...

Reviews: